I’ve been working as a freelance developer in Tokyo for over 6 years. On the side, I’ve been building a product called Inkdrop. It’s a multi-platform Markdown editor App. I’ve worked on designing the UI and building the back-end and front-end.
Recently, I had a need to make an email form for my static website. I decided to use AWS Lambda. In this article I will tell you how I built it. If you would like to try it without reading this, please check out my repository on GitHub.
A problem with adding server-side logic to static websites
If you know Git, you can publish static websites for free on hosting services like GitHub Pages and Netlify. These services are so useful.
By ‘static’, I mean the website uses only HTML, CSS and JavaScript. It doesn’t have server-side logic like PHP.
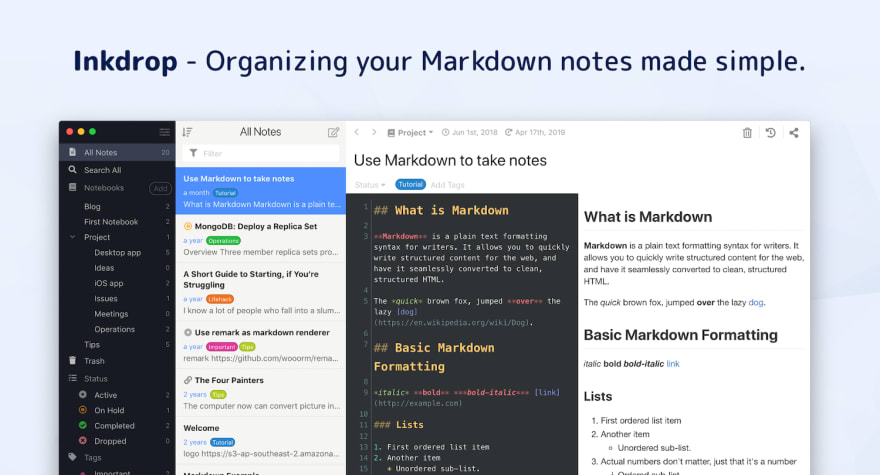
I host my personal website and product website on Netlify which is fast and stable and I really love it..
Fig. My product webpage of Inkdrop deployed on Netlify.
Static websites can’t generate dynamic content. They can’t do things that need permissions like sending email. But sometimes you want to do so. For example, adding a contact form to your homepage.
The problem is that it’s overkill to deploy a server for that. It doesn’t make sense to have a server running all the time when you don’t know when a visitor will try to contact you.
Serverless architectures are useful when you want to add server side logic to static websites. It allows you to run the server-side scripts only when you need them.
For example, AWS Lambda only charges you based on the number of requests for your function and the time your code executes. So you’re not charged while waiting for visitors to contact you.
Fig. A contact form on my homepage (PLEASE DO NOT SEND ME A MAIL FOR A TEST PURPOSE)
I built a simple contact form on my homepage using AWS Lambda (PLEASE DO NOT SEND ME AN EMAIL FOR A TEST PURPOSE). I open-sourced an example project on GitHub. You can build the same API by using it. This would be a good tutorial for using AWS Lambda.
Building an email sending API based on Lambda
Fig. API Architecture
When you invoke an API, you call a function which is a script running on Lambda. It supports Node.js, C#, Java and Python by default. The function uses Amazon SES (Simple Email Service) to send emails. Since Lambda functions are not internet accessible by default, you have to set up each HTTP endpoint using an API Gateway.
Your APIs can be invoked from your website as illustrated in the diagram above.
Managing Lambda functions with Apex
It’s kind of hard to manage Lambda functions within AWS. Apex solves this problem by simplifying the workflow. It helps you build, deploy, and manage AWS Lambda functions with ease.
To install Apex:
curl https://raw.githubusercontent.com/apex/apex/master/install.sh | sh
Apex needs AWS credentials. You must specify them via environment variables below:
AWS_ACCESS_KEY_IDAWS account access keyAWS_SECRET_ACCESS_KEYAWS account secret keyAWS_REGIONAWS region
See here to learn more details to configure Apex.
Now let’s create your new Apex project by cloning a repository for this tutorial:
git clone [git@github.com](mailto:git@github.com):craftzdog/send-email-lambda.git
cd send-email-lambda
apex init
> Project name: send-email
Name your project send-email . Then Apex will set up IAM roles based on your project name. And you will get project.json at the root directory of your project. Edit it like so:
{
  "name": "send-email",
  "description": "Simple email transmitter",
  "memory": 128,
  "timeout": 5,
  "environment": {},
  "runtime": "nodejs6.10",
  "role": "<YOUR_IAM_ROLE>"
}
Now you are ready to use Lambda!
Sending emails from a Lambda function
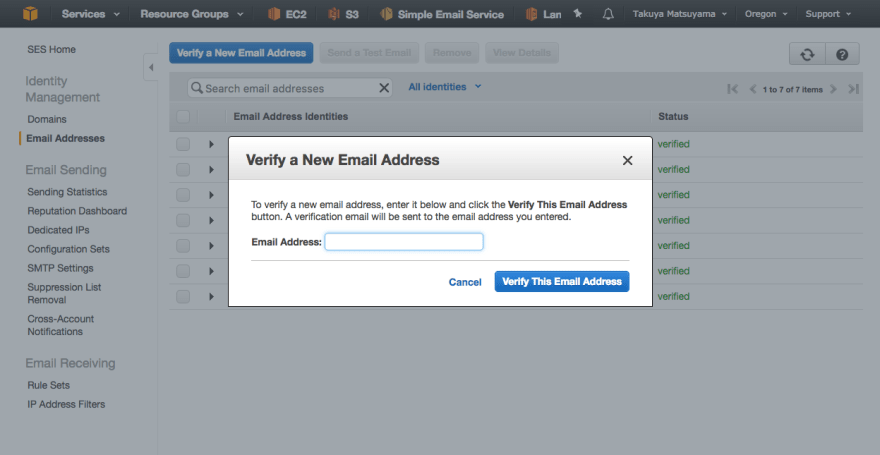
To let Lambda functions send emails, you have to set up AWS SES. You need to have your email address registered on it.
Make it verified by SES by pressing “Verify This Email Address” button like below:
Fig. Registering your email address to SES
AWS will send you a verification email. Open a link in it and then your email address is ready to use for sending emails via SES and Lambda.
Configure the Lambda function for using SES
You have a file at functions/submit/function.json which is a configuration for a function named “submit”. Edit this file like so:
{
  "environment": {
    "SES_REGION": "us-west-2",
    "FROM_NAME": "Your Contact Form",
    "FROM_EMAIL": "<YOUR_AUTOMATED_EMAIL_SENDER>",
    "TO_EMAIL": "<EMAIL_TO_RECEIVE>"
  }
}
SES_REGION: The AWS region for the SESFROM_NAME: Sender name like "Contact Form"FROM_EMAIL: The email address you would receive from. For example, contact@example.comTO_EMAIL: Your email address to receive emails.
Add a permission to the IAM role
The IAM role for the Apex project has minimal permissions to prevent abuse. By default, it restricts access to SES. Let’s add a permission to allow our Lambda function to use it.
Go to IAM dashboard and find the IAM role that Apex created. In the below image the name of the role is contact-form_lambda_function. Your role should be named send-email_lambda_function.
Press “Create Role Policy” button to create following role policy with named send-email_submit:
{
    "Version": "2012-10-17",
    "Statement": [
        {
            "Sid": "Stmt1504526549000",
            "Effect": "Allow",
            "Action": [
                "ses:SendEmail"
            ],
            "Resource": [
                "*"
            ]
        }
    ]
}
This policy allows the Lambda function to use SES.
Deploy and test sending emails
Now your project is ready to send emails. Let’s test if it works. The command below will deploy the lambda function. Run it from the root directory of the project.
apex deploy
Then you can run the Lambda function manually with below command:
echo -n '{ "subject": "hello", "body": "world" }' | apex invoke submit
You will receive an email to the configured address with the title “hello” and the body “world”. Congratulations!
If you didn’t receive the email, check the logs with following command:
apex logs -f
Read error messages and check if the IAM role and the AWS region are correct. The sender address should be correctly registered on SES.
Making it possible to invoke via HTTP with API Gateway
Now we would like to invoke the Lambda function from the website. AWS API Gateway allows you to make a HTTP endpoint for the function.
Let’s set it up to accept requests to /submitwith the POST method which invokes the Lambda function.
1. Create API
Go to API Gateway console and press “Create API” button. Let’s name it “my-awesome-send-email-api” or something you like.
2. Create an endpoint to /submit
Click “Actions” ➜ “Create Resource” to make /submit resource from resources section.
After that, check “Enable API Gateway CORS”.
3. Make POST method
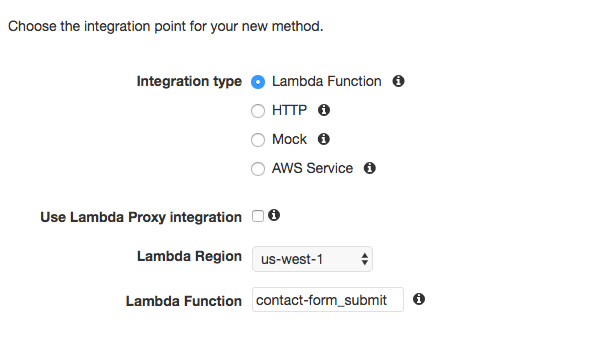
Define new method to let the endpoint /submit accept POST method by selecting “Actions” ➜ “Create Method”.
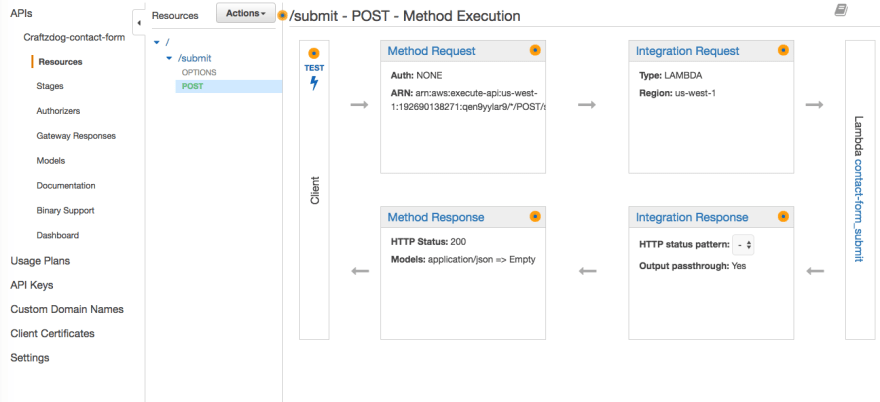
Set it to invoke the Lambda function as above.
Fig. API endpoint overview
4. Deploy the API
Click “Actions” ➜ “Deploy API” to deploy the API.
It will make the API public on the web.
Now the API can be invoked from your website.
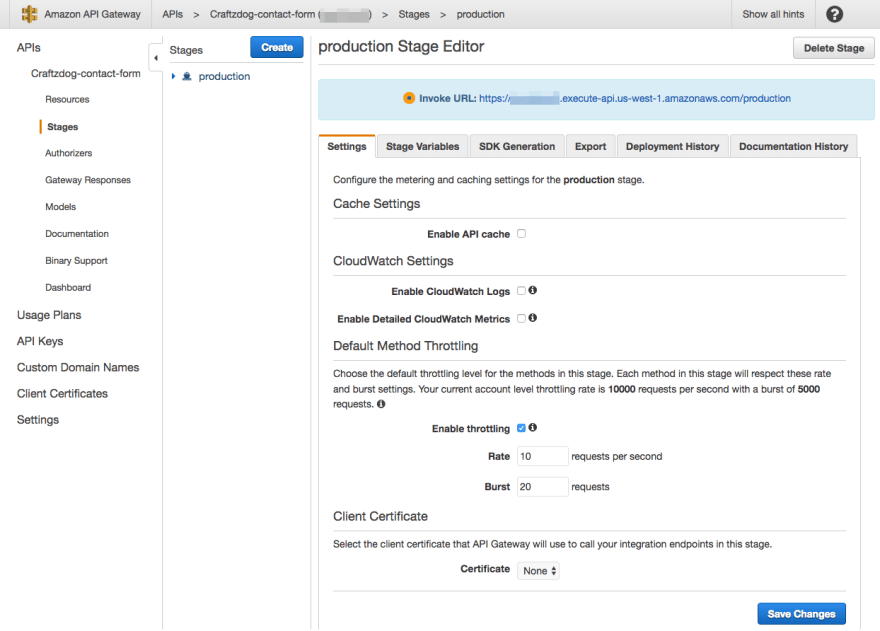
Fig. The deployment result
As you can see above, Invoke URL is the entrypoint of your API.
You can invoke it with curl command like so:
curl --request POST \
  --url [https://******.execute-api.us-west-1.amazonaws.com/production/submit](https://qen9yylar9.execute-api.us-west-1.amazonaws.com/production/submit) \
  --header 'content-type: application/json' \
  --data '{
 "subject": "Hello",
 "body": "Hoge"
}'
Got an email? It’s now working!
Optional: Rate limit
I recommend you configure rate limit to your API so that the number of requests are limited.
Click the “Enable throttling” checkbox at the above screen and specify 1 or 2 value to “Rate”.
Integrating with your website
Now you have an API that can be invoked with AJAX.
Here is an example of how to invoke it with the Fetch API:
export default function sendEmail (subject, body) {
  return fetch('[https://******.execute-api.us-west-1.amazonaws.com/production/submit'](https://qen9yylar9.execute-api.us-west-1.amazonaws.com/production/submit'), {
    method: 'POST',
    headers: {
      'Accept': 'application/json',
      'Content-Type': 'application/json'
    },
    body: JSON.stringify({ subject, body })
  })
}
Now all you have to do is to make a form with some JavaScript that invokes this function when submitted.
You don’t always need servers to add dynamic contents
Lambda lets you add dynamic contact forms easily. This is very useful for building simple home pages for companies and shops.
Serverless architecture lets you build websites generating dynamic content. And without spending too much money. For example, you can build a comment form with S3 and Lambda. That’s so powerful.
Thanks for reading. I’m sharing my experiences regarding building my products and freelancing on my blog. If you enjoyed, please check out top stories from it:
Follow me on Twitter to keep in touch!







Top comments (4)
I did not know about apex and will have to check it out!
One suggestion; you could add a JSON schema to your API Gateway config, to ensure the input to your lambda function is always valid/what you expect.
Very informative, thanks
What measures could you take to ensure only traffic from your static site can POST to your lambda?
Hi there! just a note: the apex link is dead