Cellular automata is a fun topic and Conway's Game of Life is a very popular cellular automaton.
In the previous Elm-specific post, I covered on how to render a basic calendar. In this one, let's write an application that implements Conway's Game of Life.
Rules of the game
Apparently there are many versions of the "game" but the basic rules are:
- a "live" cell will live in the next generation if it has exactly 2 or 3 "live" neighbors
- a "live" cell will die if it has less than 2 or more than 3 "live" neighbors
- a "dead" cell will come alive if it has exactly 3 "live" neighbors
- a "dead" cell will remain dead if it has less than 3 neighbors.
The trick for us is to figure out what it means to be a "neighbor" in the programmatic sense.
What's a good data structure?
Conway's game of life is laid out as a grid containing lots of cells.
For simplicity, we'll take a square grid. Example, a 15x15 grid will have 225 cells. We can start off with that.
We need to know if a cell is alive or dead. So we could model a cell like this:
type alias Cell = { status : Status }
type Status = Alive | Dead
But of course, we'd also need to know where that cell is located in the grid because we'd need to that to compute the neighbors...
type alias Cell = { status : Status, position : Position }
type Status = Alive | Dead
type alias Position = (RowId, ColumnId)
type alias RowId = Int
type alias ColumnId = Int
That is, we just represent a cell as: a row index, a column index (these two locate the cell's position in the grid) and then the status which tells us whether the cell is alive or dead.
The grid is just a list of cells. So:
type alias Grid = Array Cell
Why Array instead of List?
- Eventually, we'd need to work out the neighboring cells of a cell.
- This involves filtering the cells.
-
Arrays are faster when it comes to such accesses. - Hence, using
Arrayinstead ofList.
1. How to render a board?
We have our types defined.
Let's now try and render a sample grid.
To get a sample grid, I'm going to use a random generator.
Generating a random Grid
The logic is this:
- start with a "random cell generator" – takes a rowId, a columnId and returns a cell generator where the
statuscould be dead or alive (with a 40/60 odds). - use this generator to create a Grid generator that can generate a list of cells when called
First, the random cell generator:
randomCellGenerator : RowId -> ColumnId -> Random.Generator Cell
randomCellGenerator rowId columnId =
    let position = (rowId, columnId)
    in
    Random.weighted (40, { position = position, status = Alive })
        [ (60, { position = position, status = Dead }) ]
Then, we use this in our Grid generator:
randomGridGenerator : Int -> Random.Generator Grid
randomGridGenerator size =
        -- create a List that starts with 1, and goes up to the size of the grid
    List.range 1 ((size * size))
    -- now map the list created above
    |> List.map
            (\cellId ->
                let
                    remainder =
                        remainderBy size cellId

                    rowId =
                        if remainder /= 0 then
                            (cellId // size) + 1

                        else
                            cellId // size

                    -- this creates the rowId
                    columnId =
                        if remainder == 0 then
                            size

                        else
                            remainder

                    -- this creates the columnId
                in
                randomCellGenerator rowId columnId
            )
    -- the above step returns a `List (Generator Cell)` but we need `Generator (List Cell)` so we `sequence` it. For this we use the `Random.Extra` package
    |> Random.Extra.sequence
    -- and finally convert it into an Array.
    |> Random.map (Array.fromList)
The random generator Generator Grid is not useful on its own.
We need to run the generator (so it generates the Grid) and for that, we need a Msg.
type Msg
    = UpdateGrid Grid

type alias Model =
    { grid : Grid, size : Int }

update : Msg -> Model -> ( Model, Cmd Msg )
update msg model =
    case msg of
        UpdateGrid grid ->
            ({ model | grid = grid }, Cmd.none)

init : () -> ( Model, Cmd Msg )
init _ =
    let
        size =
            15
    in
    ( { grid = Array.empty, size = size }, Random.generate UpdateGrid (randomGridGenerator size) )
In the init function, I'm generating a 15x15 grid.
Rendering the Grid
Again, simple composition here.
- First, we write a function that renders a cell.
- Then, we use this to compose the function that writes an entire grid.
- We'll use CSS grid for layout.
The function that renders a cell:
viewCell : Cell -> Html Msg
viewCell { status, position } =
    case status of
        Alive ->
            div
                [ Attr.style "background-color" "black"
                , Attr.style "width" "16px"
                , Attr.style "height" "16px"
                , Attr.style "border" "1px solid black"
                ]
                [ text "" ]

        Dead ->
            div
                [ Attr.style "background-color" "white"
                , Attr.style "width" "16px"
                , Attr.style "height" "16px"
                , Attr.style "border" "1px solid black"
                ]
                [ text "" ]
Now, the grid renderer:
viewGrid : Model -> Html Msg
viewGrid { grid, size } =
    div
        [ Attr.style "display" "grid"
        , Attr.style "gap" "0"
        , Attr.style "grid-template-columns" ("repeat(" ++ String.fromInt size ++ ",16px)")
        ]
        (Array.map viewCell grid |> Array.toList)

-- simply map over the grid (which is an array) using the `viewCell` function, but convert that into a `List` because it's easier to deal with `List (Html Msg)` in view/render functions in Elm.
And finally:
view : Model -> Html Msg
view model =
    viewGrid model
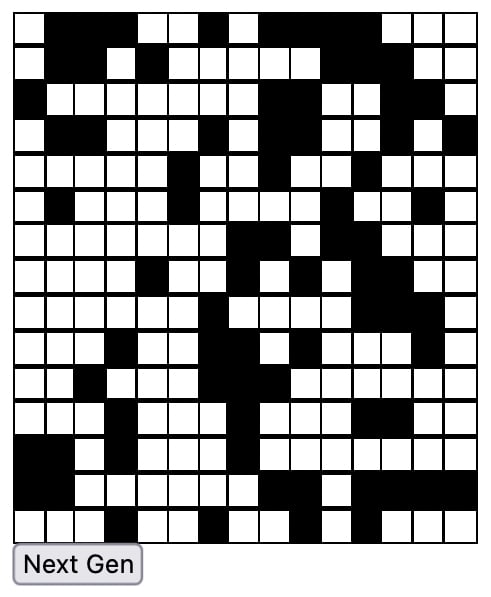
If we ran this application now, we get something like this:

2. Computing the "next" generation of the app
Conway's game of life proceeds by moving to the "next" generation. Each "step" is going to the next generation.
Next generation basically means which cells survive and which die.
To compute this, we need two things:
- who are the neighbors?
- what are their statuses?
- what are the rules for a cell to survive, die or revive depending on its neighbors?
First, the neighbors:
Imagine a cell at the center...

The neighboring cells are:
- top-left == rowId-1, columnId-1
- top == rowId-1, columnId
- top-right == rowId-1, columnId+1
- left = columnId-1
- right = columnId+1
- bottom-left == rowId+1, columnId-1
- bottom == rowId+1, columnId
- bottom-right == rowId+1, columnId+1
Sometimes, some of these neighbors may not exist. Example: top-left-most cell (ie, start of the grid) does not have a top-* or left neighbor.
But that's okay.
We know the formula for neighbors now. We can use this to get a list of "valid" neighboring cells.
isTopLeft : Position -> Cell -> Bool
isTopLeft ( rowId, columnId ) { position } =
    rowId == Tuple.first position - 1 && columnId == Tuple.second position - 1


isTop : Position -> Cell -> Bool
isTop ( rowId, columnId ) { position } =
    rowId == Tuple.first position - 1 && columnId == Tuple.second position


isTopRight : Position -> Cell -> Bool
isTopRight ( rowId, columnId ) { position } =
    rowId == Tuple.first position - 1 && columnId == Tuple.second position + 1


isLeft : Position -> Cell -> Bool
isLeft ( rowId, columnId ) { position } =
    Tuple.first position == rowId && columnId == Tuple.second position - 1


isRight : Position -> Cell -> Bool
isRight ( rowId, columnId ) { position } =
    Tuple.first position == rowId && columnId == Tuple.second position + 1


isBottomLeft : Position -> Cell -> Bool
isBottomLeft ( rowId, columnId ) { position } =
    rowId == Tuple.first position + 1 && columnId == Tuple.second position - 1


isBottom : Position -> Cell -> Bool
isBottom ( rowId, columnId ) { position } =
    rowId == Tuple.first position + 1 && columnId == Tuple.second position


isBottomRight : Position -> Cell -> Bool
isBottomRight ( rowId, columnId ) { position } =
    rowId == Tuple.first position + 1 && columnId == Tuple.second position + 1


getNeighboringCells : Cell -> Grid -> Array Cell
getNeighboringCells cell grid =
    Array.filter
        (\cell_ ->
            isTopLeft cell_.position cell
                || isTopRight cell_.position cell
                || isTop cell_.position cell
                || isLeft cell_.position cell
                || isRight cell_.position cell
                || isBottomLeft cell_.position cell
                || isBottomRight cell_.position cell
                || isBottom cell_.position cell
        )
        grid
We can test this in a Debug statement:
> getNeighboringCells { status = Alive, position = ( 1, 1 ) } grid

Array.fromList [{ position = (1,2), status = Dead },{ position = (2,1), status = Dead },{ position = (2,2), status = Dead }]
Now that we have the neighbors (and their status), we can compute if the cell will be alive, dead or revived from death.
These are the rules:
- a "live" cell will live in the next generation if it has exactly 2 or 3 "live" neighbors
- a "live" cell will die if it has less than 2 or more than 3 "live" neighbors
- a "dead" cell will come alive if it has exactly 3 "live" neighbors
- a "dead" cell will remain dead if it has less than 3 neighbors.
newStatusOfCell : Cell -> Grid -> Cell
newStatusOfCell cell grid =
    let
        neighboringCells =
            getNeighboringCells cell grid

        totalCellsAlive =
            Array.filter (\{ status } -> status == Alive) neighboringCells |> Array.length
    in
    case cell.status of
        Alive ->
            if totalCellsAlive == 2 || totalCellsAlive == 3 then
                { cell | status = Alive }

            else
                { cell | status = Dead }

        Dead ->
            if totalCellsAlive == 3 then
                { cell | status = Alive }

            else
                cell
It's worth adding a "Next" Msg to our app so it's easy to test the above function right away.
type Msg
    = UpdateGrid Grid
    | Next -- the new Msg

update : Msg -> Model -> ( Model, Cmd Msg )
update msg model =
    case msg of
        UpdateGrid grid ->
            ( { model | grid = grid }, Cmd.none )

        Next ->
            ( { model | grid = Array.map (\cell -> newStatusOfCell cell model.grid) model.grid }, Cmd.none )

view : Model -> Html Msg
view model =
    div []
        [viewGrid model, div [] [ button [ onClick Next ] [text "Next Gen"] ] ]
This renders a "Next Gen" button under the grid and clicking that advances the grid to the next generation. You can fiddle around with the app at this stage here
3. Making the grid come alive
The final step is to make the grid come alive. That is, it should step to the next generation automatically!
To do this, we'll add a Tick Msg that calls itself. Since we have the Next msg that computes the next generation of the board, we can re-use that!
type Msg
    = UpdateGrid Grid
    | Next
    | Tick -- we added a new Msg type


update : Msg -> Model -> ( Model, Cmd Msg )
update msg model =
    case msg of
        UpdateGrid grid ->
            -- existing code as is

        Next ->
            -- existing code as is

        Tick ->
            let
                ( newModel, _ ) =
                    update Next model -- grab the new model/grid
            in
            ( newModel
            , Task.perform (\_ -> Tick) (Process.sleep 1000.0)
            )
I'm using Process.sleep to mimic the behavior of Javascript's setTimeout. And then I use the Task.perform to perform some task – in this case, (\_ -> Tick).
To trigger this, we'll add a Start button:
view : Model -> Html Msg
view model =
    div []
        [ viewGrid model
        , div []
            [ button [ onClick Next ] [ text "Next Gen" ]
            , button [ onClick Tick ] [ text "Start" ]
            ]
        ]

If you now click on the Start button, the grid starts changing every second, essentially moving to the next generation.
And the cells live/die or come alive depending on the rules.
Here's the final output you can play with.
You could try and add more features:
- a "Pause" function.
- a way to stop the game when either every cell dies or when it reaches an equilibrium.
- configurable size of the grid.

Top comments (1)
An older implementation can be found here: elm-conway.vercel.app/