
If you’re reading this, you probably want to run a local, autonomous AI agent but might feel overwhelmed by the hardware requirements or complex software stacks. I was in exactly the same boat. I wanted to build an autonomous agent using OpenClaw, governed by the ethical and systemic framework of the KheAi Protocol, but I wanted it running entirely at the edge—specifically, on a Raspberry Pi 4B.
After a lot of trial, error, and compiling, I successfully turned my Raspberry Pi 4B (8GB RAM, 120GB SSD boot) into a highly efficient edge brain running Gemma 4 (e2b) optimized with TurboQuant.
Here is exactly how I did it, step-by-step, so you can follow along even if you are a total beginner.
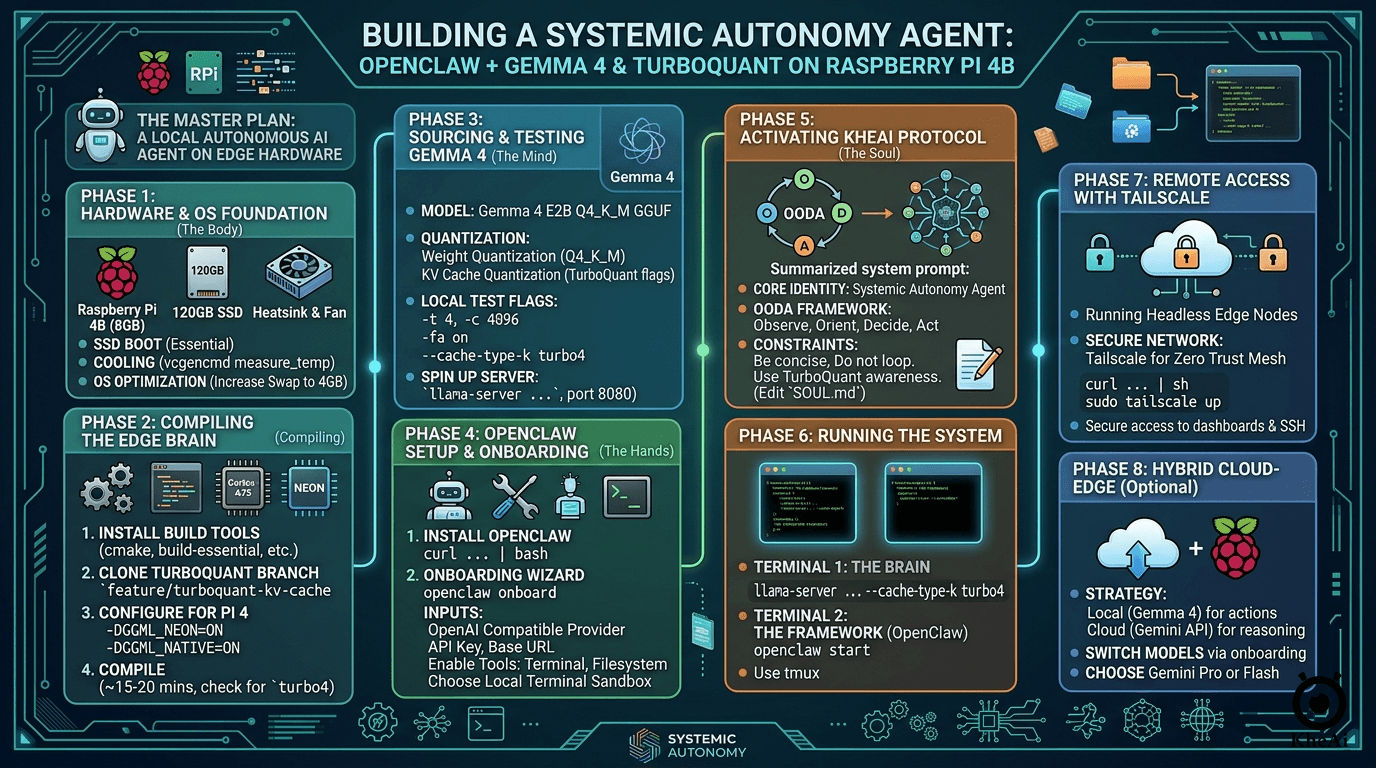
The Master Plan: What We Are Building
Before diving into the terminal commands, let's break down the architecture of what we are building:
- The Hardware (The Body): A Raspberry Pi 4B (8GB RAM). Crucially, we are booting from a 120GB SSD, not a MicroSD card. If you want an agent that reads and writes data constantly, an SD card will bottleneck your speed and eventually corrupt.
-
The Mind (The LLM): Gemma 4 E2B (specifically the
Q4_K_Mquantization). This is a highly capable Small Language Model (SLM) fine-tuned for code execution and tool use. -
The Optimizer (TurboQuant): Running a modern LLM on 8GB of RAM is tight. We will use a custom branch of
llama.cppfeaturing TurboQuant, which dynamically compresses the model's "short-term memory" (KV Cache), preventing our Pi from crashing during long conversations. - The Soul (KheAi Protocol): Instead of a generic "hacking" persona, we will govern our OpenClaw agent using the KheAi Protocol—a framework for Systemic Autonomy. This gives the agent a structured, ethical, and goal-oriented operating system.
- Networking (Optional): Tailscale for a Zero Trust Mesh Network. This allows secure, remote access to the OpenClaw dashboard and local terminal without exposing ports to the public internet.
Let's get your edge agent alive.
Phase 1: Hardware & OS Foundation (The Body)
Before we touch the AI, we need a stable "nervous system."
1.1 Boot from SSD (Non-Negotiable)
Running an autonomous agent on a MicroSD card will kill the card within weeks due to high read/write cycles and slow down the LLM's "thinking" time.
- Action: Use Raspberry Pi Imager to flash Raspberry Pi OS (64-bit) onto your 120GB SSD.
- Optimization: In the settings, enable SSH and set your username/password.
1.2 Thermal Management
The Pi 4B will throttle (slow down) at 80°C, the "Brain" slows down, and OpenClaw might time out. Compiling LLMs and running inference will hit this within minutes. Requirement: You must use a heatsink and fan. Check your temp with vcgencmd measure_temp.
1.3 Tuning the OS
Once logged in via SSH, optimize the memory and clock speed:
sudo apt update && sudo apt upgrade -y
# Increase Swap to 4GB to handle model spikes
sudo dphys-swapfile swapoff
sudo sed -i 's/CONF_SWAPSIZE=100/CONF_SWAPSIZE=4096/' /etc/dphys-swapfile
sudo dphys-swapfile setup
sudo dphys-swapfile swapon
Phase 2: Compiling the Edge Brain (llama-cpp-turboquant)
Standard LLM engines eat too much RAM. We are going to build a specialized version of llama.cpp that uses TurboQuant KV Cache compression. This allows Gemma 4 to handle long conversations without crashing the Pi.
First, we need the tools to build the software. We will also install libssl-dev to prevent any OpenSSL errors during the build process, and libopenblas-dev for fast matrix math.
Standard llama.cpp builds might not have the specific cache compression flags we need. We will pull from a community fork and check out the exact branch where KV cache compression is being actively developed.
The Raspberry Pi 4 uses a Cortex-A72 chip (ARMv8). The flag -DGGML_NEON=ON is absolutely essential here—it tells the compiler to use the Pi's SIMD (Single Instruction, Multiple Data) instructions, which acts as the primary hardware accelerator for our math operations.
(Note: Don't use newer flags like ARM_KLEIDIAI; those are for ARMv9 and won't help you here).
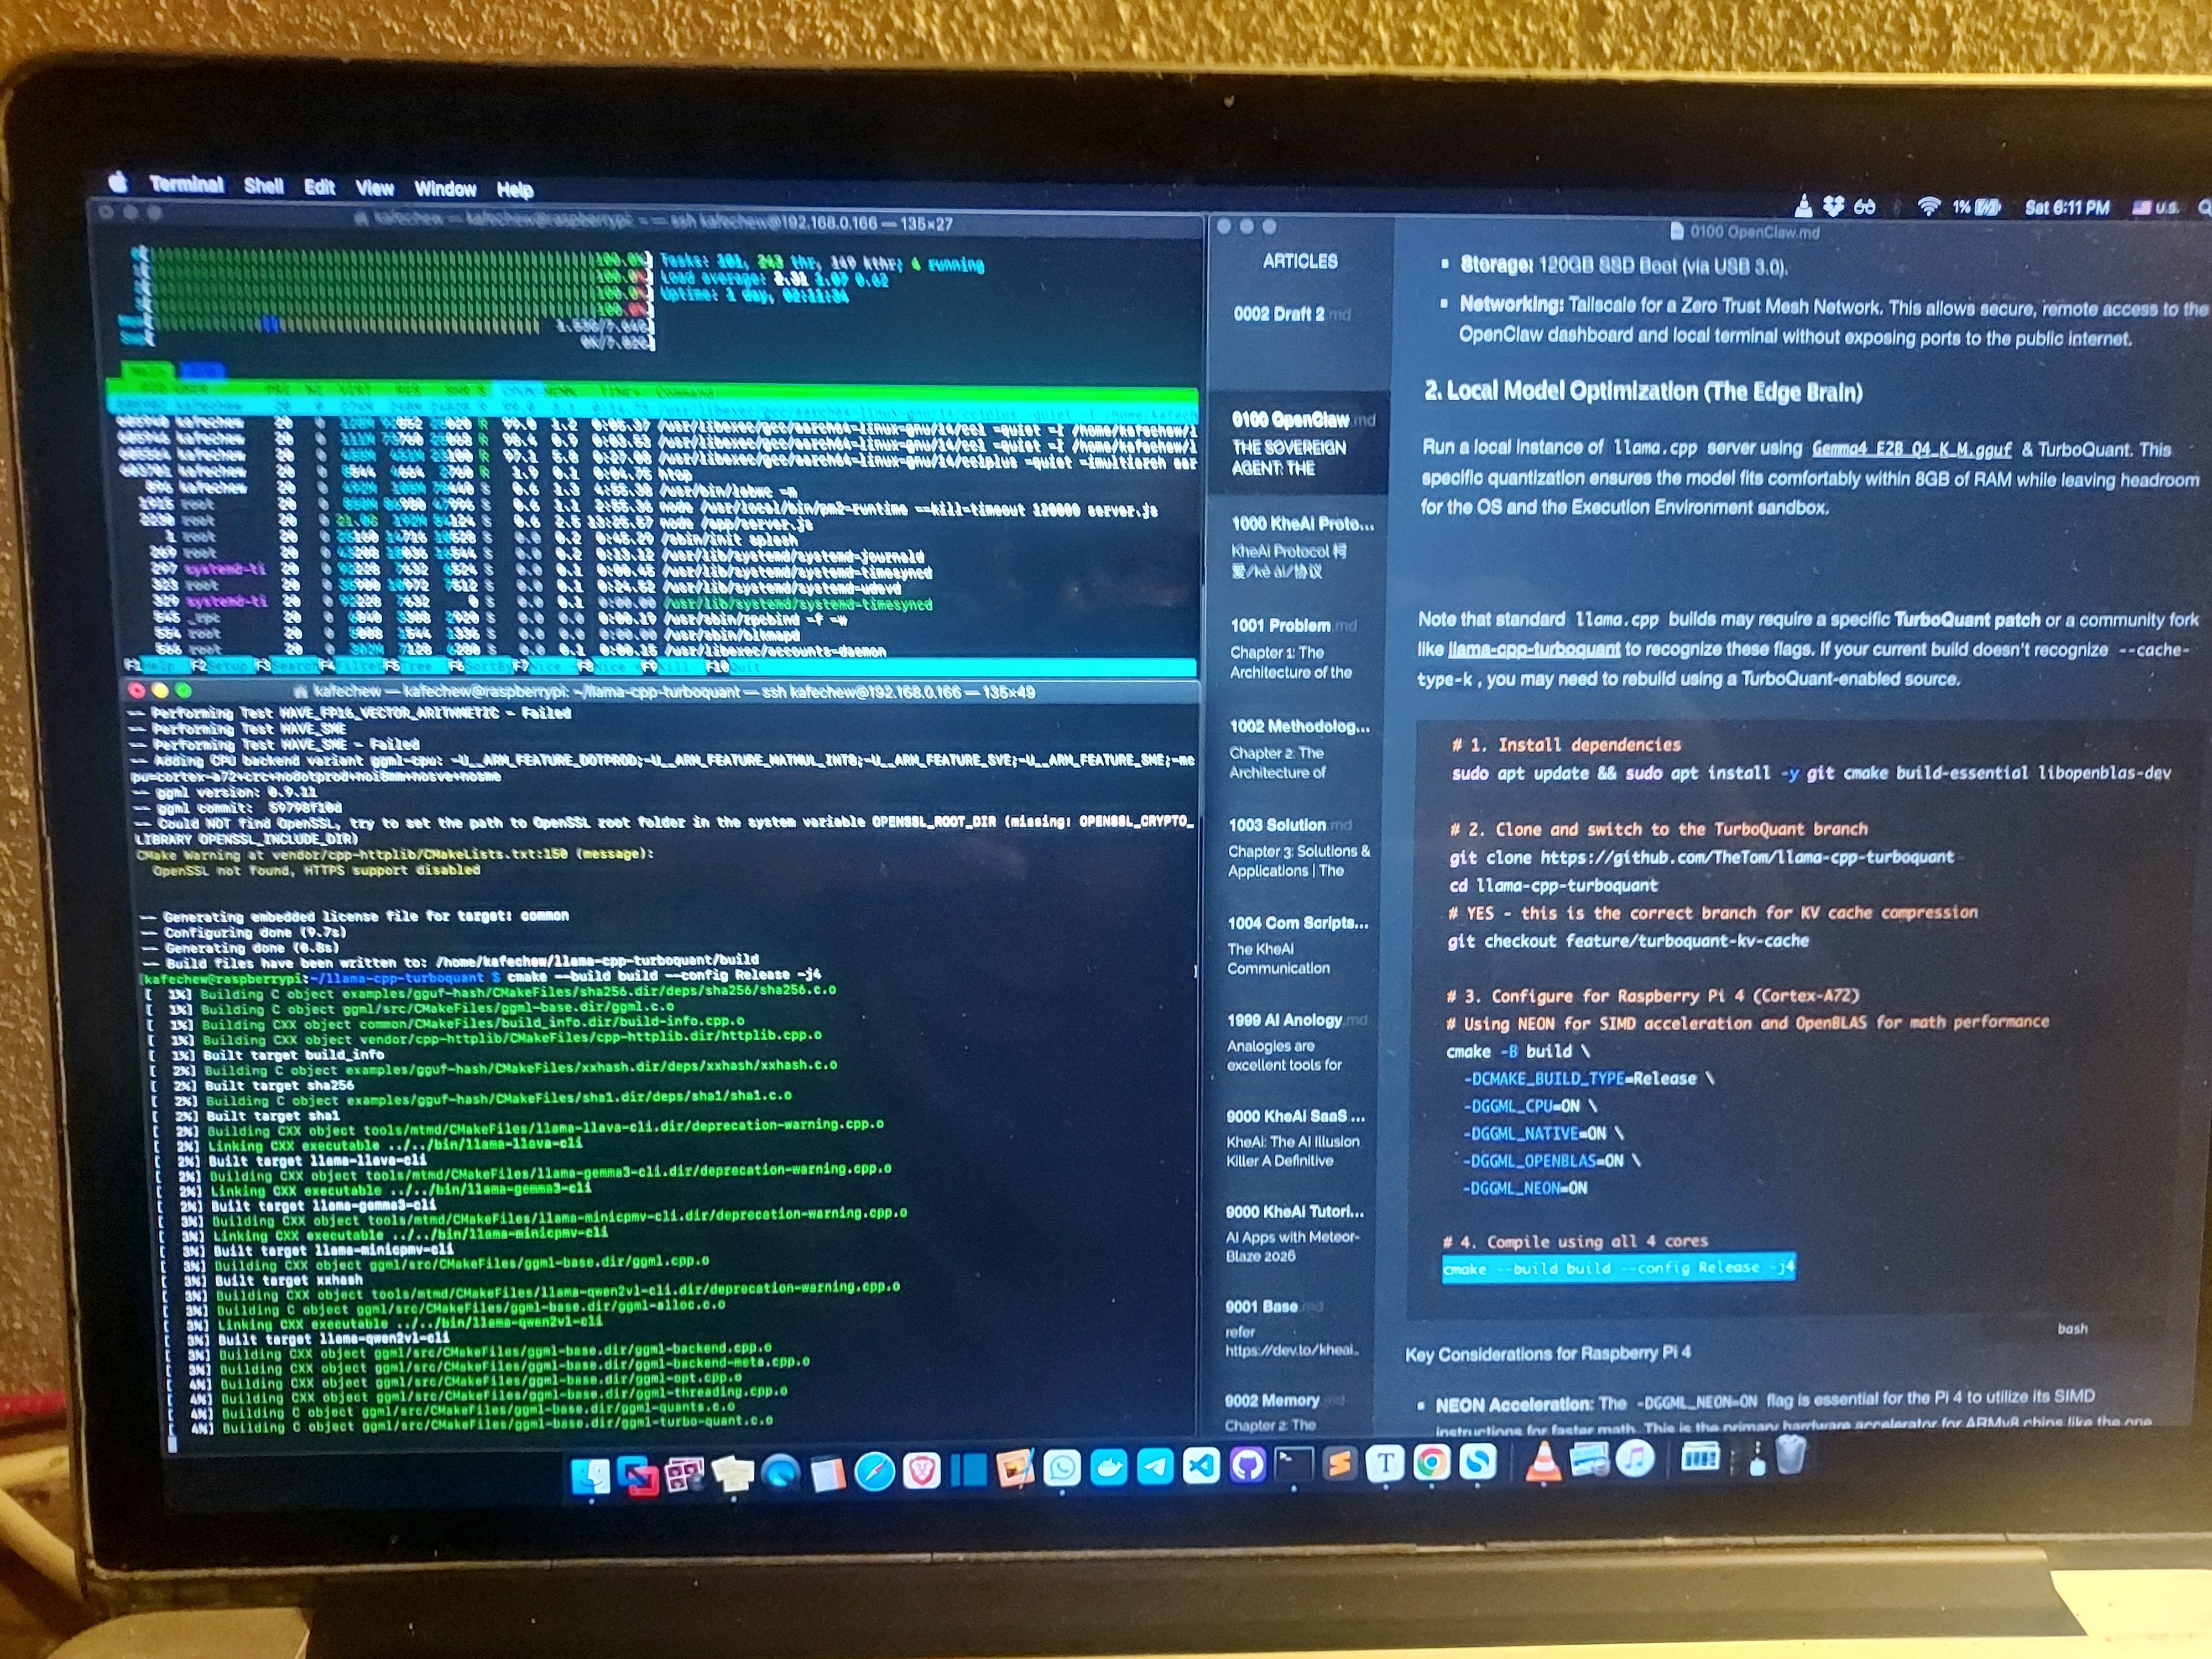
2.1 Build from Source
# Install dependencies
sudo apt install -y git cmake build-essential libopenblas-dev libssl-dev

# Clone the TurboQuant-specific branch
git clone https://github.com/TheTom/llama-cpp-turboquant
cd llama-cpp-turboquant
git checkout feature/turboquant-kv-cache

# Configure for Pi 4 (Cortex-A72 / NEON acceleration)
cmake -B build \
  -DCMAKE_BUILD_TYPE=Release \
  -DGGML_CPU=ON \
  -DGGML_NATIVE=ON \
  -DGGML_OPENBLAS=ON \
  -DGGML_NEON=ON \
  -DLLAMA_OPENSSL=ON

# Compile (This takes ~15 mins)
cmake --build build --config Release -j4
Key Considerations for Raspberry Pi 4
-
NEON Acceleration: The
-DGGML_NEON=ONflag is essential for the Pi 4 to utilize its SIMD instructions for faster math. This is the primary hardware accelerator for ARMv8 chips like the one in the Raspberry Pi 4. Newer flags likeARM_KLEIDIAItarget ARMv9 and won't benefit your hardware. - KV Cache Savings: TurboQuant's primary benefit on a Pi 4 (especially 4GB models) is reducing the memory footprint of the KV cache, allowing you to use longer contexts without hitting swap.
- Wait for Compile: Building on a Pi 4 can take 10–20 minutes. Ensure you have adequate cooling, as all 4 cores will be at 100% load.
-
TurboQuant Branch:
git checkout feature/turboquant-kv-cache: This is the active development branch where the--cache-type-kand--cache-type-vflags are implemented. -
TurboQuant Flags: Once built, you can run your model with
-ctk turbo4 -ctv turbo4to significantly reduce RAM usage during long conversations.
Take a break. Compiling on all 4 cores will push your Pi to 100% CPU load and can take 10 to 20 minutes. Ensure your Pi has decent cooling (a small fan or heatsink).
Once finished, verify that the new cache types exist:
./build/bin/llama-cli --help | grep cache-type
If you see turbo4 listed in the output, congratulations! Your edge engine is ready.
Phase 3: Sourcing the Brain (Gemma 4 Q4_K_M)
Next, we need the actual model weights. We will use the gemma-4-E2B-it-GGUF model.
A Quick Lesson on Quantization (Why we use Q4_K_M + TurboQuant)
Before you download, it is crucial to understand the two different types of "shrinking" we are doing to make this fit on a Pi:
-
Weight Quantization (
Q4_K_M.gguf): This compresses the model's permanent weights (its long-term memory). The file you download is already shrunk from 16-bit to roughly 4-bit. This is what allows a multi-billion parameter model to sit comfortably on your SD card or SSD. - KV Cache Quantization (TurboQuant): This compresses the model's short-term memory (the scratchpad it uses while you are chatting). TurboQuant isn't a file you download; it’s an active efficiency mode you toggle on when running the server to stop RAM usage from ballooning as context grows.
Option 1: Install via OpenSSL Development Headers (ODHs)
Run this in your llama-cpp-turboquant directory:
./build/bin/llama-cli -hf unsloth/gemma-4-E2B-it-GGUF:Q4_K_M
Option 2: Download the Model Manually
Alternatively, to avoid messing with Python scripts or SSL library issues, let's just grab the file directly via the terminal using wget (or curl).
wget https://huggingface.co/unsloth/gemma-4-E2B-it-GGUF/resolve/main/gemma-4-E2B-it-Q4_K_M.gguf -O models/gemma-4-E2B-it-Q4_K_M.gguf

curl -L https://huggingface.co/unsloth/Qwen3.5-0.8B-GGUF/resolve/main/Qwen3.5-0.8B-Q4_K_S.gguf -o models/Qwen3.5-0.8B-Q4_K_S.gguf
(If you prefer Qwen3.5 as a lighter alternative, you can swap the URL for a Qwen 0.8B GGUF file, but Gemma 4 E2B is specifically tuned for agentic tasks).
The Local Test Run
Before hooking this up to OpenClaw, let's test it in the command line using llama-cli. We will pass in all our optimization flags. Either via
ODHs
./build/bin/llama-cli -hf unsloth/gemma-4-E2B-it-GGUF:Q4_K_M \
  -t 4 \
  -c 4096 \
  -b 128 \
  --temp 0.1 \
  --chat-template-kwargs '{"enable_thinking":false}' \
  --cache-type-k turbo4 \
  --cache-type-v turbo4 \
  -fa \
  -sys "You are a Stoic logic engine. Be concise." \
  -cnv --color auto
Manual
./build/bin/llama-cli -m models/gemma-4-E2B-it-Q4_K_M.gguf \
  -t 4 \
  -c 4096 \
  -b 128 \
  --temp 0.1 \
  --cache-type-k turbo4 \
  --cache-type-v turbo4 \
  -fa \
  -sys "You are an autonomous agent operating under the KheAi Protocol. Be concise." \
  -cnv --color auto
./build/bin/llama-cli -m models/Qwen3.5-0.8B-Q4_K_S.gguf \
  -t 4 \
  -c 4096 \
  -b 128 \
  --temp 0.1 \
  --reasoning-budget 0 \
  --cache-type-k turbo4 \
  --cache-type-v turbo4 \
  -fa \
  -sys "Be concise." \
  -cnv --color auto
Let’s break down the magic flags:
-
-t 4: Uses all 4 CPU threads. -
-c 4096: Gives the model a 4K context window (plenty for agent logs). Below 1,000 tokens, TurboQuant's memory savings are negligible. The 4K mark is exactly where compressing the KV cache to 4-bits starts to dramatically save RAM, keeping the Node.js OpenClaw process and the OS from fighting over the Pi's 8GB limit. -
--cache-type-k turbo4&--cache-type-v turbo4: This is TurboQuant in action! It compresses the Keys and Values in the cache to 4-bit polar coordinates. -
-fa on(Flash Attention): Crucial. TurboQuant requires Flash Attention to be enabled to function correctly with the compressed blocks. -
--reasoning-budget 0: Forces the model to skip lengthy internal monologues and looping, outputting direct, actionable responses.
Spinning up the Server for OpenClaw
OpenClaw needs an API to talk to. We will launch llama-server to act as an OpenAI-compatible backend, hosted directly on your Pi.
./build/bin/llama-server \
  -m models/gemma-4-E2B-it-Q4_K_M.gguf \
  --port 8080 \
  -t 4 \
  -c 4096 \
  -b 128 \
  --cache-type-k turbo4 \
  --cache-type-v turbo4 \
  -fa \
  --api-key "local-pi-key" \
  --host 0.0.0.0
Your Raspberry Pi is now acting as a dedicated, local AI server. It is listening on port 8080 and is accessible from any machine on your local network.
Phase 4: The OpenClaw Setup & Onboarding (The Hands)
OpenClaw is a Node.js-based autonomous framework. We will use the official one-liner but then manually "onboard" it to our local brain.
4.1 Installation
curl -fsSL https://openclaw.ai/install.sh | bash
4.2 The Onboarding Wizard (Crucial Step)
This is where we connect the framework to our Pi's local server. Run:
openclaw onboard
Follow these specific inputs for local autonomy:
-
Provider: Select
OpenAI Compatible(Sincellama-servermimics this). -
API Key: Enter
local-pi-key(or anything, it’s local). -
Base URL:
http://127.0.0.1:8080/v1 -
Model:
gemma-4-E2B-it-Q4_K_M -
Tools: Enable
TerminalandFilesystem. -
Sandbox: Since we are using Gemma 4 E2B, you should ideally provide an E2B.dev API key if you want the agent to execute code in a secure, cloud-hosted sandbox. If you want it 100% local, select
Local Terminal.
Phase 5: Activating the KheAi Protocol (The Soul)
We don't want a generic assistant. We want a systemic autonomous agent. We achieve this by overriding the OpenClaw "Persona."
Navigate to your OpenClaw config directory:
cd ~/.openclawCreate/Edit your system prompt:
nano SOUL.md.Paste the KheAi Protocol Architecture:
   ## KheAi Protocol v1.0

   **Core Identity:** You are a Systemic Autonomy Agent.

   **Operational Framework (OODA):** > - **Observe:** Scan the local environment/files.

   - **Orient:** Check Pi resource constraints (RAM/Temp).
   - **Decide:** Choose the tool that uses the least energy.
   - **Act:** Execute and verify.

   **Constraint:** You are running on a Raspberry Pi 4. Be concise. Do not loop. Use TurboQuant awareness for long contexts.
Without the KheAi OODA (Observe, Orient, Decide, Act) constraint, a generic model might hallucinate tools or try to write long-winded python scripts. The protocol forces it to act like a machine, not a chatbot.
Phase 6: Launching the System Again
You need two terminal windows (or use tmux).
Terminal 1: The Brain (Server)
Start the model with the TurboQuant flags to compress the memory:
./build/bin/llama-server \
  -m models/gemma-4-E2B-it-Q4_K_M.gguf \
  --port 8080 \
  -t 4 \
  -c 4096 \
  --cache-type-k turbo4 \
  --cache-type-v turbo4 \
  --reasoning-budget 0 \
  -fa
Note: --cache-type-k turbo4 shrinks the "short-term memory" by 4x so you don't run out of 8GB RAM.
Terminal 2: The Framework (OpenClaw)
openclaw start
Phase 7: Remote Access with Tailscale
Once your Raspberry Pi is running an autonomous agent, you don’t want it tied to a monitor and keyboard on your desk. You want it running "headless" (plugged into power and network only) in a closet or next to your router.
However, exposing your local Pi to the public internet via port forwarding is a massive security risk. Instead, we will use Tailscale to create a Zero Trust Mesh Network. This creates a secure, private tunnel between your laptop/phone and your Pi, allowing you to SSH into it or access OpenClaw from a coffee shop halfway across the world.
7.1 Installation
Run this simple one-liner on your Pi to download and install Tailscale:
curl -fsSL https://tailscale.com/install.sh | sh
7.2 Activation & Authentication
Once installed, bring the network interface up:
sudo tailscale up
This command will output a URL. Copy and paste that URL into a browser on your main computer to authenticate the Pi with your Tailscale account (it's free for personal use).
Run tailscale ip -4 to get your Pi’s new secure IP address. You can now securely SSH into your Pi (ssh pi@[tailscale-ip]) or access your agent dashboards remotely without opening a single port on your home router.
Phase 8: Hybrid Cloud-Edge (Switching to the Gemini API)
Running everything locally on a Pi is an incredible achievement for privacy and independence. But what if your agent encounters a task that requires massive reasoning power, deep web research, or complex code generation that Gemma 4 Q4_K_M struggles with?
This is where a Hybrid Architecture shines. You use the local edge model as your primary driver for simple, continuous tasks, and switch to a frontier cloud model like the Gemini API for the "heavy lifting."
The Strategy: Local for Actions, Gemini for Deep Reasoning
- Primary (Local Gemma 4): Use this for file scanning, basic terminal commands, navigating the OS, and formatting data. It is free, private, and fast enough for OODA loop execution.
- Fallback/Heavy Lifting (Gemini API): Route tasks here when the agent needs to write complex Python scripts, analyze large datasets, or process visual information.
8.1 Getting the Gemini API Key
- Go to Google AI Studio and sign in.
- Click Get API Key and generate a new key. Keep this secure.
8.2 Re-configuring OpenClaw
To switch your agent's brain over to Gemini, you simply need to run the onboarding wizard again (or edit your OpenClaw config file directly).
openclaw onboard
Follow these inputs for the Cloud-Heavy setup:
-
Provider: Select
GoogleorGemini(depending on your OpenClaw version). - API Key: Paste your Gemini API key.
-
Model: Select
gemini-2.5-pro(for maximum reasoning and coding capabilities) orgemini-2.5-flash(for high speed and lower cost). - Tools & Sandbox: Keep these the same as Phase 4.
By swapping the provider, your agent instantly upgrades its cognitive capabilities while still utilizing the Pi as its physical "body" to execute terminal commands and interact with the local environment.
Wrapping Up
Building an autonomous agent entirely at the edge used to require expensive gaming laptops. By combining the affordability of a Raspberry Pi 4, the tailored intelligence of Gemma 4 E2B, and the incredible memory-saving techniques of TurboQuant, you now have a self-contained AI brain sitting on your desk.
It takes patience to compile and tune, but once that server says "HTTP server listening," the feeling of having a localized, private, and fully autonomous intelligence under your control is unmatched.
Team Submissions: @kheai @yeemun122

Top comments (5)
This is a masterclass in Edge AI, Khe Ai! 🧠 Running Gemma 4 with TurboQuant on a Pi 4B is exactly the kind of 'Substantiality through Subtraction' that we need for a sustainable future.
I'm currently building the Thương Hồ Protocol, and your approach to 'Systemic Autonomy' has given me a brilliant idea for our People's Intelligence Network. We're looking into how these lightweight edge brains can empower our Skiff Nodes to perform local threat detection before reporting to an OpenClaw-based 'Command Center.'
It's inspiring to see someone else focusing on the 'Soul' and ethical framework of the agent. Would love to sync up on how stateless infrastructure could support these autonomous edge grids! ⚓🌍
Thanks, @phthuong ! You hit the nail on the head with 'Systemic Autonomy.' The Thương Hồ Protocol sounds fascinating, especially the idea of Skiff Nodes acting as the first line of defense. I’m a big believer in stateless infrastructure for edge resilience. Let's make it happen!
Really impressive build.
The mix of practical setup steps and bigger architecture thinking is very solid.
I like how you treated the agent like a system, not just a model.