
This is a submission for the OpenClaw Writing Challenge
If you've been looking into autonomous Node.js frameworks lately, you've probably stumbled across OpenClaw. It’s incredibly powerful, but let’s be honest: the onboarding process is not exactly beginner-friendly. There are a dozen options to research and understand before you even finish the setup wizard.
If you're anything like me, you don't just blindly trust automated setups. You want to understand what you are installing, why you are selecting specific configurations, and how to verify everything is running correctly.
In this guide, I’m going to walk you through the easiest and safest way to get OpenClaw running on your local machine. We are going to intentionally skip the complex external integrations (like Telegram or Discord) for now. Instead, we will build a solid foundation using the local web chat and terminal UI.
Let's dive in and build your local brain.
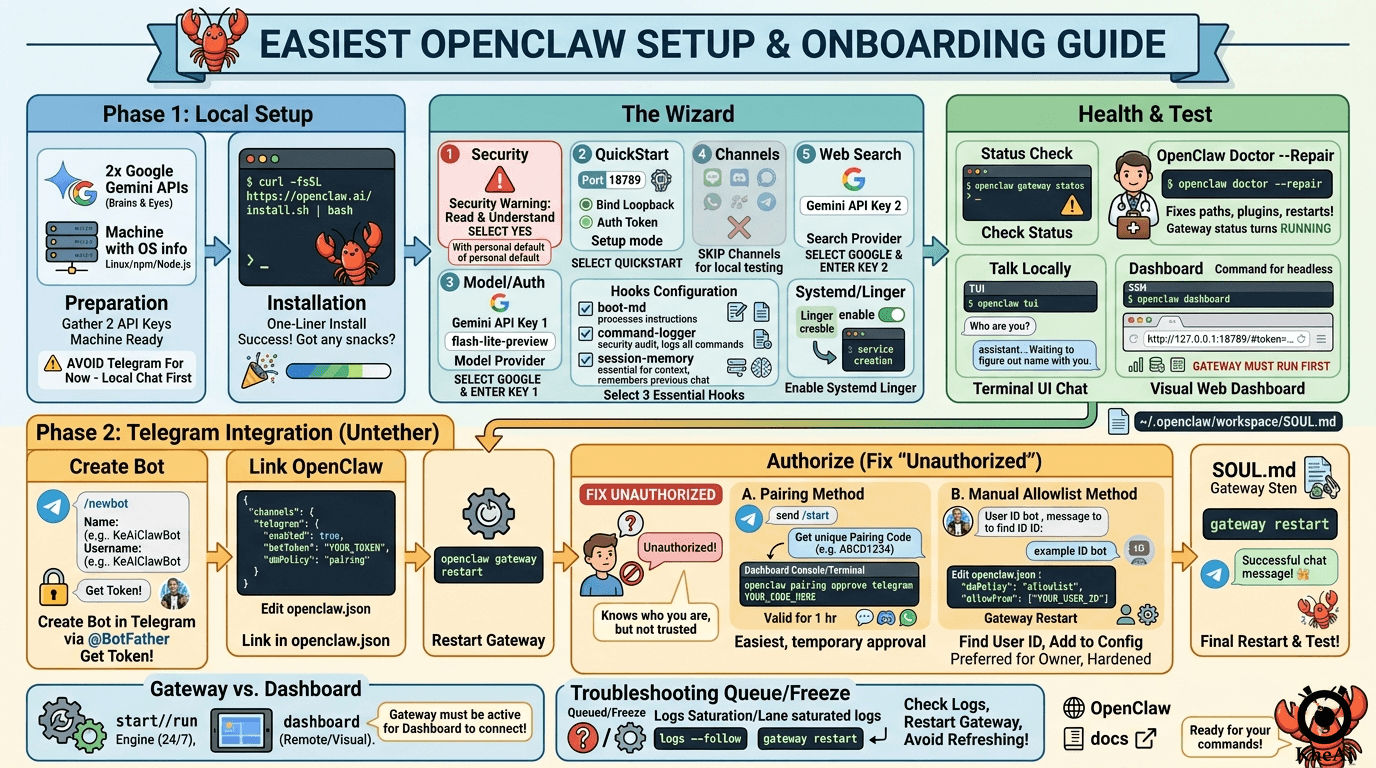
🛠️ Phase 1: Preparation
Before touching the terminal, you need to gather your API keys. To keep this completely free while maximizing performance, we are going to use two separate free-tier Google Gemini API accounts.
Splitting the load across two accounts prevents rate-limiting and keeps our architecture clean:
- Gemini API Key 1 (The Brain): This will be our default Model Provider for reasoning and conversation.
- Gemini API Key 2 (The Eyes): This will be dedicated entirely to our Web Search Provider.
Generate these keys from Google AI Studio and keep them in a secure text file.
🚀 Phase 2: Installation & The Setup Wizard
OpenClaw provides an official one-liner script. It’s the easiest way to pull the latest version (currently the 2026.x branch) and ensure your Node.js environment is recognized.
Open your terminal and run:
curl -fsSL https://openclaw.ai/install.sh | bash
The script will check your OS, detect your Node.js and npm versions, and pull the latest OpenClaw package. Once installed, the interactive setup wizard will immediately launch.
Here is exactly how to navigate the wizard to avoid early headaches:
1. Safety Confirmation
The very first thing OpenClaw shows you is a massive security warning. Because this bot can read files and execute commands, a bad prompt can cause real damage.
-
Prompt:
I understand this is personal-by-default and shared/multi-user use requires lock-down. Continue? - Action: Select Yes.
2. Setup Mode
-
Prompt:
Setup mode -
Action: Select QuickStart. This is the safest baseline configuration. It binds the gateway to your local loopback (
127.0.0.1), meaning no one outside your machine can access it.
3. Model & Authentication
This is where we plug in our first API key.
-
Prompt:
Model/auth provider - Action: Select Google, then paste Gemini API Key 1.
-
Model Selection: When asked for the default model, select
google/gemini-3.1-flash-lite-preview.
Why this model? It is lightweight, blazingly fast, and handles log analysis and command generation exceptionally well without eating through token limits.
4. Channels (Skip for Now!)
The wizard will present a massive list of communication channels (Telegram, Discord, Signal, WhatsApp, etc.).
- Action: Skip for now.
- Why? Setting up external channels introduces webhooks, port forwarding, and pairing complexities. We want to test our agent strictly in a localized environment first. Avoid Telegram completely during this initial setup.
5. Web Search
-
Prompt:
Search provider - Action: Select Gemini (Google Search) and paste Gemini API Key 2. This gives your agent the ability to look things up online dynamically.
6. Configuring Hooks (Crucial Step)
Hooks allow you to automate actions when the agent boots up or executes commands. Use your arrow keys and the Spacebar to select these three essential hooks, then hit Enter:
-
[x] 🚀 boot-md: Highly recommended. This processes and loads your Markdown-based instructions (BOOT.md) and system prompts the moment the agent starts. -
[x] 📝 command-logger: Essential for security. This creates an audit trail of all CLI commands and agent actions. If the bot does something unexpected, this is how we debug it. -
[x] 💾 session-memory: Mandatory for fluid chat. This allows the bot to "remember" context between sessions so you don't have to repeat yourself constantly.
(Note: There is also bootstrap-extra-files, which is great if you have custom documentation to index, but we can leave it off for now).
7. Systemd & Lingering
If you are on Linux (like a Raspberry Pi), OpenClaw will offer to set up a systemd user service.
- Action: Allow it to enable lingering. This ensures your OpenClaw gateway stays running in the background even after you log out of your SSH session.
🩺 Phase 3: The Health Check
Just because an installation says "success" doesn't mean it's optimized. Let's double-check our system state.
Run the following command:
openclaw gateway status
If you see warnings about your Node path (e.g., using a version manager like nvm), or a failure stating gateway closed (1006), don't panic. OpenClaw has a built-in diagnostic tool.
Run the repair tool:
openclaw doctor --repair
This command acts as a mechanic. It will automatically optimize startup flags (OPENCLAW_NO_RESPAWN), fix bundled plugin dependencies (like @discordjs/opus), and restart the systemd service cleanly. Run openclaw gateway status one more time to verify the gateway is now running.
🗣️ Phase 4: Talking to Your Agent
Now that the engine is running smoothly, it's time to interact with your new AI. Because we skipped Telegram and Discord, we have two excellent local options.
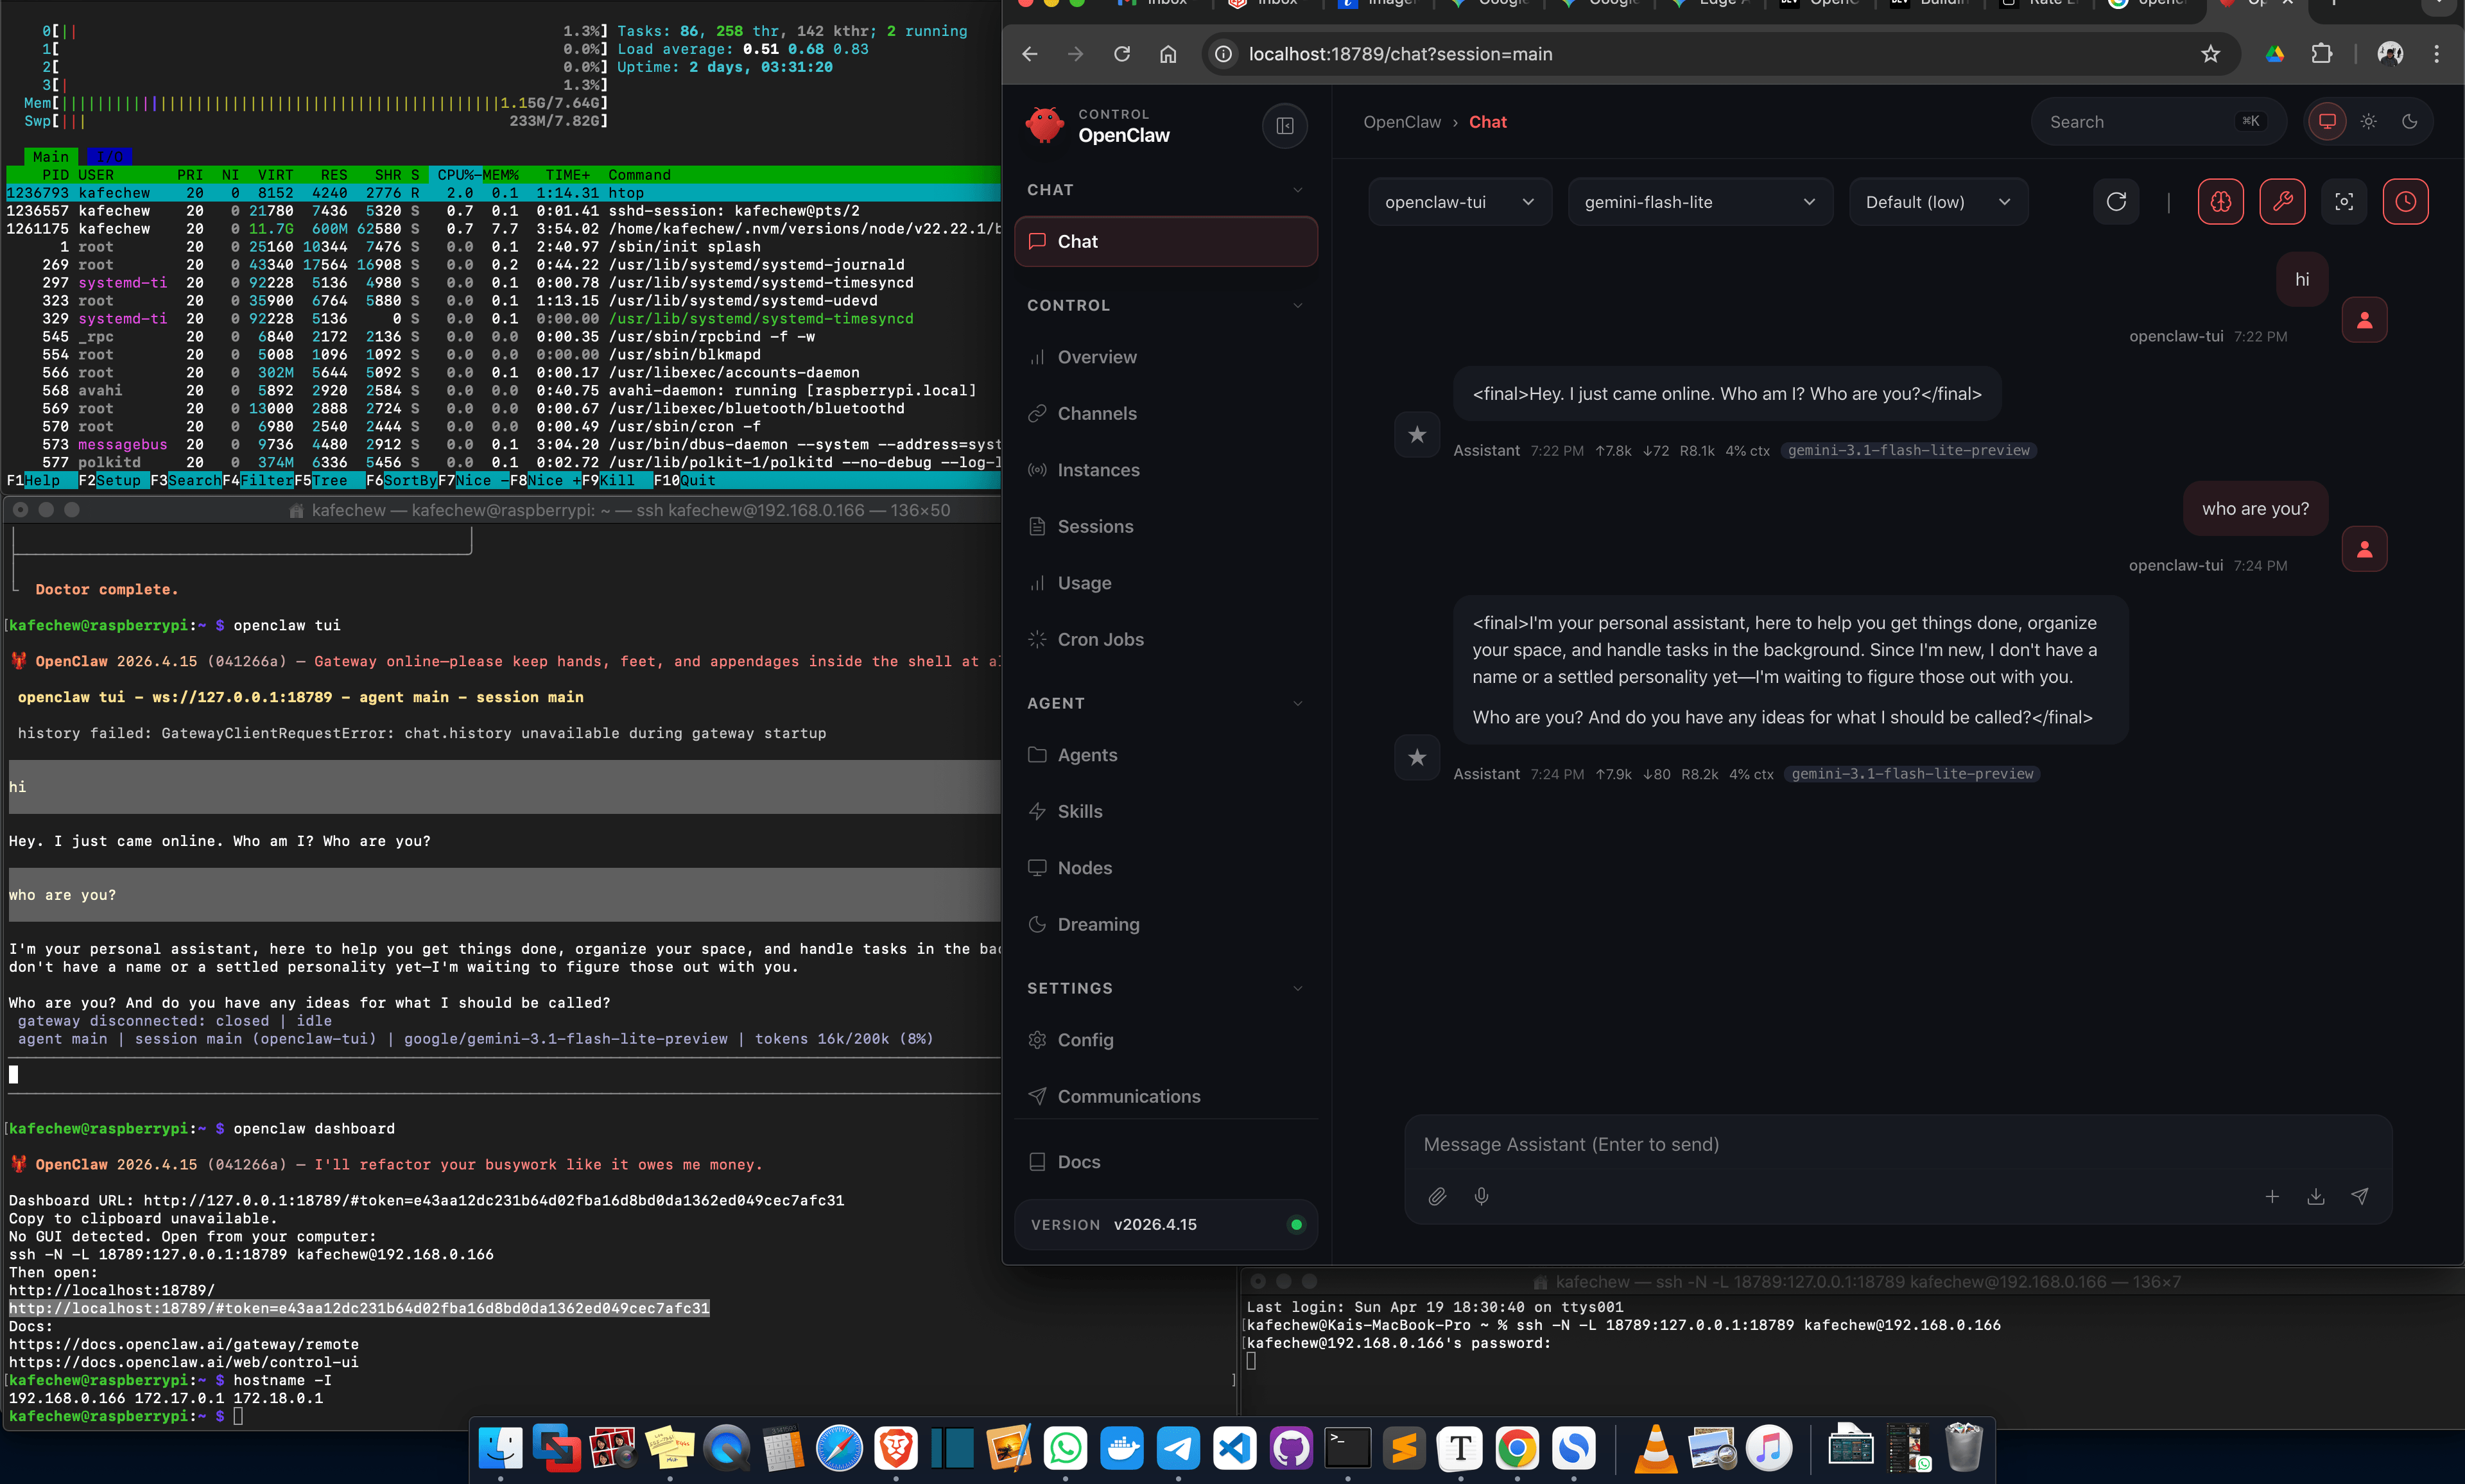
Option A: The Terminal UI (TUI)
For the purists who love staying in the shell, run:
openclaw tui
This drops you directly into a sleek, command-line chat interface.
- Tip: Try typing "Who are you?" to verify the session memory is working.
-
To exit: Press
Ctrl + Ctwice.
Option B: The Web Dashboard (The Remote Control)
To view real-time logs, manage skills, and monitor API usage, you need the web dashboard.
Run:
openclaw dashboard
This generates a secure, tokenized URL (e.g., http://127.0.0.1:18789/#token=...). If you are running this on a headless server (like a Pi), you'll need to SSH port-forward to access it from your main computer:
ssh -N -L 18789:127.0.0.1:18789 youruser@your_server_ip
Then, open the provided URL in your local browser.
Phase 5: Function / Tool: Web Browser (Web Search)
If there is one feature that moves OpenClaw from a "cool chat bot" to a "true autonomous partner," it’s Web Search.
Standard AI models are frozen in time; they only know what they were trained on up to their "knowledge cutoff." By enabling the search tool, you allow your agent to break out of that box, verify real-time data, and research topics it has never encountered before.
How the Search Logic Works
In Phase 1, we configured Gemini API Key 2 specifically for search. Because we enabled the boot-md and session-memory hooks, the agent knows it has this "tool" in its belt.
When you ask a question the agent can't answer from its internal weights, it doesn't just guess (hallucinate). Instead, it triggers a Tool Call. You can see this happening in real-time in the Control UI:
- The Trigger: You ask a question about something specific or recent (e.g., "What is the KheAi Protocol?").
- The Thought: The agent realizes it lacks this specific context.
-
The Action: It calls the
web_searchtool, sends a query to Google, and parses the results. - The Output: It synthesizes a response based on the live data it just found.
Real-World Demo: Searching the "KheAi Protocol"
I tested this by asking my agent about my own architectural framework—the KheAi Protocol. Since this isn't part of a standard LLM training set, a normal bot would likely give a generic answer or fail.
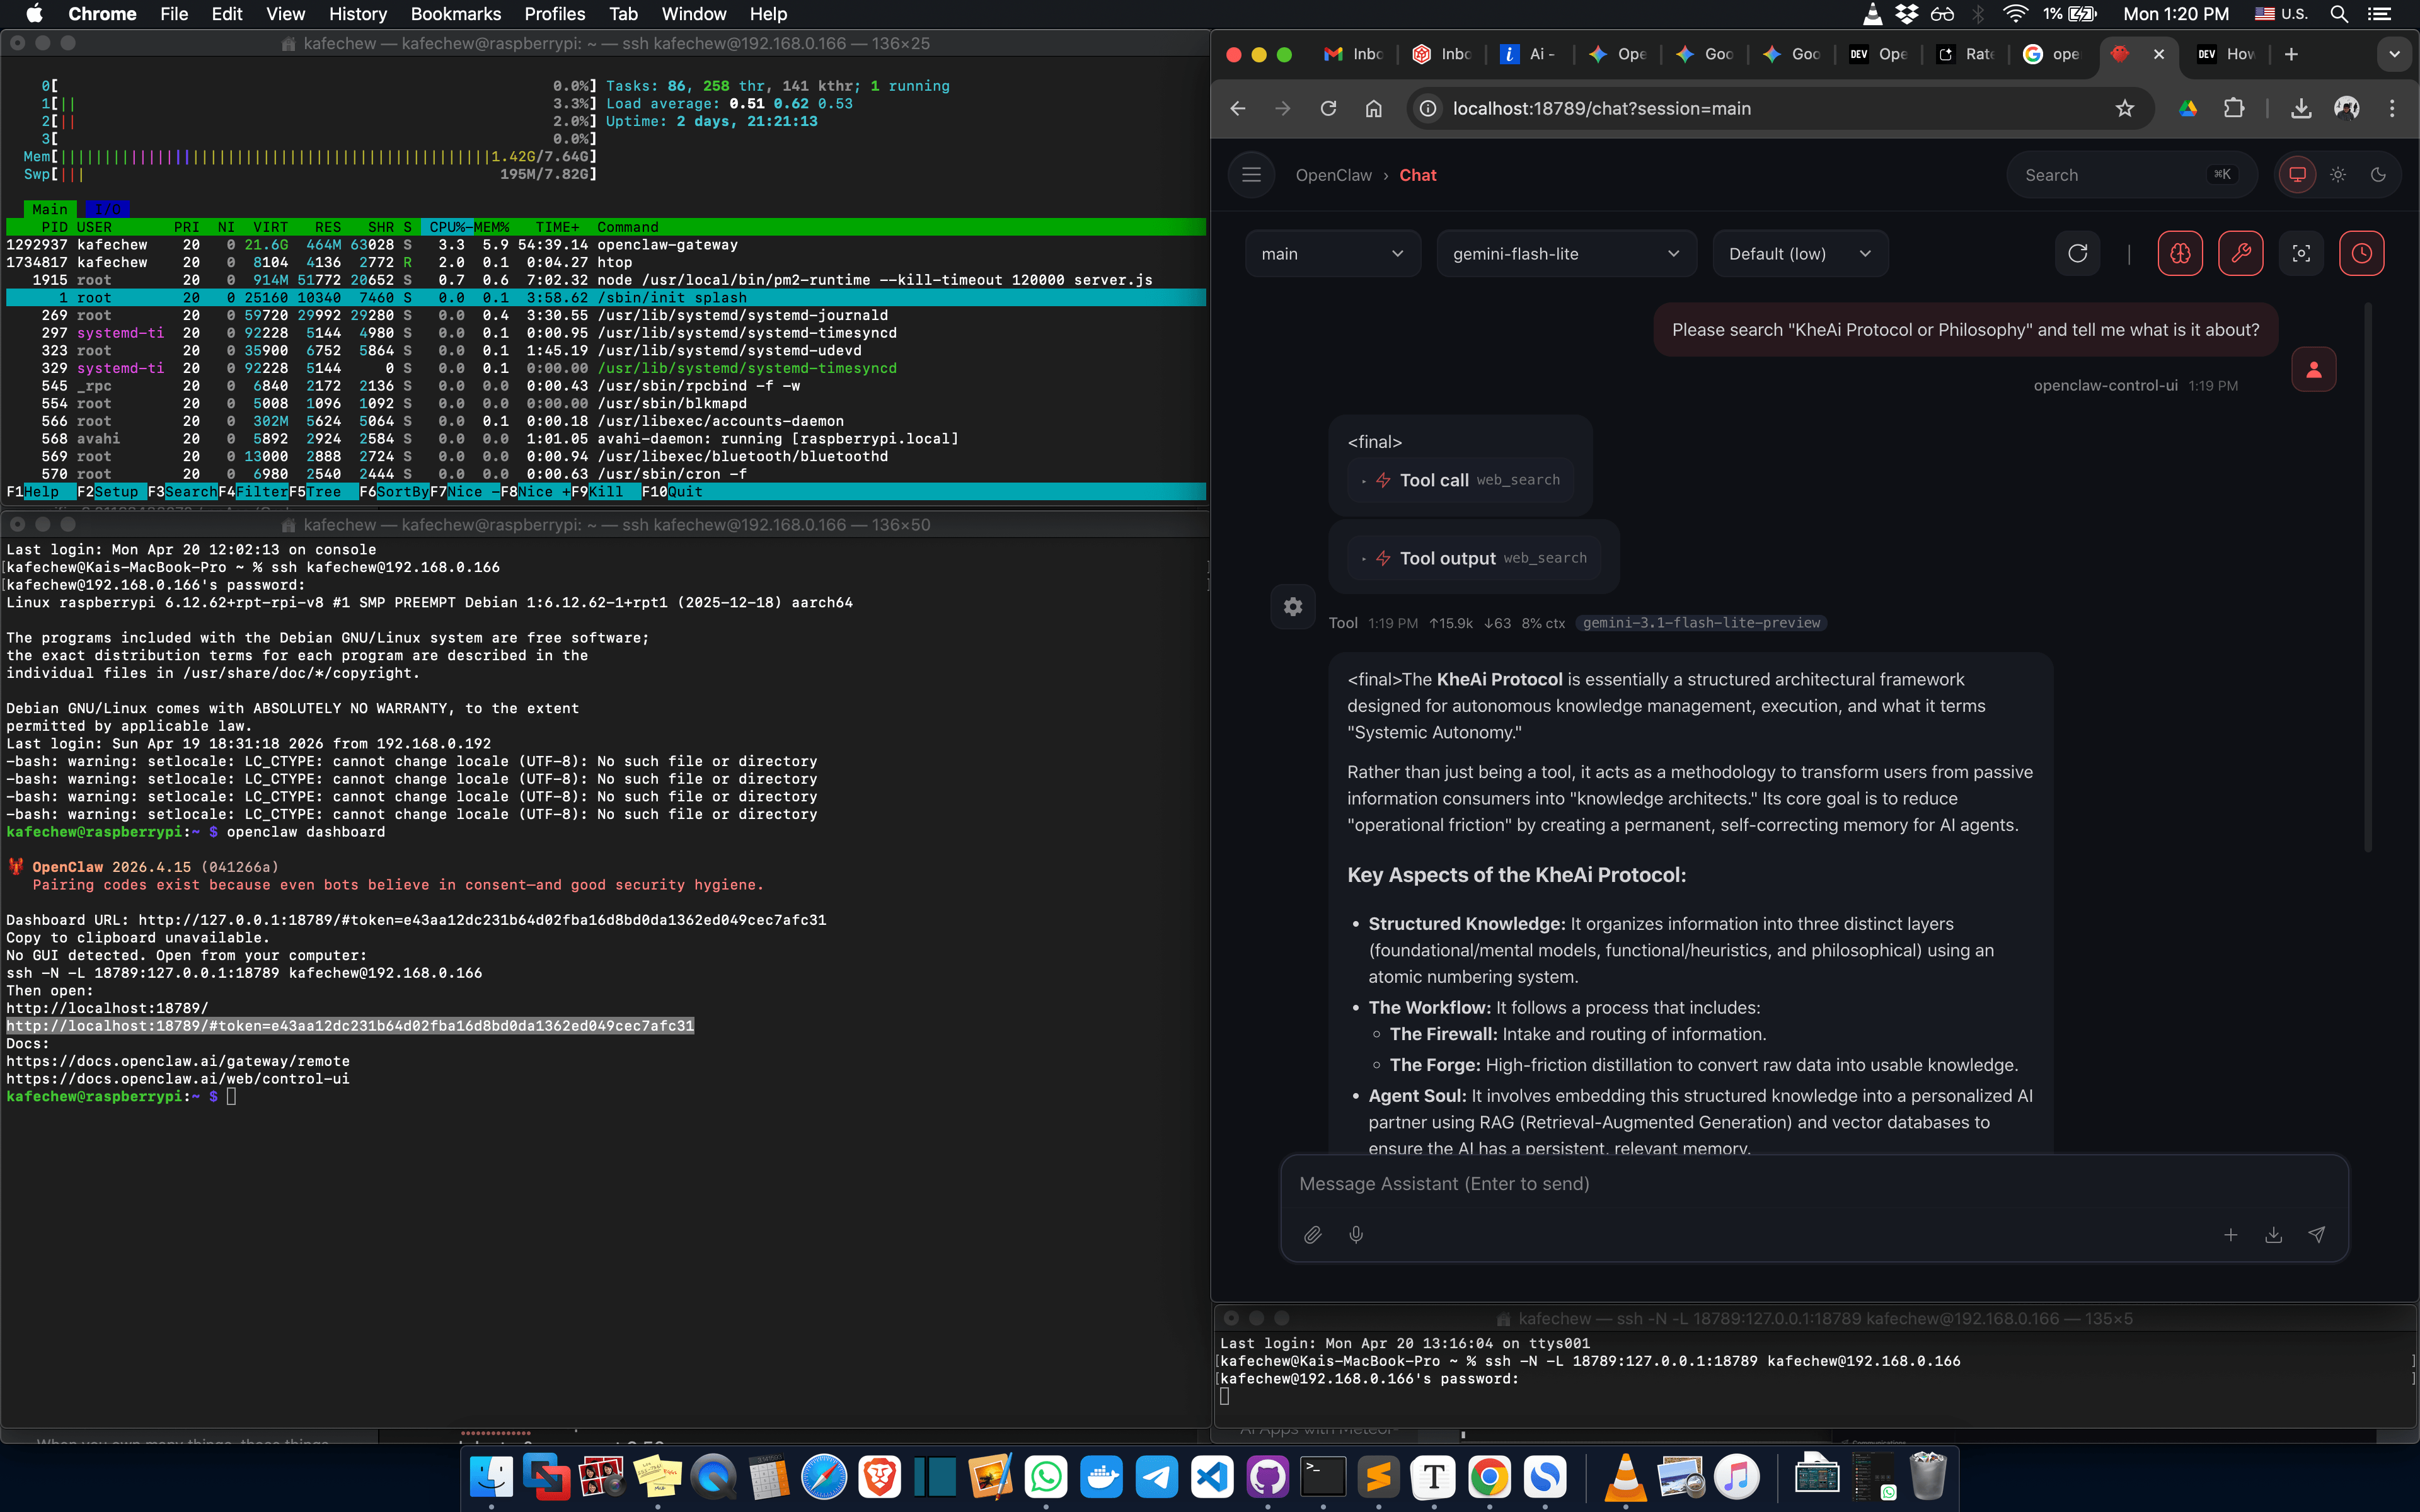
As you can see in the screenshot below, OpenClaw immediately identified the need for a search:
- It triggered the
web_searchtool call. - It successfully identified the core layers: The Firewall (intake), The Forge (distillation), and Agent Soul (RAG/memory).
- It correctly categorized it as a methodology for "Systemic Autonomy".
By using Gemini-3.1-Flash-Lite for these searches, the process is incredibly cheap (often free-tier) and extremely fast. The agent doesn't just read the first link; it behaves like a "knowledge architect," transforming raw search results into usable, structured information that stays in its session memory for the rest of your conversation.
Pro-Tip: If your search feels slow or fails, check your openclaw.json to ensure your Search Provider API key is separate from your Model Provider key. This prevents "rate limit" collisions when the agent tries to "think" and "search" at the same exact time.
⚙️ Phase 6: Essential Troubleshooting & Commands
As you experiment, keep these core concepts in mind to keep your system healthy.
The Two Pillars of OpenClaw Commands
-
openclaw gateway start(The Engine): Manages the background daemon that runs 24/7. Use this if the gateway crashes or stops. (If you prefer seeing logs live in your terminal instead of the background, useopenclaw gateway run). -
openclaw dashboard(The Remote Control): Launches the visual UI. Note: The gateway must already be running for the dashboard to work.
Fixing the "Message Queued" Error
Occasionally, your agent might freeze, leaving your messages stuck on "Queued." Here is my step-by-step protocol for fixing it:
-
Check Live Logs: Run
openclaw logs --follow. Look for errors like "lane saturated" to see what the agent is getting stuck on. -
Restart the Gateway: Run
openclaw gateway restart. This clears the current in-process queue and drops stale entries. -
Check Concurrency: If your hardware allows, edit
~/.openclaw/openclaw.jsonto increasemaxConcurrentfor sessions. - Don't Spam Refresh: The web chat queue relies on browser React state. Refreshing the page while messages are pending can cause desyncs and lost data.
🧠 Phase 7: Giving Your Agent a Soul
Right now, your agent is a blank slate. To make it truly autonomous and useful, you need to configure its SOUL.md file.
Navigate to: ~/.openclaw/workspace/SOUL.md
When editing this file, you must define three critical pillars clearly:
- WHO it is: Define its role. Is it a senior sysadmin? A creative writer? A precise data analyst?
- HOW it works: Define its reasoning style and protocols. Does it ask for permission before running a bash script, or do you want it to act autonomously?
- WHERE its limits are: Set strict boundaries. Tell it explicitly what directories it is never allowed to touch.
What's Next?
Congratulations. You now have a fully functional, localized, and highly optimized OpenClaw agent running on your hardware.
Take some time to chat with it in the TUI, refine your SOUL.md, and watch the logs to see how it "thinks." Once you are fully comfortable with how it handles local commands, you'll be ready for the next step: securely exposing it to the outside world via Telegram.
ClawCon Michigan: We would love to, but we missed it!
Team Submissions: @kheai @yeemun122

Top comments (0)