building REST API with Nodejs / MongoDB /Passport /JWT

if your don’t know Node and JS before Take this Wes Bos Course that helps your jump start

A premium training course to learn to build apps with Node.js, Express, MongoDB, and friends. Start Learning Now →
In this lesson, we will start our journey on making REST APIs with NodeJSalong with MongoDBdatabase. if you don’t have experience on Nodejs and MongoDB before
Why this tutorial?
When I started learning to program, I was searching for a solution to my problems and found it. But the problem was I didn’t know why something was working when it was and why it wasn’t. I had to copy other’s source code and use it without knowing why was something done.
This tutorial will help you to go through all the boilerplate code you can use and still understand each part of it.
What will we be making?
We will be making a website very similar to the Medium website with REST standards. We will also use the following functionalities:
- Authentication local + JWT
- User can create a post
- User can delete his own post and update it
- User can follow another user’s post
- User gets a notification for a post made by a user he is following
- User can like a post
- User can see a list of all the positions he has liked
Sounds interesting, right? Let’s see what we will be using to make this wonderful app.
Tech stack for the app
We will be using Javascript, ES6 + ES7 and we will compile our source using babel and Webpack v2. You should be familiar with JS promises and async working as well.
For the database, we will be using MongoDB.
Setting up the tools
To start with Part 1 of this series, we will be setting up our environment with the following tools:
- Editorconfig
- Express
- Eslint
- Babel
- Webpack 2
Once we finish this post, we will be having a simple Express server up and running. Let’s get started!
Just make a new directory for your project. I called it ‘makenodejsrestapi’. I will be using yarnpackage to install my tools. Inside the directory, we first create a new file called .gitignore and add the following contents:
node_modules/
Now, we will be initializing our project by running the following command:
yarn init
You will be asked various questions, for which I just hit Enter key and let yarntake default values. Once the command has completed its work, you will see a new file in the project directory named as _package.json_with following content:
{
 “name”: “makenodejsrestapi”,
 “version”: “1.0.0”,
 “main”: “index.js”,
 “license”: “MIT”
}
This file just contains the meta-data for our project. Next, we will start adding the express in our project. Run the following command next:
yarn add express
If this package is not found initially, the yarn will take some time to find it but it surely will. Once the command is done running, our package.json will be updated with the following content:

Next, we create a new directory in our project named as src and create a new file named as an index.js file in it. Put the following content in it:
import express from 'express';
 const app = express();
 const PORT = process.env.PORT || 3000;
 app.listen(PORT, err => {
     if (err) {
         throw err;
     } else {
         console.log(Server running on port: $ {
             PORT
         }-- - Running on $ {
             process.env.NODE\_ENV
         }-- - Make something great!)
     }
 });
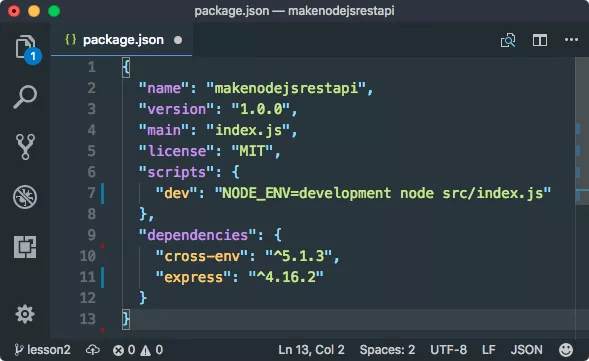
Note that we are using a port 3000 if a port is not set in the environment variables. Now, we will add a ‘script’ in our package.json file so that we can use dev profile while running our using babel. Here is the modified file:
Now, install the cross-env with yarn with this command:
yarn add cross-env
This is the updated package.json file:
{
     "name": "makenodejsrestapi",
     "version": "1.0.0",
     "main": "index.js",
     "license": "MIT",
     "scripts": {
         "dev": "NODE\_ENV=development node src/index.js"
     },
     "dependencies": {
         "cross-env": "^5.1.3",
         "express": "^4.16.2"
     }
 }
Now we can add babel dependencies with this command:
yarn add -D babel-preset-env babel-plugin-transform-object-rest-spread
Once you run the command, you can create a file called .babelrc in which you can provide environment and plugin information about the app. This is what we will do next:
{
     "presets": [
         ["env", {
             "targets": {
                 "node": "current"
             }
         }]
     ],
     "plugins": [
         ["transform-object-rest-spread", {
             "useBuiltIns": true
         }]
     ]
 }
The transform-object-rest-spread plugin is used to transform rest properties for object destructuring assignments. Now, we will use webpack 2 as well:
yarn add -D webpack babel-core babel-loader webpack-node-externals
Finally, we will configure the webpack as well as we have added its dependencies above as well:
const nodeExternals = require('webpack-node-externals');
 const path = require('path');
 module.exports = {
     target: 'node',
     externals: [nodeExternals()],
     entry: {
         'index': './src/index.js'
     },
     output: {
         path: path.join(\_\_dirname, 'dist'),
         filename: '[name].bundle.js',
         libraryTarget: 'commonjs2',
     },
     module: {
         rules: [{
             test: /\.js$/,
             exclude: /node\_modules/,
             use: 'babel-loader'
         }]
     }
 }
Now, we run our package.json script as well:
"scripts": { "dev:build": "webpack -w", "dev": "cross-env NODE\_ENV=development node dist/index.bundle.js" }
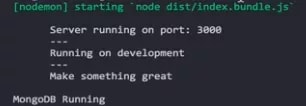
Finally, we can run our app:
To look at it graphically, here is the output when we run the build:
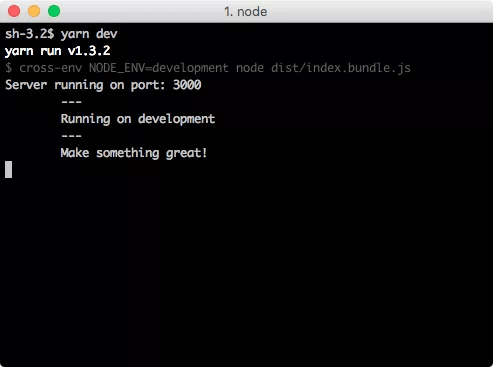
Note that we ran two commands above:
- The first command just built the application and prepared babel build
- The second command actually runs the request and you can see the output in the console
Now, we will finally install ES Lint as well:
yarn add -D eslint eslint-config-equimper
Now, make a new file called ‘.eslintrc’ and add the following content:
{ “extends” : “equimper” }
Once you do this, you will start to get warnings if you are not following correct ES standards. This tool is very helpful when you need to follow strict conventions for your project.
A premium training course to learn to build apps with Node.js, Express, MongoDB, and friends. Start Learning Now →
Next What we will be adding now?
In this section, we will be setting up more tools needed for the backend of this application:
- Add mongoose, body-parser, morgan, compression, helmet
- Setup config folder
- Setup constants
Adding Mongoose
To add mongoose and other mentioned modules to your application, run the following command:
yarn add mongoose body-parser compression helmet && yarn add -D morgan
This is to be noted that the order in which we specify the modules, they will be downloaded in the same order.
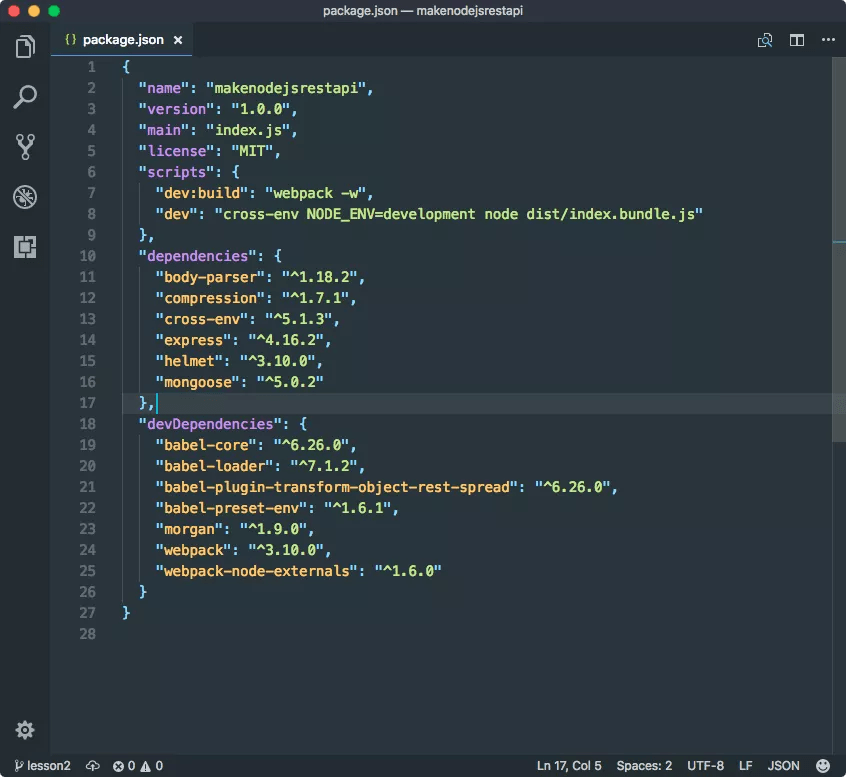
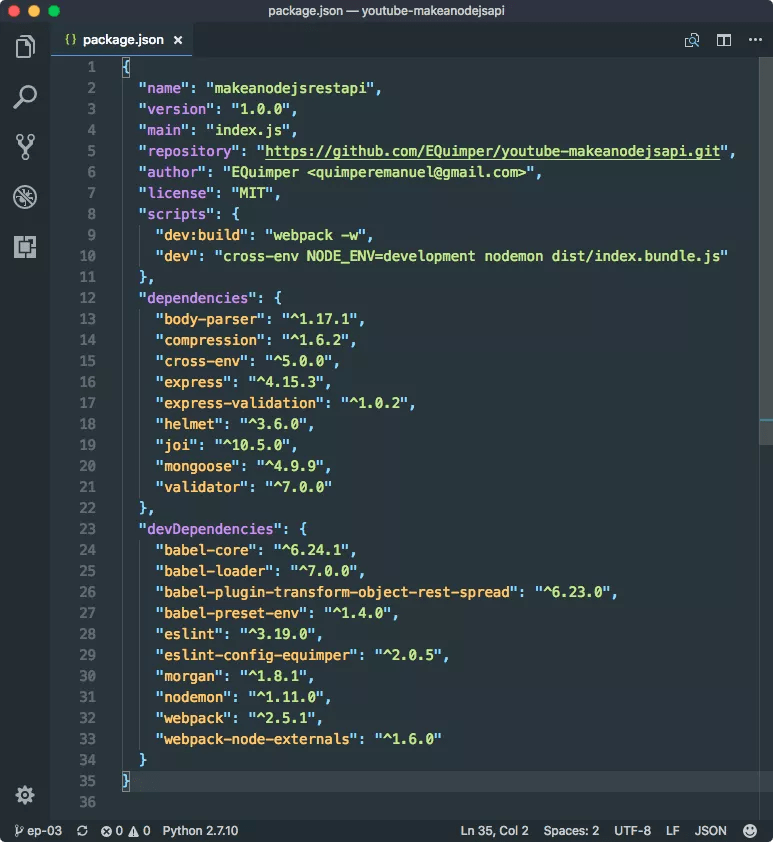
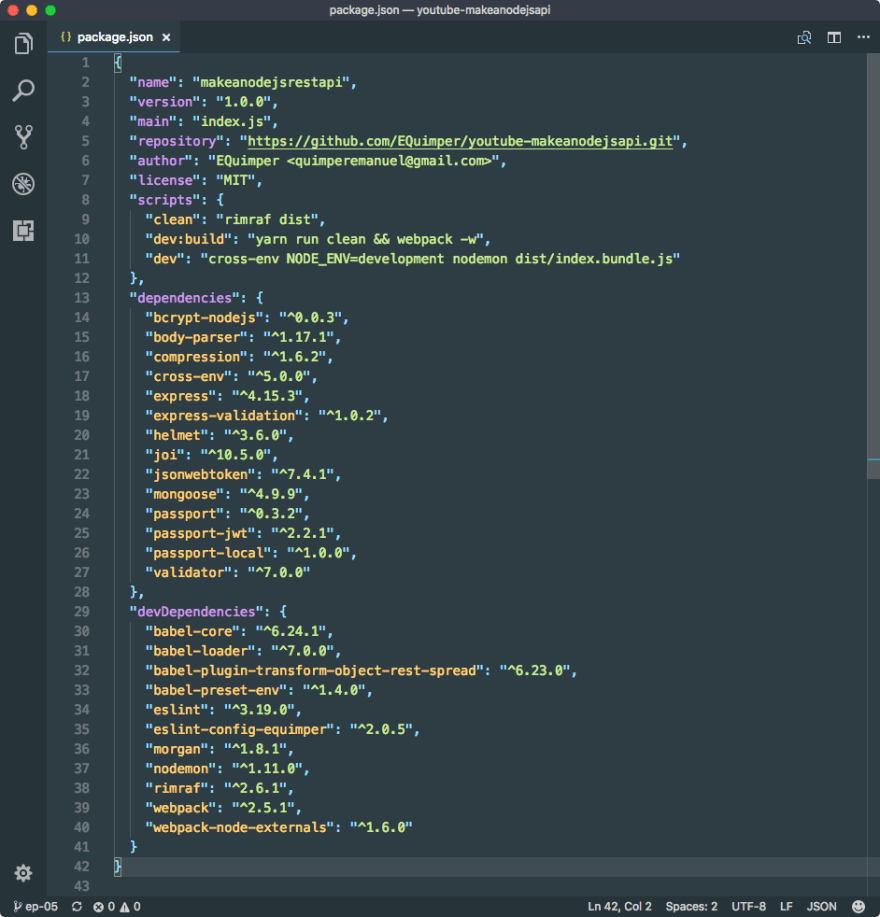
Just to make sure we are on the same track, here is how my package.json file looks like:
Now, we will compile our project again with this command:
yarn dev
Just make sure that the project is still running. Now, make a new config folder inside the src folder and make a file named as constants.js with following contents:
const devConfig = {};
const testConfig = {};
const prodConfig = {};
const defaultConfig = {

PORT: process.env.PORT || 3000,
};

function envConfig(env) {
     switch (env) {
         case 'development':
             return devConfig;
         case 'test':
             return testConfig;
         default:
             return prodConfig;
     }
 }

 //Take defaultConfig and make it a single object
 //So, we have concatenated two objects into one
 export default { ...defaultConfig,
     ...envConfig(process.env.NODE\_ENV),
 };
Now, moving back to the index.js file, we will add a dependency for this constants file and change references to PORT to use this file like:
import express from 'express';
import constants from './config/constants';
const app = express();
app.listen(constants.PORT, err => {
    if (err) {
        throw err;
    } else {
        console.log(`Server running on port: ${constants.PORT} --- Running on ${process.env.NODE_ENV} --- Make something great.!`)
    }
});
Now, make a new file named as database.js in config folder with the following contents:
import mongoose from 'mongoose';
 import constants from './constants';

 //Removes the warning with promises
 mongoose.Promise = global.Promise;

 //Connect the db with the url provided
 try {
     mongoose.connect(constants.MONGO\_URL)
 } catch (err) {
     mongoose.createConnection(constants.MONGO\_URL)
 }
 mongoose.connection.once('open', () => console.log('MongoDB Running')).on('error', e => {
     throw e;
 })
We also modified the config for mongoose connection in our constants.js file as:
const devConfig = { MONGO\_URL: 'mongodb://localhost/makeanodejsapi-dev', };
 const testConfig = { MONGO\_URL: 'mongodb://localhost/makeanodejsapi-test', };
 const prodConfig = { MONGO\_URL: 'mongodb://localhost/makeanodejsapi-prod', };
This will make sure that the database used is different when we run our application with different profiles and environments. You can go on and run this application again.
When you have a database running on the said port, you can successfully start using your application.
Designing the Middleware
Now, we will start making the middleware of the application.
In the config folder, make a new file and name it as middleware.js with the following content:
import morgan from 'morgan';
 import bodyParser from 'body-parser';
 import compression from 'compression';
 import helmet from 'helmet';
 import {
     isPrimitive
 } from 'util';
 const isDev = process.env.NODE\_ENV === 'development';
 const isProd = process.env.NODE\_ENV === 'production';
 export default app => {
     if (isProd) {
         app.use(compression());
         app.use(helmet());
     }
     app.use(bodyParser.json());
     app.use(bodyParser.urlencoded({
         extended: true
     }));
     if (isDev) {
         app.use(morgan('dev'));
     }
 };
To put this config to use, add the import to index file as well, like:
import express from 'express';
 import constants from './config/constants';
 import './config/database';
 import middlewareConfig from './config/middleware';
 const app = express(); //passing the app instance to middlewareConfig

 middlewareConfig(app);
 app.listen(constants.PORT, err => {
     if (err) {
         throw err;
     } else {
         console.log(`Server running on port: ${constants.PORT} --- Running on ${process.env.NODE_ENV} --- Make something great.!`)
     }
 });
Now, run your application and it should be serving a GET request on Port 3000!

Register User
In this section, we will use the MongoDB setup we did in the last lesson and build up an app from there allowing a user to register in our app. Just that you do not miss out, our latest package.json file looks like this:

In this section, we will step ahead by making functionality for allowing a user to register on our application. We will also be making the User model so that the data can be saved in the database.
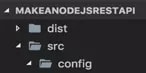
Once you are done with this section, you will have at least following file structure:
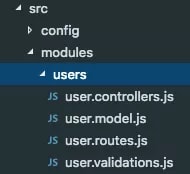
Just follow along with the lesson how this turns out!
Defining the model
We will start by making our User model. To do this, create a new file at src > modules > users and name it as user.model.js with the following content:
import mongoose, {
     Schema
 } from 'mongoose';
 import validator from 'validator';
 import {
     passwordReg
 } from './user.validations';
 const UserSchema = new Schema({
     email: {
         type: String,
         unique: true,
         required: [true, 'Email is required!'],
         trim: true,
         validate: {
             validator(email) {
                 return validator.isEmail(email);
             },
             message: '{VALUE} is not a valid email!',
         },
     },
     firstName: {
         type: String,
         required: [true, 'FirstName is required!'],
         trim: true,
     },
     lastName: {
         type: String,
         required: [true, 'LastName is required!'],
         trim: true,
     },
     userName: {
         type: String,
         required: [true, 'UserName is required!'],
         trim: true,
         unique: true,
     },
     password: {
         type: String,
         required: [true, 'Password is required!'],
         trim: true,
         minlength: [6, 'Password need to be longer!'],
         validate: {
             validator(password) {
                 return passwordReg.test(password);
             },
             message: '{VALUE} is not a valid password!',
         },
     },
 });
 export default mongoose.model('User', UserSchema);
We just defined the schema of our User model with various properties like:
- Defined properties for a user
- Also provided the meta-information about the properties of their types, their uniqueness and how this data should be validated
- Note how we provided a validation function as well. This makes things very easy when we are inserting the data into the Mongo collections
Defining the Controller
Now, we will put the User model to use by using it in the Controller definition. Create a new file at src > modules > users and name it as user.controllers.js with the following content:
import User from './user.model';
 export async function signUp(req, res) {
     try {
         const user = await User.create(req.body);
         return res.status(201).json(user);
     } catch (e) {
         return res.status(500).json(e);
     }
 }
We just defined a signUp function with a request and response object as parameters and created it using the User model we just defined above.
We also returned an appropriate response along with their codes so that user can be notified if the transaction was successful.
Defining application routes
We will define for routes for our application where we can specify the mapping where a User must visit to see the application we made. Create a new file at src > modules > users and name it as user.routes.js with the following content:
import {
     Router
 } from 'express';
 import \* as userController from './user.controllers';
 const routes = new Router();
 routes.post('/signup', userController.signUp);
 export default routes;
Note that this will not work. We must define module index.js inside the modules folder with the following content:
import userRoutes from './users/user.routes';
 export default app => {
     app.use('/api/v1/users', userRoutes);
 };
Now we can run our application which will be the actual first version of our app. Just that we need to make final changes to our root index.js file now:

Here is the updated content:
/\* eslint-disable no-console \*/
 import express from 'express';
 import constants from './config/constants';
 import './config/database';
 import middlewaresConfig from './config/middlewares';
 import apiRoutes from './modules';
 const app = express();
 middlewaresConfig(app);
 app.get('/', (req, res) => {
     res.send('Hello world!');
 });
 apiRoutes(app);
 app.listen(constants.PORT, err => {
     if (err) {
         throw err;
     } else {
         console.log(` Server running on port: ${constants.PORT} --- Running on ${process.env.NODE_ENV} --- Make something great `);
     }
 });
Now when we run the app, we can still see that our app is running:
Postman is useful for API Testing to take this course to help your understand how they're useful
A premium training course to learn to build apps with Node.js, Express, MongoDB, and friends. Start Learning Now →
Using MongoDB and Postman
We will now be using two tools which are necessary:
- Robomongo: Download it here. It is an awesome tool to visualize Mongo data and query with it. It’s free as well! This is available for all OS platforms.
- Postman: Download it here. It is a tool to hit APIs and get a response back. It has great visualization features and you can save request format too which saves you a lot of time. Again, it’s free! This is available for all OS platforms.
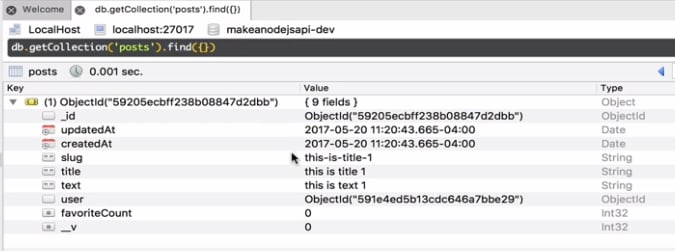
When you open Robomongo and connect to your local MongoDB instance, you can see the DB present for our already:

We already have a collection ready which was made by our app, it will look like:
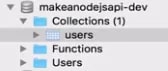
This will be empty right now as we haven’t created any data as of now. We will be doing this really soon!
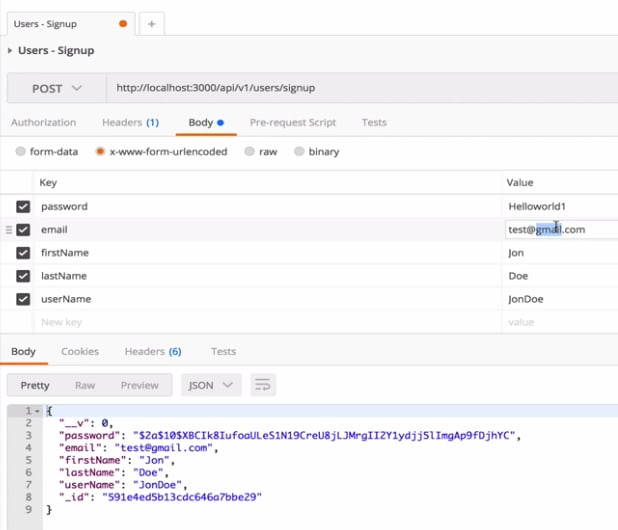
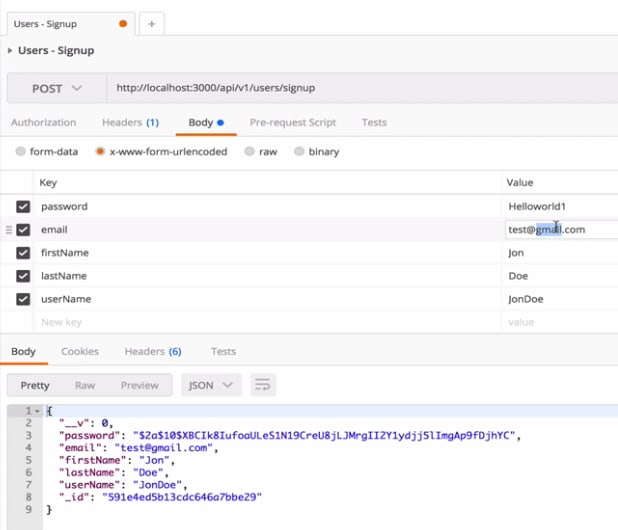
Trying the User Registration
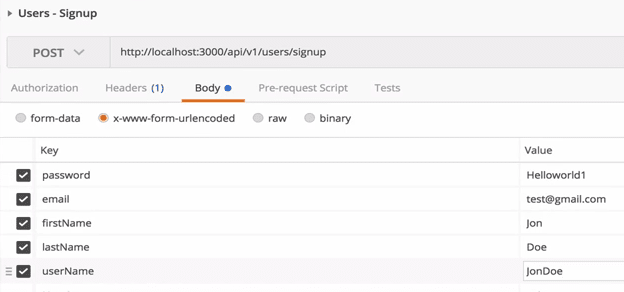
Let’s open postman now. We will hit an API with this URL:
http://localhost:3000/api/v1/users/signup
In postman, it will look something like:

Before hitting this API, we will try a Hello World version. See what happens in this API:
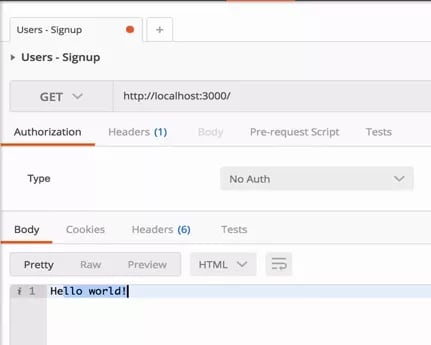
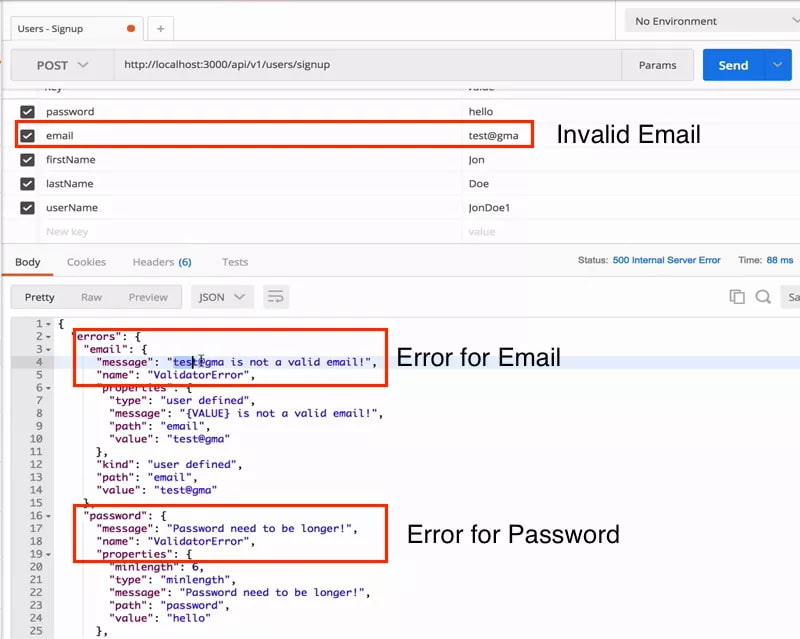
Now, back to the registration API. Before doing a successful hit, we will try to provide invalid values and see what errors we face. In case of an invalid email, here is the result:
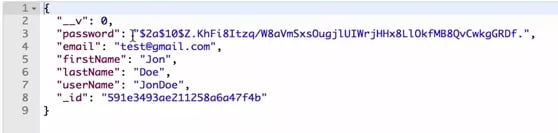
Now, we will try with correct data as well. Let’s try it!

Well, the story isn’t over yet. We can also see the data being inserted into the MongoDB database now:

Excellent!
Adding more validations
Though we already added some validations in the User model, what if we want to keep in another file too! To do this, create a new file at src > modules > users and name it as user.validations.js with the following content:
import Joi from 'joi';
 export const passwordReg = /(?=.\*\d)(?=.\*[a-z])(?=.\*[A-Z]).{6,}/;
 export default {
     signup: {
         email: Joi.string().email().required(),
         password: Joi.string().regex(passwordReg).required(),
         firstName: Joi.string().required(),
         lastName: Joi.string().required(),
         userName: Joi.string().required(),
     },
 };
Next, add this validation in the router file as well:
import {
       Router
   } from 'express';
   import validate from 'express-validation';
   import \* as userController from './user.controllers';
   import userValidation from './user.validations';
   const routes = new Router();
   routes.post('/signup', validate(userValidation.signup), userController.signUp);
   export default routes;
Notice that:
- We added an import for validations from express
- We also passed a new function for user validation for sign up
Now when we try a user to register with the same credentials, we get an error:
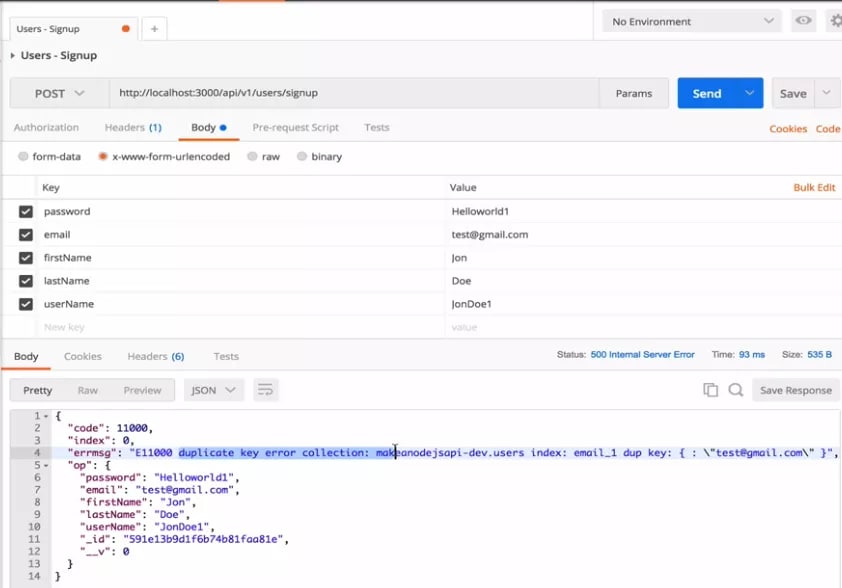
This was not actually because of the validation but because we are trying to insert another user with the same email. Let’s try something different:
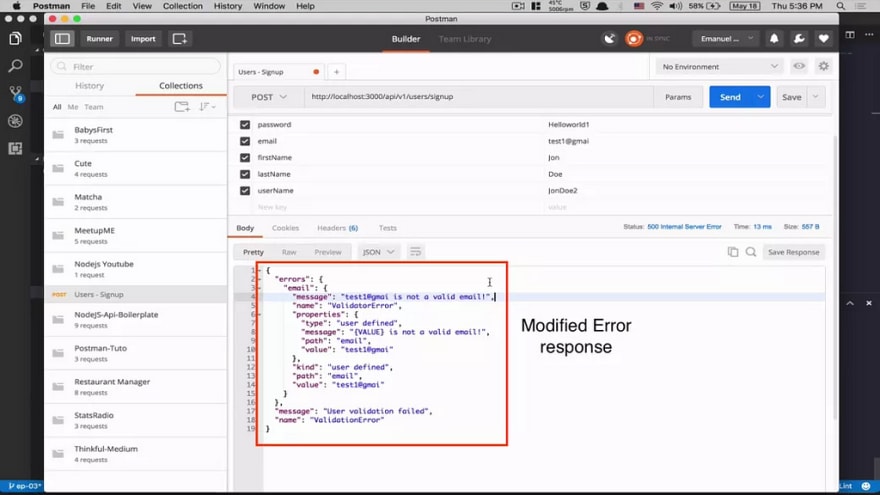
Now, we can correct this and see the data appearing in MongoDB database:
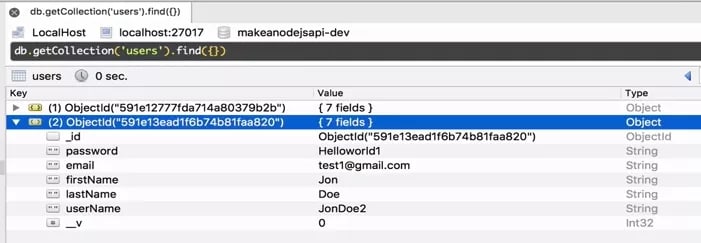
Excellent! We were able to add powerful validations to our project.
Password Encryption and User Login
We will be working more with our User. In our last lesson, we were able to save a new User. The main issue with this approach was that the password of the User was saved as plain text. This will be one of the changes we will be making in our app now.
Just that you do not miss out, our latest package.jsonfile looks like this:
In this lesson, we will step ahead by making functionality for encrypting a User’s password. Apart from this, we will also be making changes like:
- Add rimraf and clean dist on webpack build
- Encrypt the user’s password
- Create the local strategy with passport
- Allow user login
Adding rimraf dependency
We will start by adding rimraf dependency in our project by using the following command:
yarn add -D rimraf
Just to build your project again, run the following command:
yarn
Now, let’s add rimraf to our package.json file as well:
“scripts”: {
 “clean”: “rimraf dist”,
 “dev:build”: “yarn run clean && webpack -w”,
 “dev”: “cross-env NODE\_ENV=development nodemon dist/index.bundle.js”
}
Now, run the following command:
yarn dev:build
When you run this command, the dist folder will be refreshed and come back once the build process is complete:
Library to encrypt a password
Now, we will be adding a library to our project so that we can encrypt a user’s password before it is saved to the database. This way, we can ensure that it is safe even if a database is hacked.
Run the following command:
yarn add bcrypt-nodejs
This way, the library will be added to our project.
Modifying the model
Now, we will have to modify our model so that an encrypted password can be set in it when a plain-text password comes in the request. Add the following in user.model.js
UserSchema.pre('save', function(next) {
     if (this.isModified('password')) {
         this.password = this.\_hashPassword(this.password);
     }
     return next();
 });
 UserSchema.methods = {
     \_hashPassword(password) {
         return hashSync(password);
     },
     authenticateUser(password) {
         return compareSync(password, this.password);
     },
 };
In the above code, this refers to our current user mentioned by the request. Also, the authenticateUser is called as soon as we try logging in and a password which is a plain-text is passed by the user. we hash this password and only after that we will compare it to the value in our Database.
Now, let’s try to make a new request and check if this works. Here is my request:
When I run this request, this is the response we get back:
Let’s check out the database now, we will see a similar scene there too:

Now, we will be a login API for our application.
Using Passport for Login
We will be using a library known as Passport. You are free to use any other authentication library like Facebook, Google etc.
To continue we need to add two libraries to our project. Lets’ do this by running the following command:
yarn add passport passport-local
Once this is done, let’s create a new folder inside the src folder known as services. We will be creating a new file named as auth.services.js inside the services folder with the following content:
import passport from 'passport';
 import LocalStrategy from 'passport-local';
 import User from '../modules/users/user.model';
 const localOpts = {
     usernameField: 'email',
 };
 const localStrategy = new LocalStrategy(localOpts, async (email, password, done) => {
     try {
         const user = await User.findOne({
             email
         });
         if (!user) {
             return done(null, false);
         } else if (!user.authenticateUser(password)) {
             return done(null, false);
         }
         return done(null, user);
     } catch (e) {
         return done(e, false);
     }
 });
 passport.use(localStrategy);
 export const authLocal = passport.authenticate('local', {
     session: false
 });
Here, we tried a local strategy which will be async in nature and data is sent to the passport library as our user’s email and password. The library will then authenticate the user and will return the response.
We will add Passport as our middleware as well. Here is the modified file:
import morgan from 'morgan';
 import bodyParser from 'body-parser';
 import compression from 'compression';
 import helmet from 'helmet';
 import passport from 'passport';

 const isDev = process.env.NODE\_ENV === 'development';
 const isProd = process.env.NODE\_ENV === 'production';

 export default app => {
     if (isProd) {
         app.use(compression());
         app.use(helmet());
     }
     app.use(bodyParser.json());

     app.use(bodyParser.urlencoded({
         extended: true
     }));
     app.use(passport.initialize());

     if (isDev) {
         app.use(morgan('dev'));
     }
 };
Here, we initialized the Passport library with our app instance as well.
Adding Login to Controller
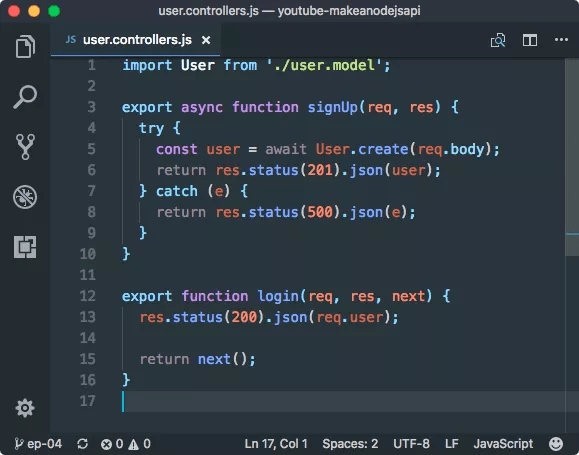
It is time that we add the login functionality to our Controller layer as well. Add the following function to our Controller:
export function login(req, res, next) {
 res.status(200).json(req.user);
 return next();
}
Note that this is how our final Controller file looks like:
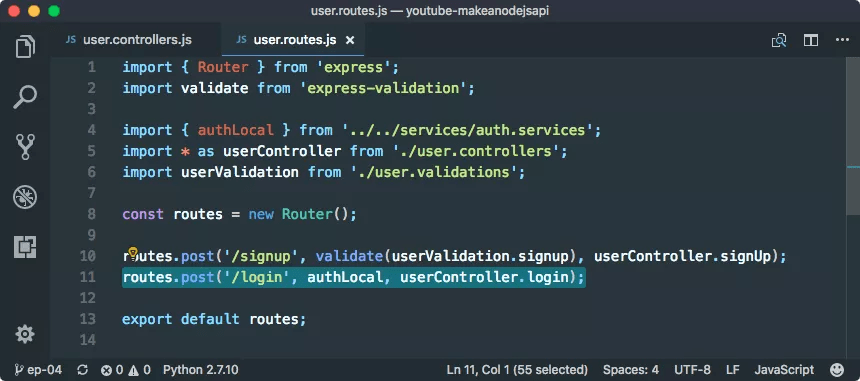
Providing Route for login
We will have to provide a route to login API as well. We will be making this change in user.routes.jsfile. Add this route to the file along with the import:
import {
 authLocal
} from ‘../../services/auth.services’;

routes.post(‘/login’, authLocal, userController.login);
Here is how our final file looks like:
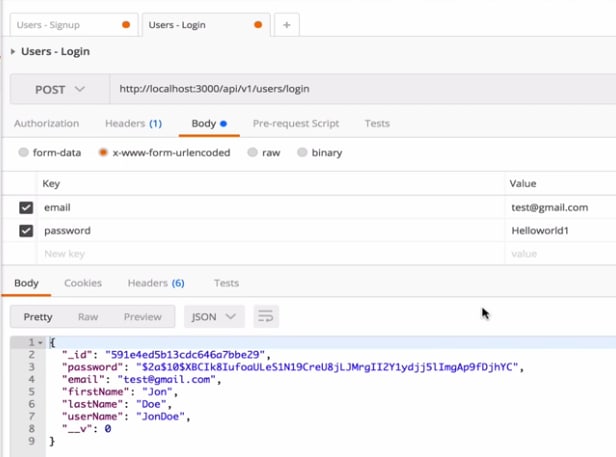
Trying the Login functionality
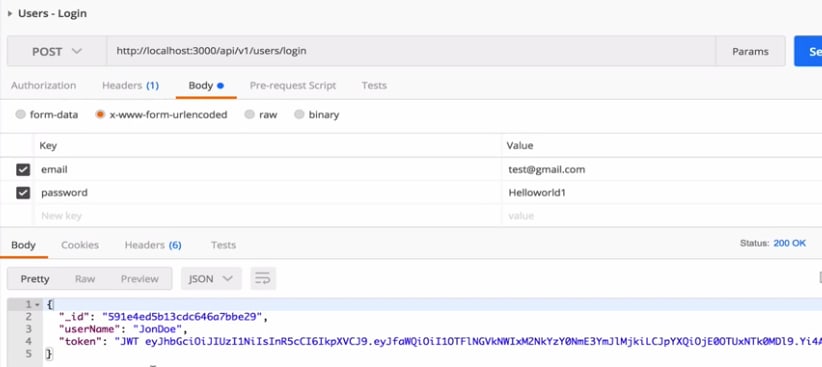
We will try the following POST API now with the credentials we previously created:
http://localhost:3000/api/v1/users/login
When the credentials are correct, this is what happens:
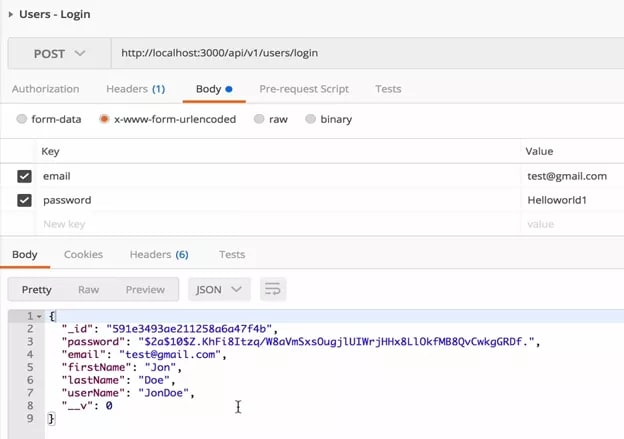
Isn’t that excellent? We were able to login to an existing user, and we were also able to protect his password by encrypting it.
Adding JWT Authentication
Till now, we are able to register a new user in our application:

We are also able to allow a user to login into our application:

Before knowing what we will be making in this post, let’s finally see how our current _package.json_file looks:
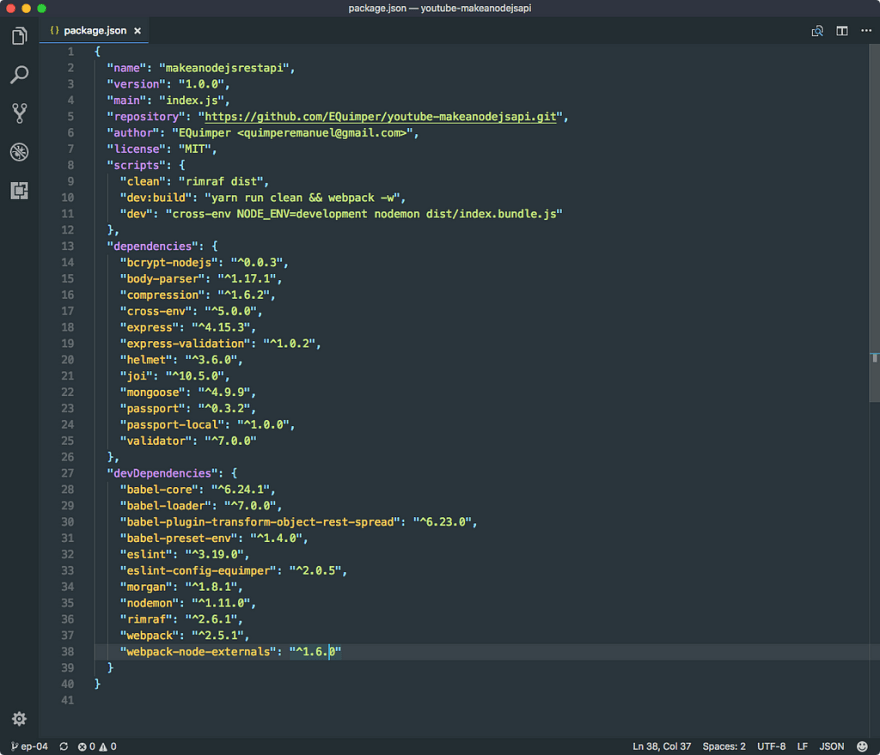
In this section, we will be adding the following functionalities:
- We will implement JWT authentication and add a secret password
- Add the new passport-jwt library
- Add JSON web token library
- Sending only required fields as a response in JSON
How does JSON web token stores data?
When we provide data to encrypt along with a secret password, it is encrypted to form various parts of a JWT token, such as:
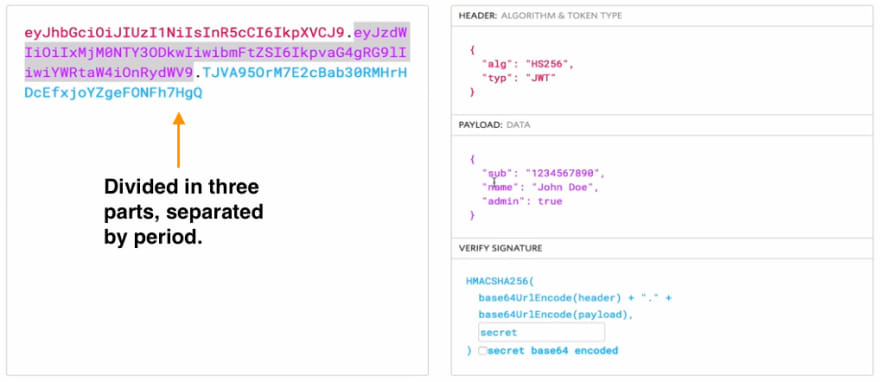
As shown above, a single token can contain a users identity and other data associated with him.
Adding JWT secret
Let’s move on to our _constants.js_file and add a JWT secret here in dev config present already:
const devConfig = {
 MONGO\_URL: ‘mongodb://localhost/makeanodejsapi-dev’,
 JWT\_SECRET: ‘thisisasecret’,
};
Next, we will be installing two libraries by using the following command:
yarn add jsonwebtoken passport-jwt
Now, move to the auth services file and JWT service in the file with this line:
import { Strategy as JWTStrategy, ExtractJwt } from ‘passport-jwt’;

import User from ‘../modules/users/user.model’;
import constants from ‘../config/constants’;
Next, let passport use the specified strategy:
// Jwt strategy
 const jwtOpts = {
   jwtFromRequest: ExtractJwt.fromAuthHeader('authorization'),
   secretOrKey: constants.JWT\_SECRET,
 };

 const jwtStrategy = new JWTStrategy(jwtOpts, async (payload, done) => {
   try {
     //Identify user by ID
     const user = await User.findById(payload.\_id);

     if (!user) {
       return done(null, false);
     }
     return done(null, user);
   } catch (e) {
     return done(e, false);
   }
 });

 passport.use(localStrategy);
 passport.use(jwtStrategy);

 export const authLocal = passport.authenticate('local', { session: false });
 export const authJwt = passport.authenticate('jwt', { session: false });
To test if this works, we will now use a private route in our route JS file. The final file content will look like:
import userRoutes from ‘./users/user.routes’;
import { authJwt } from ‘../services/auth.services’;
export default app => {
app.use(‘/api/v1/users’, userRoutes);
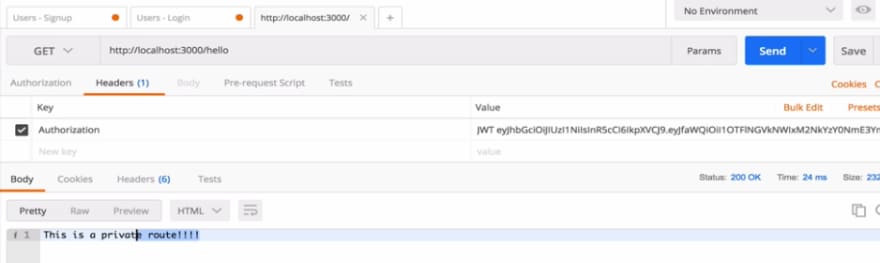
app.get(‘/hello’, authJwt, (req, res) => {
res.send(‘This is a private route!!!!’);
});
};
Verifying JWT
Let’s try this and verify that JWT is working in Postman now:

We need to add a JWT token in a request now which belongs to a particular user only.
We will add functionality to the User model so that it contains the JWT token as well when a user logs in. So, let’s add more libraries to User model JS file:
import jwt from ‘jsonwebtoken’;
import constants from ‘../../config/constants’;
Now, we can decrypt a token and get user information.
Creating a JWT Token
We will also have to create a method which creates a token for the user. Let’s add this method now:
UserSchema.methods = {

     createToken() {
       return jwt.sign(
         {
           \_id: this.\_id,
         },
         constants.JWT\_SECRET,
       );
     },
     toJSON() {
       return {
         \_id: this.\_id,
         userName: this.userName,
         token: `JWT ${this.createToken()}`,
       };
     },
   };
Using the toJSON() method is important as well. We appended JWT in front of a token as a passport library uses it to identify the JWT token.
Now, let’s try logging a user again:
This time, we even got a JWT token in response. This token will contain the user ID and username as well. We have a working example for JWT now!
Let’s copy the JWT value and try the private route now:
Making a Post by User and Object Association
next, we are able to register a new user in our application:

We are also able to allow a user to login into our application:

Before knowing what we will be making in this post, let’s finally see how our current package.json file looks:
In this section, we will be adding the following functionalities:
- We will create a new resource for a Post. Now, a User can create a Post as well
- Make the User as the Post’s author
- Work on some issues which we created in past posts
Creating Model for Post
Just what we did for the User model, it needs to be done for Post model as well like creating a new folder. By the end of this lesson, you will following the new folder and files in your project:

We will start by creating the Post model. We will also include the validations we need. Let’s add another library for mongoose unique validation:
yarn add mongoose-unique-validator
We will also add a new Slug library. To do this, install it using the following command:
yarn add slug
If you’re wondering what is slugify, a post’s URL should look like the title of the post. This looks good and the glimpse of the post is also visible in its URL which is a good procedure.
Now, we can add this library as well. Our model will look like the following:
import mongoose, { Schema } from 'mongoose';
   import slug from 'slug';
   import uniqueValidator from 'mongoose-unique-validator';

   const PostSchema = new Schema({
     title: {
       type: String,
       trim: true,
       required: [true, 'Title is required!'],
       minlength: [3, 'Title need to be longer!'],
       unique: true,
     },
     text: {
       type: String,
       trim: true,
       required: [true, 'Text is required!'],
       minlength: [10, 'Text need to be longer!'],
     },
     slug: {
       type: String,
       trim: true,
       lowercase: true,
     },
     user: {
       type: Schema.Types.ObjectId,
       ref: 'User',
     },
     favoriteCount: {
       type: Number,
       default: 0,
     },
   }, { timestamps: true });

   PostSchema.plugin(uniqueValidator, {
     message: '{VALUE} already taken!',
   });

   PostSchema.pre('validate', function (next) {
     this.\_slugify();

     next();
   });

   PostSchema.methods = {
     \_slugify() {
       this.slug = slug(this.title);
     },
   };

   PostSchema.statics = {
     createPost(args, user) {
       return this.create({
         ...args,
         user,
       });
     },
   };

   export default mongoose.model('Post', PostSchema);
We did the following in the above model:
- Defined fields for the Post model
- Added validation against each field
- Added validation for overall Post object
- We slugify the post by its title and we save that value as well
In the code shown above, we will be adding the createPost method next in our controller.
Creating Post Controller
We will now be needing a Controller so that a user should actually be able to do the operations related to a Post.
Based on the directory structure shown above, define a new file post.controller.js file in post module itself with the following content:
import Post from './post.model';

 export async function createPost(req, res) {
   try {
     const post = await Post.createPost(req.body, req.user.\_id);
     return res.status(201).json(post);
   } catch (e) {
     return res.status(400).json(e);
   }
 }
We return an appropriate response when we face an error or we were successfully able to create a new post.
Creating Post Route
Let’s create the route to the Post Controller in our app now in the file named post.route.js file under posts module with the following content:
import { Router } from 'express';

 import \* as postController from './post.controllers';
 import { authJwt } from '../../services/auth.services';

 const routes = new Router();

 routes.post(
   '/',
   authJwt,
 );

 export default routes;
Let’s modify the index.jsfile for this as well. The final content will be:
import userRoutes from ‘./users/user.routes’;
import postRoutes from ‘./posts/post.routes’;

export default app => {
 app.use(‘/api/v1/users’, userRoutes);
 app.use(‘/api/v1/posts’, postRoutes);
};
Verifying the posts API
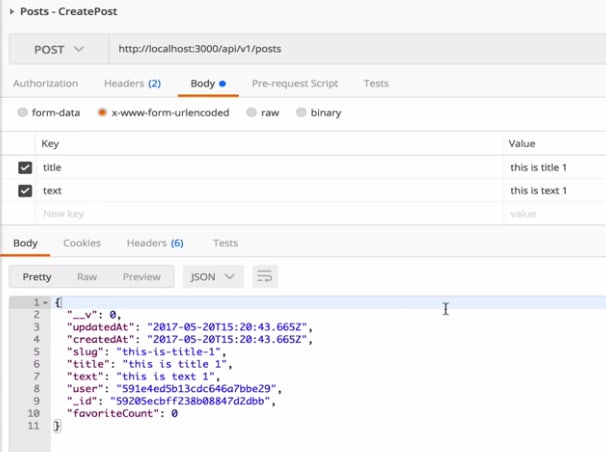
We will now try the POST API to create a new post.
To start, try login a user so that you get a JWT token to hit the Create Post API on this URL:
http://localhost:3000/api/v1/posts
Here is what we tried and the response:

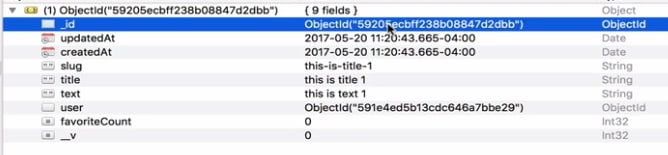
We have populated date and slug fields as well. This also contains the user ID. Let’s see this post in MongoDB as well:
If we again hit this API to create the post, it will fail as a title is already taken:
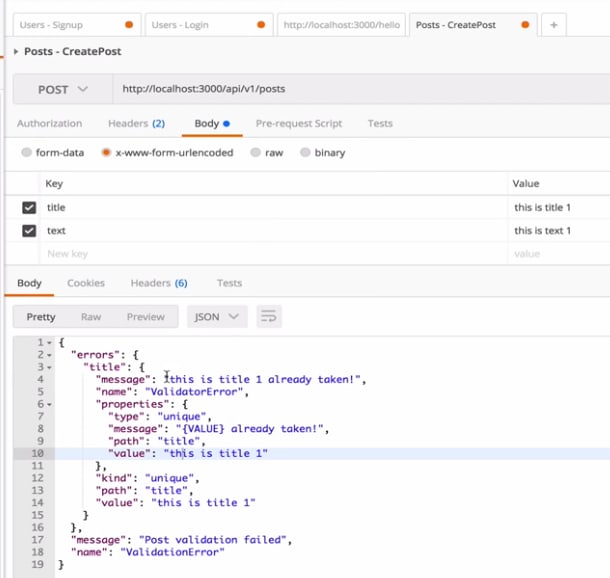
This means that our validation is working fine as well.
Making the title as compulsory
We can implement more validations like making the title for a post as compulsory.
Let’s create a new file named as post.validations.js in posts module with the following content:
import Joi from 'joi';

   export const passwordReg = /(?=.\*\d)(?=.\*[a-z])(?=.\*[A-Z]).{6,}/;
   export default {
     signup: {
       body: {
         email: Joi.string().email().required(),
         password: Joi.string().regex(passwordReg).required(),
         firstName: Joi.string().required(),
         lastName: Joi.string().required(),
         userName: Joi.string().required(),
       },
     },
   };
We will have to modify the routes file as well to include this validation. Here is the modified file:
import { Router } from 'express';
 import validate from 'express-validation';
 import \* as postController from './post.controllers';
 import { authJwt } from '../../services/auth.services';
 import postValidation from './post.validations';

 const routes = new Router();
 routes.post(
   '/',
   authJwt,
   validate(postValidation.createPost),
   postController.createPost,
 );

 export default routes;
We were able to get the user ID from the authJwtobject we use above. The message we now receive is:

We will be changing the response soon to be more graceful.
Getting Data by ID and populating an object in another
next, we are able to register a new user in our application:

We are also able to allow a user to login into our application:

We were also able to create a post related to a user as well:

In this section, we will be adding the following functionalities:
- We will get a post by its ID
- We will also create Controllers and route
- We will show you how to populate the user information in a post
- Other libraries we will use
A premium training course to learn to build apps with Node.js, Express, MongoDB, and friends. Start Learning Now →
Adding HTTP status library to Controller
To add this library, run the following command:
yarn add http-status
Now, we can use this library in our User Controller as well. Let’s start by importing this library:
import HTTPStatus from ‘http-status’;
Next, instead of using status like 200 etc. in our Controller, we will modify status provided by this library as:
export async function signUp(req, res) {
     try {
       const user = await User.create(req.body);
       return res.status(HTTPStatus.CREATED).json(user.toAuthJSON());
     } catch (e) {
       return res.status(HTTPStatus.BAD\_REQUEST).json(e);
     }
   }

   export function login(req, res, next) {
       res.status(HTTPStatus.OK).json(req.user.toAuthJSON());
     return next();
   }
We will do the same in the Post Controller as well:
import HTTPStatus from 'http-status';
   import Post from './post.model';

   export async function createPost(req, res) {
     try {
       const post = await Post.createPost(req.body, req.user.\_id);
         return res.status(HTTPStatus.CREATED).json(post);
     } catch (e) {
       return res.status(HTTPStatus.BAD\_REQUEST).json(e);
     }
   }
Getting Post by ID
We will define a new function in the Post Controller for Getting a Post by ID:
export async function getPostById(req, res) {
   try {
     const post = await Post.findById(req.params.id);
     return res.status(HTTPStatus.OK).json(post);
   } catch (e) {
     return res.status(HTTPStatus.BAD\_REQUEST).json(e);
   }
 }
Let’s move to define the route for this function:
routes.get(‘/:id’, postController.getPostById);
As we have the following Post in our Mongo Database:
We will get this post via our API:
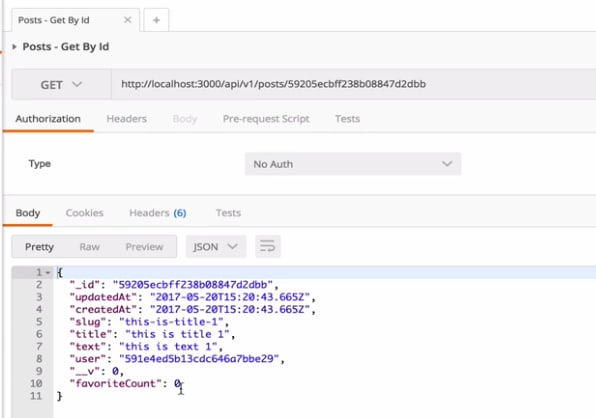
The problem with this response is that we got back all the fields which were present in MongoDB as well. We do not want this. Let’s change this in the Post model:
PostSchema.methods = {
   \_slugify() {
     this.slug = slug(this.title);
   },
   toJSON() {
     return {
       \_id: this.\_id,
       title: this.title,
       text: this.text,
       createdAt: this.createdAt,
       slug: this.slug,
       user: this.user,
       favoriteCount: this.favoriteCount,
     };
   },
 };
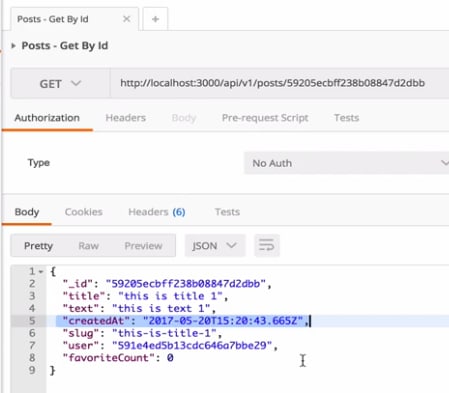
Once we have applied the toJSON()function in our model, this is the response we get back now:
Getting User data in Post response
If we see the above JSONclosely, we actually have the user field which holds its ID. But what if we also want its info in the same object?
Just modify the getPostById function slightly and modify this post const in the function as:
const post = await Post.findById(req.params.id).populate(‘user’);
We just added a populate call and the response will now be:
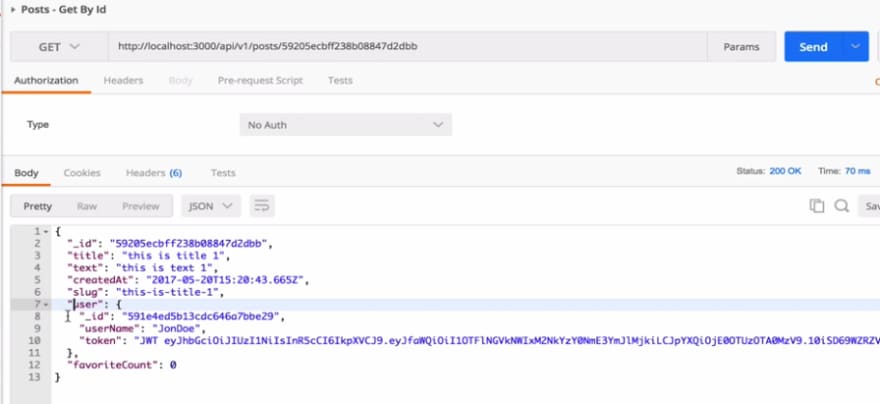
toJSONwill also work when we populate the user object. This is an issue here as we also got back the token field above which should never happen!
Let’s modify the user model to improve this:
UserSchema.methods = {
   \_hashPassword(password) {
     ...
   },
   authenticateUser(password) {
     ...
   },
   createToken() {
     ...
   },
   toAuthJSON() {
     ...
   },
   toJSON() {
     return {
       \_id: this.\_id,
       userName: this.userName,
     };
   },
We modified the toJSONmethod above so token field is not included in the response itself.
The issue is still present actually. Let’s see what happens when I try logging a user in:
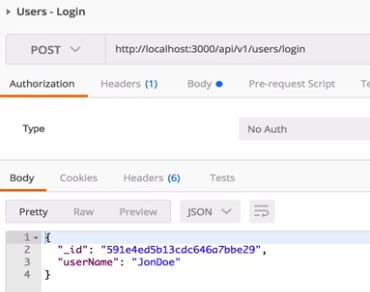
See, no token field is present here as well. To resolve this, go to the login function in User controllerand modify as follows:
export function login(req, res, next) {
 res.status(HTTPStatus.OK).json(req.user.toAuthJSON());
 return next();
}
Now, I have used the toAuthJSONfunction itself. If you try now, login will work like before!
Getting All data from Database
next, we are able to register a new user in our application:

We are also able to allow a user to login into our application:

We were also able to create a post related to a user as well:

In this section, we will be adding the following functionalities:
- Work on Post Controller to add more functionality
Extending Controller
Till now, we only have the following functionality in our Post Controller:
- Create a post
- Get Post By ID
Now, we will also add more functionality and we will start by getting all the posts in a list.
Getting all posts
Let’s extend the functionality in our Post Controller by adding a new method to get all posts:
export async function getPostsList(req, res) {
     try {
       const posts = await Post.find().populate('user');
       return res.status(HTTPStatus.OK).json(posts);
     } catch (e) {
       return res.status(HTTPStatus.BAD\_REQUEST).json(e);
     }
   }
Here, we returned the posts. Let’s modify the route file to use this function we added above:
routes.get(‘/’, postController.getPostsList);
We haven’t added this in authentication in this to enable even an unauthenticated user to allow him to at least the posts. Let’s try this API now:
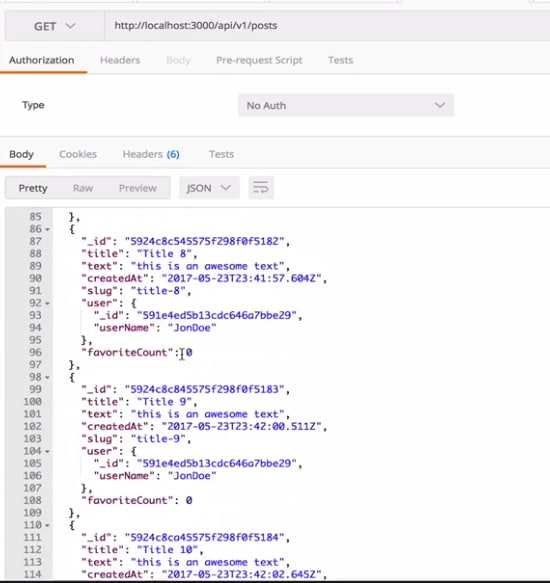
Right now, we have 11 posts in Database and so, above API shows no problem. But what happens when there are more than 50,000 posts? We wil have serious performance issues in such cases.
Pagination to the rescue
We can return a limited number of posts based on user request. In postmodel, we can provide pagination parameters like:
PostSchema.statics = {
     createPost(args, user) {
       ...
     },
     list({ skip = 0, limit = 5 } = {}) {
       return this.find()
         .sort({ createdAt: -1 })
         .skip(skip)
         .limit(limit)
         .populate('user');
     },
   };
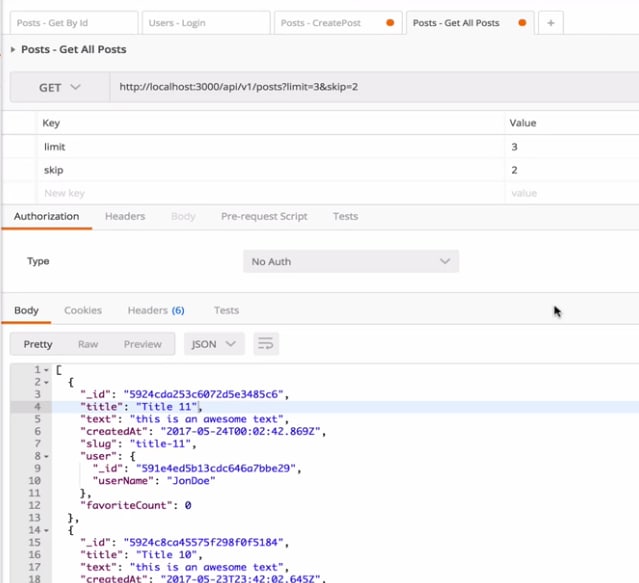
What list does is, it returns only 1st 5 posts initially. If skip is 5, list function will return 5 posts but after it has skipped 1st 5 posts. Let’s modify the Controller as well:
export async function getPostsList(req, res) {
   const limit = parseInt(req.query.limit, 0);
   const skip = parseInt(req.query.skip, 0);
   try {
     const posts = await Post.list({ limit, skip });
     return res.status(HTTPStatus.OK).json(posts);
   } catch (e) {
     return res.status(HTTPStatus.BAD\_REQUEST).json(e);
   }
 }
Now when we provide these values, we get this response:
Updating a Post and Adding Validations
next, we are able to register a new user in our application:
We are also able to allow a user to login into our application:

We were also able to create a post related to a user as well:

In this lesson, we will be adding the following functionalities:
- We will update a post and make sure that the user who is updating the post is its author
- Create a validation field
We will add more operations on a post in the coming lessons.
A premium training course to learn to build apps with Node.js, Express, MongoDB, and friends. Start Learning Now →
Extending Controller
Till now, we only have the following functionality in our Post Controller:
- Create a pos
- Get Post By ID
- Get a list of all Posts
Now, we will also add more functionality and we will start by allowing a user to update a post.
Updating a Post
Let’s extend the functionality in our Post Controller by adding a new method to update a post:
export async function updatePost(req, res) {
     try {
       const post = await Post.findById(req.params.id);
       if (!post.user.equals(req.user.\_id)) {
         return res.sendStatus(HTTPStatus.UNAUTHORIZED);
       }

       Object.keys(req.body).forEach(key => {
         post[key] = req.body[key];
       });

       return res.status(HTTPStatus.OK).json(await post.save());
     } catch (e) {
       return res.status(HTTPStatus.BAD\_REQUEST).json(e);
     }
   }
This is what we did above:
- Confirm from JWT token if the user is same as user present in Post object
- We return an UNAUTHORIZEDresponse if a user is not the same
- If a user is same, we get each key passed in a request and update the post based on that
- Once all updates are done, we return the OK response
Let’s modify the validations file to use this function we added above:
import Joi from 'joi';

   export default {
     createPost: {
       body: {
         title: Joi.string().min(3).required(),
         text: Joi.string().min(10).required(),
       },
     },
     updatePost: {
       body: {
         title: Joi.string().min(3),
         text: Joi.string().min(10),
       },
     },
   };
We just added validations in updatePost function for a minimum length of two fields. Time for route file now:
routes.patch(
   '/:id',
   authJwt,
   validate(postValidation.updatePost),
   postController.updatePost,
 );
Updating a Post
Now that the work is done now, we will verify the work we did above. Let’s make a PATCHrequest from Postman like this:
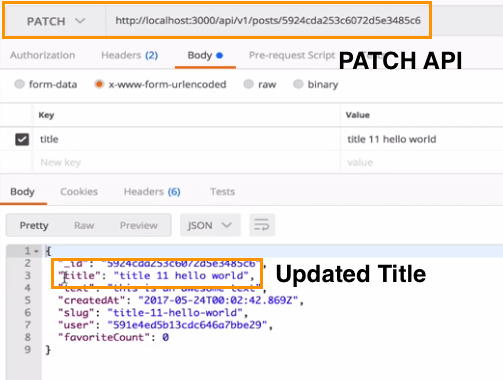
Excellent, it worked! Even the slug for the post was updated. Just make sure we have this method in a model for Post:
PostSchema.pre(‘validate’, function (next) {
 this.\_slugify();
 next();
});
Go on and try the same with Post text as well.
Deleting a Post by Authorized User
Till now, we are able to register a new user in our application:
We are also able to allow a user to login into our application:
We were able to create a post related to a user:

In this lesson, we will be adding the following functionalities:
- We will allow an author to delete a post
- Authorization functionality
- Add a tool called prettie
Extending Controller
Till now, we only have the following functionality in our Post Controller:
- Create a post
- Get Post By ID
- Get list of all Posts
- Update Posts
Now, we will also add more functionality and we will start by allowing a user to delete a post.
Deleting a Post
Let’s extend the functionality in our Post Controller by adding a new method to delete a post:
export async function deletePost(req, res) {
     try {
         const post = await Post.findById(req.params.id);

       if (!post.user.equals(req.user.\_id)) {
         return res.sendStatus(HTTPStatus.UNAUTHORIZED);
       }

       await post.remove();
       return res.sendStatus(HTTPStatus.OK);
     } catch (e) {
       return res.status(HTTPStatus.BAD\_REQUEST).json(e);
     }
   }
This is what we did above:
- Confirm from JWT token if the user is same as user present in Post object
- We return an UNAUTHORIZED response if the user is not the same
- If the user is same, we remove the post
- Once Post is deleted, we return the OK response
Time for route file now:
routes.delete(‘/:id’, authJwt, postController.deletePost);
Deleting a Post
Now that the work is done now, we will verify the work we did above. Let’s make a DELETErequest from Postman like this:
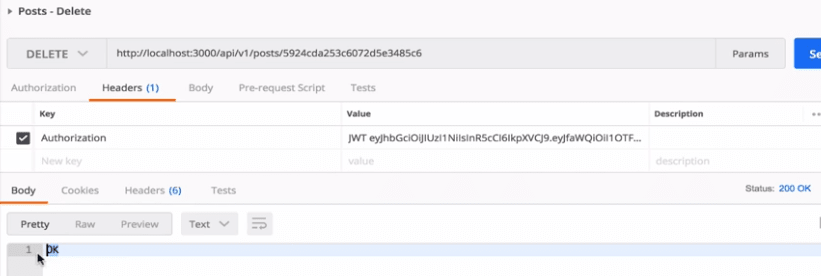
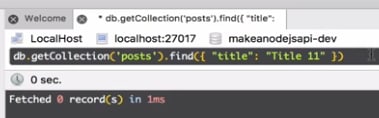
You can now verify that this Post is not present in the Get all Post API and the MongoDB as well with a query like:
Adding prettier library
We can add prettier library with the following yarn command:
yarn add -D prettier
Once this is done, here is my updated package.jsonfile:
{
     "name": "makeanodejsrestapi",
     ...,
     "scripts": {
       ...,
       "prettier": "prettier --single-quote --print-width 80 --trailing-comma all --write 'src/\*\*/\*.js'"
     },
     "dependencies": {
       ...
     },
     "devDependencies": {
       ...,
       "prettier": "^1.3.1",
       ...
     }
   }
We only displayed what changes were done. We will also add an ES lint library with the following command:
yarn add -D eslint-config-prettie
Now, we will make a new file named as .eslintrc with the following comment:
{
 “extends”: [
 “equimper”,
 “prettier”
 ]
}
Now, if you forget to add semi-colons or indentations, you just need to run the following command and they will be added for you:
yarn prettier
Isn’t that magic? :) This also shows what files were changed:

We will continue using this command and library as this really eases our work!
A premium training course to learn to build apps with Node.js, Express, MongoDB, and friends. Start Learning Now →
Favorite a Post and managing Statistics of a Post
next, we are able to register a new user in our application:

We are also able to allow a user to login into our application:

We were able to create a post related to a user:
In this section, we will be adding the following functionalities:
- The user can favorite a post when authenticated which will also increment the favoriteCount counter variable
- Modify models for both User and Post for this
- Add increment/decrement statics on Post
Modifying the User model
We will add a new field to store posts favorited by a user. Let edit _user.model.js_file to achieve this and add a new field right after password field:
favorites: {
         posts: [{
           type: Schema.Types.ObjectId,
           ref: 'Post'
         }]
       }
We will also add a function to use this field as well:
UserSchema.methods = {
     \_hashPassword(password) {
       ...
     },
     authenticateUser(password) {
       ...
     },
     createToken() {
       ...
     },
     toAuthJSON() {
       ...
     },
     toJSON() {
       ...
     },

     \_favorites: {
       async posts(postId) {
         if (this.favorites.posts.indexOf(postId) >= 0) {
           this.favorites.posts.remove(postId);
         } else {
           this.favorites.posts.push(postId);
         }
         return this.save();
       }
     }
   };
Extending Post Controller
Let’s add a function here as well to use this functionality we defined in the model. Start by using the import in_post.controller.js_file:
import User from ‘../users/user.model’;
Next, we call the Usermodel function:
export async function favoritePost(req, res) {
     try {
       const user = await User.findById(req.user.\_id);
       await user.\_favorites.posts(req.params.id);
       return res.sendStatus(HTTPStatus.OK);
     } catch (e) {
       return res.status(HTTPStatus.BAD\_REQUEST).json(e);
     }
   }
Let’s finally modify our _post.routes.js_file to access this function:
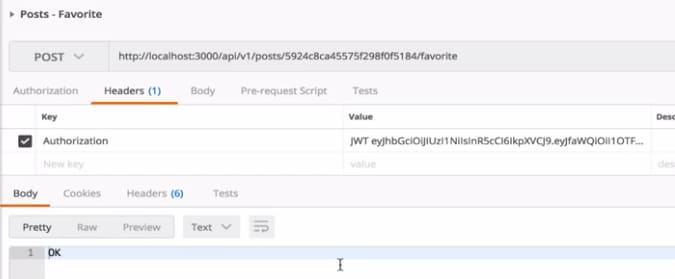
routes.post(‘/:id/favorite’, authJwt, postController.favoritePost);
Time to test this route now. In Postman, make a GETrequest to the favorite API after picking a PostID from either Database or the Get all post API:
Next, we verify if this worked from MongoDB:
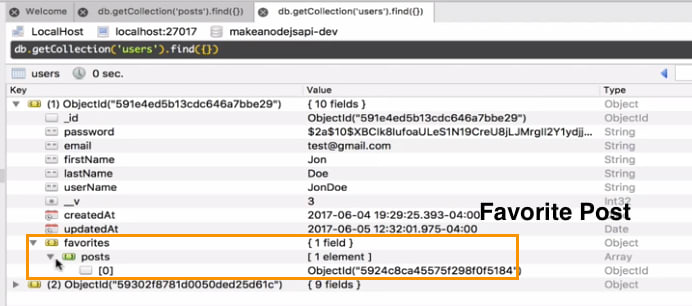
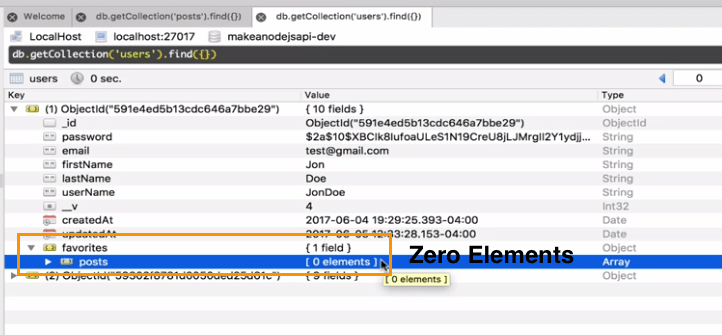
We only kept the object ID because this will save us from replicating the data. If you hit the same API again, you will see something strange, that the Post ID is now removed from the favorites in user model!
We are also keeping the favoriteCount in Post model. Let us make it work now. We will include this logic in Postmodel class:
PostSchema.statics = {
   createPost(args, user) {
     ...
   },
   list({ skip = 0, limit = 5 } = {}) {
     ...
   },

   incFavoriteCount(postId) {
     return this.findByIdAndUpdate(postId, { $inc: { favoriteCount: 1 } });
   },

   decFavoriteCount(postId) {
     return this.findByIdAndUpdate(postId, { $inc: { favoriteCount: -1 } });
   }
 };
The incFavoriteCount and decFavoriteCount methods first use Mongo’s findByIdAndUpdate method to find the Post ID and then use the $inc operator to add either 1 in case of increment or -1 in case of decrement the favorites.
Let’s modify the User model as well now. Add this import statement first:
import Post from ‘../posts/post.model’;
Then, modify the _favoritesmethod functionality here:
\_favorites: {
       async posts(postId) {
         if (this.favorites.posts.indexOf(postId) >= 0) {
           this.favorites.posts.remove(postId);
           await Post.decFavoriteCount(postId);
         } else {
           this.favorites.posts.push(postId);
           await Post.incFavoriteCount(postId);
         }

         return this.save();
       }
     }
Now the User model issue we stated above will resolve and the favoriteCount in Post model will also work:
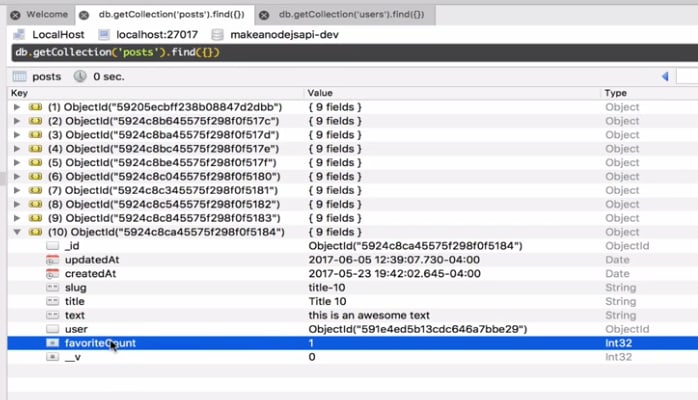
If you hit the same API again and again, the result won’t change. Excellent! We have working APIs where a user can favorite a post as well.
A premium training course to learn to build apps with Node.js, Express, MongoDB, and friends. Start Learning Now →
Identifying if a Post is already a Favorite to User
the last section, we are able to register a new user in our application:

We are also able to allow a user to login into our application:

We were able to create a post related to a user:

Update a post:

And delete a Post as well:

In this section, we will be adding the following functionalities:
- We will send them if the current post is favorite to the user or not so that front-end can make decisions based on this fact
- We will make a route modification and work on Controller functions as well
Extending route
We just need to make very few modifications in our_post.route.js_file:
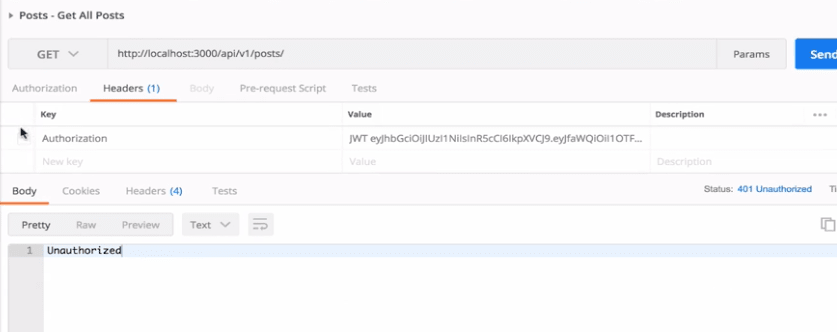
routes.get(‘/:id’, authJwt, postController.getPostById);
routes.get(‘/’, authJwt, postController.getPostsList);
We just added authJwt in these two existing lines. Once this is done, if I try to get Post list without Authorization header, we will get an error:
Extending the User model
Now, we will add more information to the post JSON if it is favorable to the current Authorizeduser.
Move to the _user.model.js_file and add this function in _favorites:
isPostIsFavorite(postId) {
     if (this.favorites.posts.indexOf(postId) >= 0) {
       return true;
     }
    return false;
    }
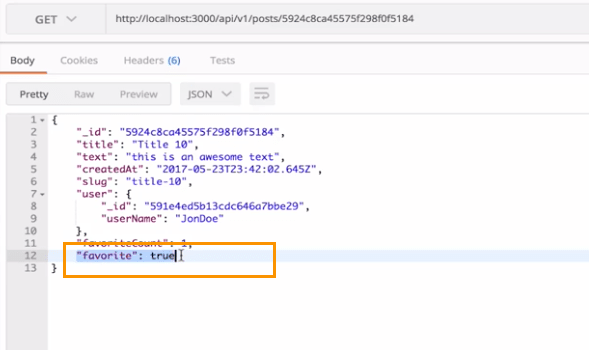
Move to the _post.controller.js_file now and modify the getPostByIdfunction:
export async function getPostById(req, res) {
     try {
       const promise = await Promise.all([
         User.findById(req.user.\_id),
           Post.findById(req.params.id).populate('user')
       ]);

       const favorite = promise[0].\_favorites.isPostIsFavorite(req.params.id);
       const post = promise[1];

       return res.status(HTTPStatus.OK).json({
         ...post.toJSON(),
         favorite
       });
     } catch (e) {
       return res.status(HTTPStatus.BAD\_REQUEST).json(e);
     }
   }
Here, we just added a new field favorite which will be reflected in a Post API like this:
We will modify our getPostsListfunction as well to include a Promise and return the appropriate response:
export async function getPostsList(req, res) {
     const limit = parseInt(req.query.limit, 0);
     const skip = parseInt(req.query.skip, 0);
     try {
       const promise = await Promise.all([
         User.findById(req.user.\_id),
         Post.list({ limit, skip })
       ]);

       const posts = promise[1].reduce((arr, post) => {
         const favorite = promise[0].\_favorites.isPostIsFavorite(post.\_id);

         arr.push({
           ...post.toJSON(),
           favorite
         });

         return arr;
       }, []);

       return res.status(HTTPStatus.OK).json(posts);
     } catch (e) {
       return res.status(HTTPStatus.BAD\_REQUEST).json(e);
     }
   }
Let’s run this now and get all posts:
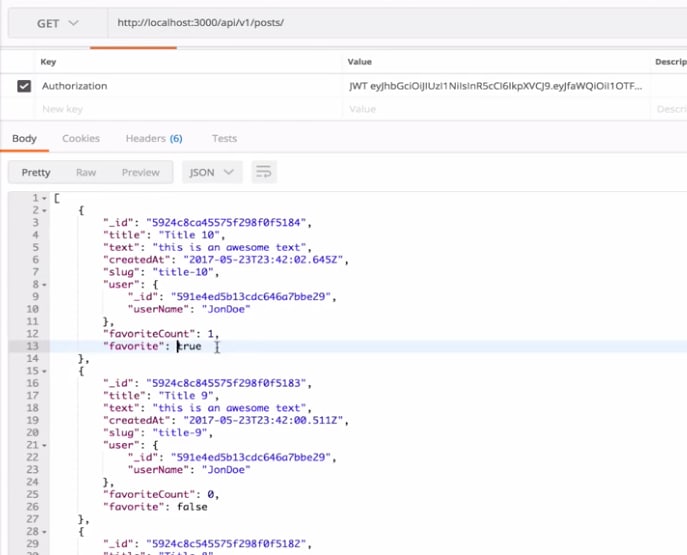
Excellent.
Conclusion
your will learn a lot of Node and API knowledge from this post but has more and more topic that we should know eg.secrity, rate limit, best practice I hope you enjoy for this.
A premium training course to learn to build apps with Node.js, Express, MongoDB, and friends. Start Learning Now →
Disclaimer
This post contains affiliate links to products. We may receive a commission for purchases made through these links.

Top comments (1)
Nice! You should record a youtube video on this :)