Get full React native Messenger clone
Looking to create a fun messaging app for both Android and iOS? Start your react native chat app with our good looking fully-functional social chat app template. Written in React Native, it has powerful ready-to-use features, such as group chats, 1 to 1 chatting, photo messaging and friendship management.
In this tutorial, we are going to learn how to integrate OneSignal push notification to React Native Chat app project. For this tutorial, we are only going to implement it in the Android platform using an android device. OneSignal is a popular service that enables push notifications on a device, abstracting details such as the platform the device is running on. By using OneSignal plugin, mobile applications can send and receive push notifications. So, we are going to implement this OneSignal service to our React Native chat app in order to enable push notifications.
Pre-requirement
Basically, to integrate OneSignal to React Native, We must have the following two requirements:
- a starter code
- Android hardware device (Because android emulator is too slow)
Setting up OneSignal
In the first step, we are going to set up our OneSignal service. For this, we need to sign in to Onesignal website then login to our OneSignal account. Note that: If you don’t have an account you can easily make one by registering to their site or by using Google, Facebook or Github login as shown in the screenshot below:

After the login, we need to create a new app. For that, first, we need to select a platform. Here, we are going to select “Google Android” platform as shown in the code snippet below:

Then, we need firebase server key to establish communication between OneSignal and Firebase cloud messaging as shown in the screenshot below:

For the Firebase server key, we need to go to the Firebase console and create a firebase app. After, the successful creation of Firebase app we need to go to “Settings”. Then, we need to navigate to “cloud messaging” tab and copy server key and sender id as shown in the screenshot below:

Now, we need to return to our OneSignal platform configuration and paste both Firebase Server key and Sender ID to OneSignal form as shown in the screenshot below:

After the completion of the platform configuration, We need to choose SDK for our OneSignal app. Here, we are going to select React native SDK as our apps SDK.

After the selection of SDK, we get our AppID for sending push notification as shown in the screenshot below:

Now, we need to click on “DONE” button which lets us navigate to our OneSignal dashboard as shown in the screenshot below:

After this, we need to go to our React native SDK document and add OneSignal code snippet code to our app which is shown in the code snippet below:
Here, We use three functions to display the activity log as you can see in the code snippet above. And when we open the app, it will automatically register to OneSignal as shown in the screenshot below:

Now, let’s test our OneSignal app by sending send a message from the OneSignal console.
First, we need to go to the Message tab then create a new message as shown in the OneSignal console screenshot below:

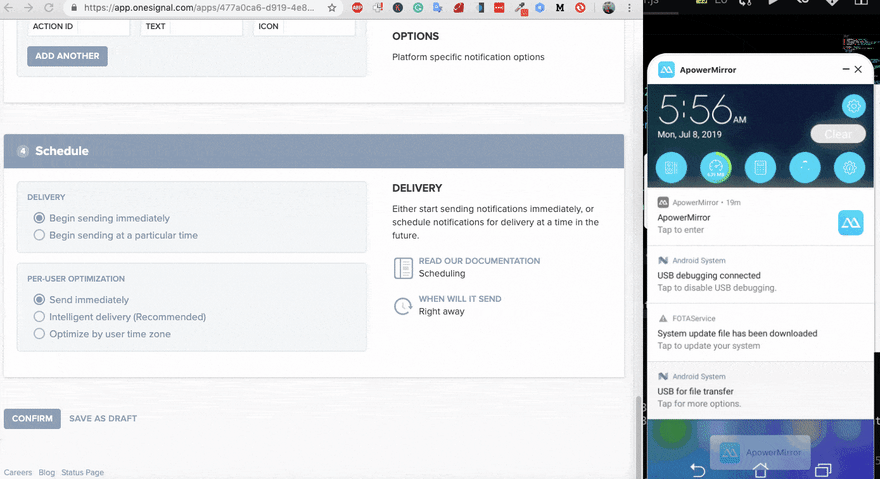
We can see the setting up of our first message in the screenshot below to the left and how a push notification will appear in the screenshot displayed below to the right:

Now, we need to confirm if we are really sending a message to the Android device. If we are sending a message then we click on SEND MESSAGE button as shown in the screenshot below:

Here, we can see that it’s working as expected. We can receive a message in our Android device as you can see in the simulation below:
After this, we are going to redirect our to message analytic dashboard which is shown in the screenshot below:

Sending Push Notification
In this step, we are sending a push notification to our React Native chat app using the OneSignal app that we configured in our previous step. Here, we are going to use rest API to send message to OneSignal server. We need to construct a URL and a payload as shown in the code snippet below:
Here, we can just copy the code above and paste it to our React Native project but we must remember that we need a server key for creating Authorization header and app_id to construct the message.
Note that: More message configurations are available in the documentation of OneSignal here.
Now, we need to add a sendNotification() function with a message to the componentDidMount of our React Native app as shown in the code snippet below:
componentDidMount() {
   this.sendNotification('Greeting from Chat App');
}
Now, we can observe that notification is displayed like an alert box when we launch our app as shown in the device screenshot below:

Now, we need to use this feature when a user joins or a user leaves the channel. For this, we can use the code provided in the code snippet below with the PresenceStatus function:
Here, we are calling sendNotification() in two conditions. One is when a user enters the channel and other is when a user leaves the channel as shown in the code snippet above. Now, let’s try it out in our android device.
For testing mode, we can use Android emulator on Mac. But, it is very slow so we stream a hardware device and use iPhone simulator as shown in the code snippet below:

We can see that it’s working properly. But the notification does not appear familiar and integrated well in the UI. So, for that, we need to the notification alert from the header. The solution to config notification style in the OneSignal documentation and also available in the code snippet shown below:
Now, we need to reload our React app and check it out. You can see that everything working as it should now. This completes our interesting tutorial for integrating a push notification using OneSignal service into our react native chat application.

Conclusion
In this tutorial, we learned how to configure OneSignal service by creating a OneSignal app. Then, by using the OneSignal app we learned how to enable push notification in our React Native chat app. We also got detail insight on how to send a push notification when a user joins or leaves a chat room. The code for this tutorial is freely available on Github.
Originally published at https://kriss.io.

Top comments (1)
my app is crashed after receiving notification
export default class PushNotification extends Component {
constructor(props) {
super(props);
}
onReceived = notification => {
console.log("Notification received: ", notification);
};
onOpened = openResult => {
console.log("Message: ", openResult.notification.payload.body);
console.log("Data: ", openResult.notification.payload.additionalData);
console.log("isActive: ", openResult.notification.isAppInFocus);
console.log("openResult: ", openResult);
};
onIds = device => {
console.log("Device info: ", device);
this.setState({ device });
};
sendNotification = data => {
let headers = {
"Content-Type": "application/json; charset=utf-8",
Authorization: "Basic 'OneSignal Server Key'"
};
};
componentDidMount() {
this.sendNotification('Greeting from Chat App');
}