
Hey, friends! Welcome to The Adventures of Blink! Today we start to dig into some fundamentals of git. We'll clear up some misconceptions, we'll explore some basics, and when today's episode is complete you should be a confident command-line git user!
Youtube, if you'd rather watch than read
What is Git, anyway?
Git is a Distributed Version Control System that you interact with through a terminal. I point this out because it's easy to confuse git with the web-based applications associated with it, such as GitHub or GitLab. Git is strictly for maintaining versions of our code - it doesn't even have so many of those other features you're probably familiar with!
Let's make our first repository
A repository (often shortened to "repo") is just a folder on your file system that git has been told to track. You can create a repository very easily by going to the folder where you want the repository to live, and running the following command:
git init
When you issue this command, a .git folder will be created. This hidden folder isn't part of your project, but it lives alongside your code and keeps track of how git is managing the code.
Making changes
Let's assume now that we're making some changes to our code. For example, maybe we add a README file in the project as part of our documentation.
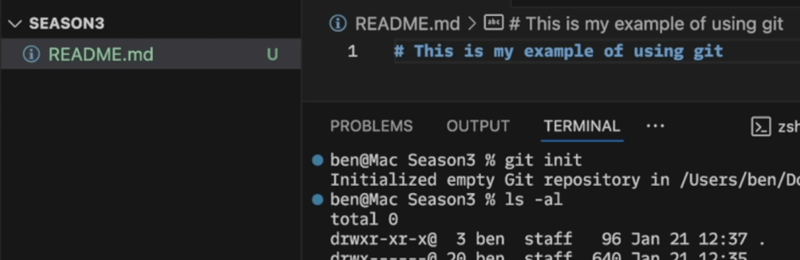
In this example you can see that VSCode has tagged the new file with a capital U... for "Untracked". Simply adding a file to the project directory does NOT tell git to track it! If you're not using VSCode, you might use
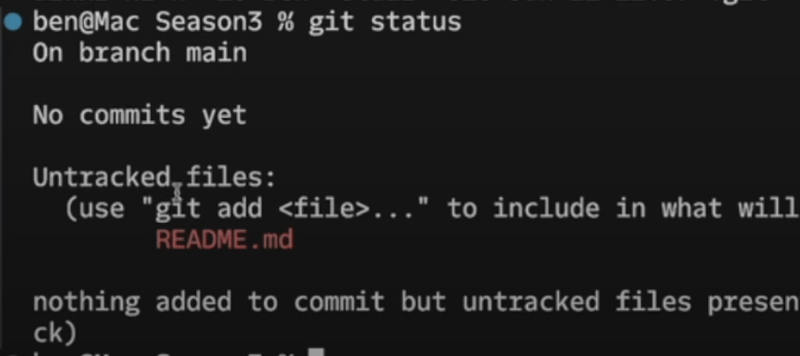
git status
To see what files are tracked/untracked in the project, like this:
If we want the file to be tracked in git, we have to tell it to do so:
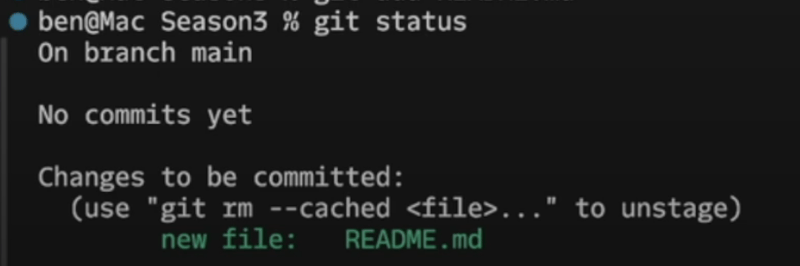
git add README.md
When we do this, VSCode will show us that it's tracked by changing the U to an A. Our git status command will also show that we've started tracking the file:
But this hasn't actually made the file part of the git repository yet. In order to tell git we're ready to include this change in the repository, we have to commit:
git commit -m "This is my commit"
The commit command can add a -m parameter which allows you to add the commit message directly on the command line - otherwise it's going to kick you out to vim to enter your message.
What makes a good commit
We can of course pile all sorts of changes into a single commit... but should you? Let's look briefly at what makes a good commit.
Good commits are small
You don't want large amounts of change in a single commit, because if something goes wrong, it's hard to diagnose. Think of it this way: if you only change one line of code and something breaks, it's pretty save to assume you know where the error lies. But if you had a 200-line change that causes errors, you now have 200 lines of code to sift through!
Good commits should have a theme
Don't just make a bunch of random edits and smash them all into a single commit. Files changed in a given commit should be related to each other - the commit should have a theme that relates to all the changes made in it.
Undo
There are two ways to remove a commit: git revert and git reset.
Reverting will create a new commit that is the opposite of the commit you're reverting. It's a great way to preserve the history that the change was made and then removed. You add the commit id to the command as follows:
git revert 3fcb449
Commit IDs are of course longer than this, but there's a "short version" that's commonly used for these kinds of changes.
Resetting is a more destructive sort of "undo". When you reset, you pick a commit to go back to, and every commit after the named one is completely erased. This is commonly used in more catastrophic situations where multiple commits need to be eliminated. Here's an example reset:
git reset --hard 3fcb449
How to keep pollution under control
You may not have thought about it before, but there are some files associated with your project that are NOT appropriate to store in git.
For example, your application might have a database password stored in a text file for testing purposes. You don't want that file committed to git, because then your password is being passed around to anyone who gets access to the git repository.
Another common example is build files. In Java programs, for example, compiling your application will create .class files that correspond to each .java file in your project. These are bytecode versions of your java program that don't need to be stored in git... best practice is to recompile them on each new architecture anyway, so you don't want to commit them to git because someone else pulling the repository down can't use them.
Git supports a special file in your repository called a '.gitignore' - it's a plain text file where you list files and paths within the project which should NOT be eligible for inclusion in git. Committing a .gitignore file in your repository allows you to control these files that you need but don't want to include in git, preventing your repository from being polluted with things that shouldn't be there.
So if I had a file CREDENTIALS.TXT in the root of my project, and I didn't want that pushed into git, I could create a .gitignore like this:
# .gitignore

CREDENTIALS.TXT
Additionally, if I had a folder called FOLDER1 that I wanted to eliminate from git, I could do it like this:
# .gitignore

CREDENTIALS.TXT
FOLDER1/
Wrapping up
How are you feeling now? Do you think you have a grasp on the basics of git? I hope you've enjoyed this introduction! Git is one of those tools that can feel daunting at first, but you can make a lot of learning progress quickly.
Make sure to do the like and subscribe thing for me, so I know you're getting something out of this and to ensure you don't miss a future episode!
See you soon!

Top comments (0)