
I've been the software developer for several years now. But in this profession there was sill an area in which I have exactly 0 experience - gamedev. I know I can watch tutorials about the Unity and build 3d games in two weeks. But to tell you the truth - it's not what I like. I like to know how it exactly works, not only how to use the framework.
Modern games engines are really, really too complicated to understand them. Even games from '90 are too complicated for me - especially when I have no experience in game development, and also too little in C language.
So I decided to start with the basic. How the games works on yours old, two-color phone? Simple gameplay, low graphic, poor hardware - I think it's the good point to start the journey.
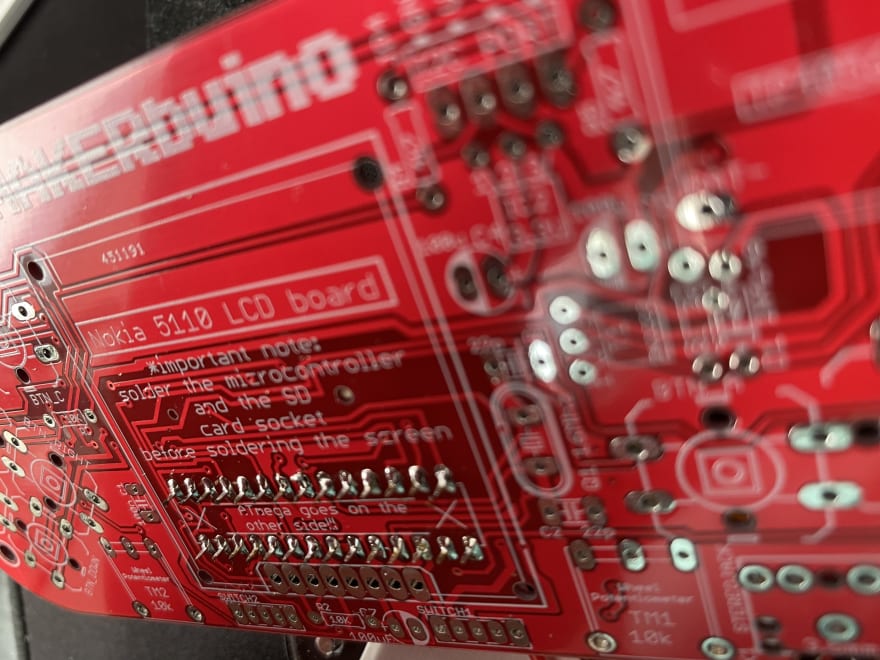
Soldering the MAKERbuino
There is a toy on the market called MAKERbuino. Actuallt it's Gamebiono Classic that you can solder by yourself.

The box contains few resistors, some buttons, one old screen and so on.

I'm not sure why my console was delivered with connected battery, but well, doesn't matter, it works anyway.
To be honest - I'm really hopeless in soldering. But hey, practice makes perfect!
So I prepared all the necessary tool...

... and I started soldering

I'm such a noob I didn't realize I was soldering with the battery connected!
The official guide is really user-friendly. It says that it should take 5 hours, I've done it in 4.
Not perfect, not terrible. The most important thing is that it works.
Four hours and one liter of water later finally I've soldered the console.


Sound works, screen brightness works, old Nokia's screen works (and can display exactly one color, it's weird nowadays) works. The MAKERbuino comes with SD card (128 MB :), inside there were few build-in games.

WOW, everything works, I'm so proud of myself.
There is only one big shortcoming - the "click" sound, it is sooo loud...
I'm game developer!
ATmega328p-pu - 2kB of RAM and an 8-bit CPU at 16MHz. I've programmed few times on so poor computer (for example I made a 3d printed fish feeder with Adruino), but sill - nowadays it's a little challenge, I can't use a dozen of frameworks. Also, I have to use skills sightly forgotten by modern programmers - optimization.
MAKERbuino is built on Arduino, so I had to configure my Arduino IDE. Fortunately official guide explains very well how to do it. Arduino IDE is not as good as Intellij Idea for example, it's very poor to be honest. But to create 100 lines of code it's good enough.
So, how to create a game? I don't know. There is no tutorial, no API. But MAKERbuino is after all Gamebuino Classic. So I used the Gamebuino tutorials. Official Gabebuino Academy is nice place to start. But it uses the new Gamebuino - with colorful screen and little different API - so I had to forgot about coping-and-pasting. I read those tutorials to understand the process and start thinking like a game developer. I've also had to use old reference to write the code.
Bouncing ball
Uploading the game to the console is not the fastest process in the world. And that loud sound of clicking. Fortunately there is a online emulator.
One hour after reading the Academy I've made bouncing ball

I have no idea what is that weird sign in right-top corner, doesn't matter. The ball is bouncing!
Full source code:
#include <Gamebuino.h>

Gamebuino gb;

int ballX = LCDWIDTH  /2;
int ballSpeedX = 1;
int ballY = LCDHEIGHT /2;
int ballSpeedY = 1;

void setup() {
  gb.begin();

  gb.titleScreen("bouncing ball");
}

void loop() {
  while(!gb.update());
  gb.display.clear();

  if (ballX == 0) {
    ballSpeedX = 1;
  } else if (ballX == LCDWIDTH - 2) {
    ballSpeedX = -1;
  }

  if (ballY == 0) {
    ballSpeedY = 1;
  } else if (ballY == LCDHEIGHT - 2) {
    ballSpeedY = -1;
  }

  ballX += ballSpeedX;
  ballY += ballSpeedY;
  gb.display.fillRect(ballX, ballY, 2, 2);
}
Maybe I can optimize and refactor the code, but hey, it's my first "game" ever.
PONG
One or two hours later I've made probably the simplest game ever - the PONG. With "Artificial Intelligence"! The CPU player is very simple of course
If ball is higher than paddle
   move up
If ball is lower than paddle
   move down

The ball was much bigger on the emulator.
Full source code:
#include <Gamebuino.h>

Gamebuino gb;

int ballX = 0;
int ballSpeedX = 0;
int ballY = 0;
int ballSpeedY = 0;
int ballSize = 2;

int paddleWidth = 3;
int paddleHeight = 15;

int playerPaddleY = 15;
int playerPaddlePadding = 3;
int cpuPaddleY = 15;
int cpuPaddlePadding = LCDWIDTH - paddleWidth - 3;

int playerScore = 0;
int cpuScore = 0;

void resetBall() {
  ballX = LCDWIDTH  /2;
  ballY = LCDHEIGHT /2;
  if (random(0, 2) == 0) {
    ballSpeedX = 1;
  } else {
    ballSpeedX = -1;
  }
  if (random(0, 2) == 0) {
    ballSpeedY = 1;
  } else {
    ballSpeedY = -1;
  }
}

void setup() {
  gb.begin();

  gb.titleScreen("super gra");
  resetBall();
}

void loop() {
  while(!gb.update());
  gb.display.clear();

  if (ballX == 0) {
    // player lose
    cpuScore++;
    resetBall();
  } else if (ballX == LCDWIDTH - ballSize) {
    // cpu lose
    playerScore++;
    resetBall();
  }

  if (ballY == 0) {
    ballSpeedY = 1;
  } else if (ballY == LCDHEIGHT - ballSize) {
    ballSpeedY = -1;
  }

  if (ballX == playerPaddlePadding + paddleWidth
      && ballY >= playerPaddleY
      && ballY <= playerPaddleY + paddleHeight) {
    // touch player's paddle
    ballSpeedX = 1;
  } else if (ballX == cpuPaddlePadding - ballSize
      && ballY >= cpuPaddleY
      && ballY <= cpuPaddleY + paddleHeight) {
    // touch cpu's paddle
    ballSpeedX = -1;
  }

  ballX += ballSpeedX;
  ballY += ballSpeedY;
  gb.display.fillRect(ballX, ballY, ballSize, ballSize);


  if (gb.buttons.repeat(BTN_UP, 0) && playerPaddleY > 0) {
    playerPaddleY -= 1;
  }
  if (gb.buttons.repeat(BTN_DOWN, 0) && playerPaddleY < LCDHEIGHT - paddleHeight) {
    playerPaddleY += 1;
  }

  int cpuPaddleCenter = (cpuPaddleY + paddleHeight) / 2;
  if (cpuPaddleCenter > ballY && cpuPaddleY > 0) {
    cpuPaddleY--;
  } else if (cpuPaddleCenter < ballY && cpuPaddleY < LCDHEIGHT - paddleHeight) {
    cpuPaddleY++;
  }

  gb.display.fillRect(playerPaddlePadding, playerPaddleY, paddleWidth, paddleHeight);
  gb.display.fillRect(cpuPaddlePadding, cpuPaddleY, paddleWidth, paddleHeight);

  gb.display.cursorY = 3;
  gb.display.cursorX = 10;
  gb.display.print(playerScore);
  gb.display.cursorX = LCDWIDTH - 13;
  gb.display.print(cpuScore);
}
Now I see that I should refactor my code. But I'm satisfied and so proud of myself.
A lot of fun
New experiences are always full of a fun, in this case a lot of fun. Soldering, making game from '70 - I had a nice time. Maybe it's not suitable for CV, but it's still a lot of experience.
If you are a fan of electronic - I can recommend from the bottom of my heart. It's time to finish this post and finish "snake" game. And later maybe Micro Machines, who knows...

Top comments (2)
Hey Mateusz, Doris here from CircuitMess. We really loved your review! :) Could you please give me your email or contact me at doris@cirucitmess.com? I'd love to talk a bit more :) Cheers!
Thats’s nice to heat it, Doris. I’m happy that you like my review! You can text me using Mateusz @ Jarzyna.eu (my name @ My last name .eu). The email that you typed is incorrect :(