
In this article, I will explain how to handle form submissions without needing to write any backend code or connect any database. This is a feature that big websites like smashing magazine use.
I will explain how to achieve this easily and also how to set up notifications so you would be aware whenever anyone fills your form.
The awesome thing is that the netlify documentation perfectly explained the whole process and even provided a simple contact form(HTML code) we could use.
Developers can easily make use of this when creating a contact form for their portfolio websites instead of going through he stress of creating a database, e.t.c.
Two major things are needed to make use of netlify form.
- Create a Github account
- Create a netlify account( you can easily make use of your Github details to sign up on netlify).
Once those major things are available, these are the steps to handle form submissions with netlify.
- Create your form
<form>
  <p>
    <label>Your Name: <input type="text" name="name" /></label>
  </p>
  <p>
    <label>Your Email: <input type="email" name="email" /></label>
  </p>
  <p>
    <label>Message: <textarea name="message"></textarea></label>
  </p>
  <p>
    <button type="submit">Send</button>
  </p>
</form>
- Add
data-netlify="true"or anetlifyattribute to the<form>tag so you can start receiving submissions in your Netlify site admin panel.
Your form's name attribute determines what we call the form in the Netlify app interface.
If you have more than one form on a site, each form should have a different name attribute.
<form name="contact" method="POST" data-netlify="true">
  <p>
    <label>Your Name: <input type="text" name="name" /></label>
  </p>
  <p>
    <label>Your Email: <input type="email" name="email" /></label>
  </p>
  <p>
    <label>Message: <textarea name="message"></textarea></label>
  </p>
  <p>
    <button type="submit">Send</button>
  </p>
</form>
- Push your code to github either via git or file upload
New to Github, check out my recent Git & Github series.
- Deploy to netlify In case you are new to netlify, I will briefly explain how to deploy your web apps or websites to netlify.
The first thing would be to Sign In to your dashboard and click the "New site from Git" button

Then click the Github button among the 3 options.

Search for the repo you created on GitHub then click it
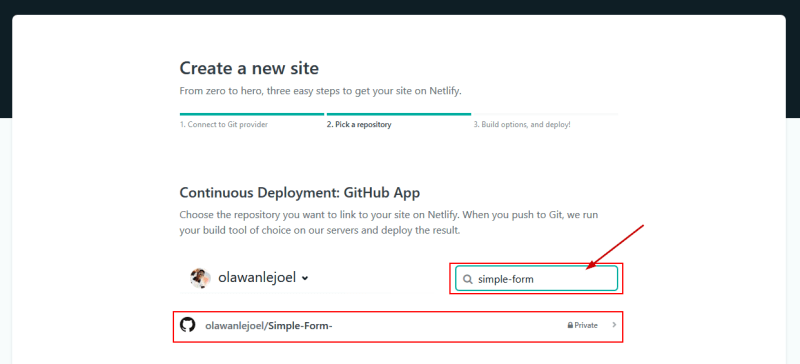
Click on the "deploy site" button

Once your site that has a form linked to netlify is deployed, you will receive a mail from netlify immediately.
You can now go ahead to fill the form. One nice feature is that you get a success page by default from netlify.
- Handling Form submissions & setting up notification
The last thing I will be explaining is where to see form responses, and how to set up notifications so you get notified when anyone fills your form.
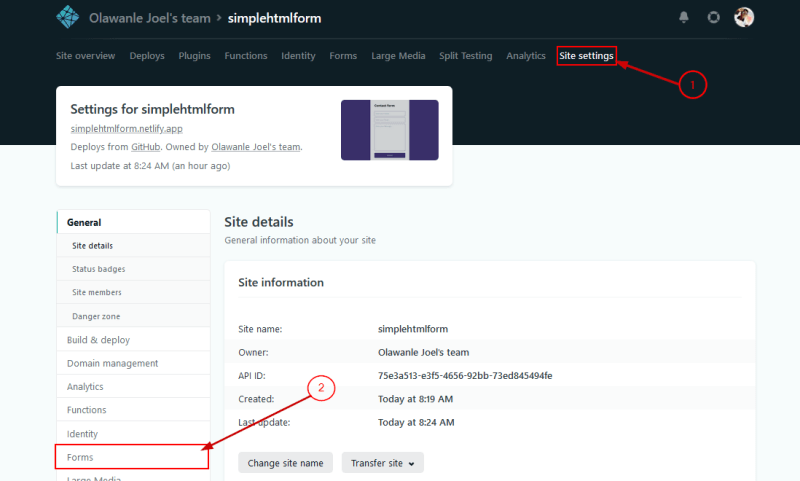
In this previous image, I marked an area "Handle form submissions". That is where all form submissions are found in your site overview.

To get notified, click on "site settings" and then "Forms" as displayed in the image below
Then scroll down to click on the "Add notification" button so you can select the type of notification you want.

Let's assume you selected Email notification, a modal will pop-up, ensure you select the name of the form in the last field, and also fill in your Email address.
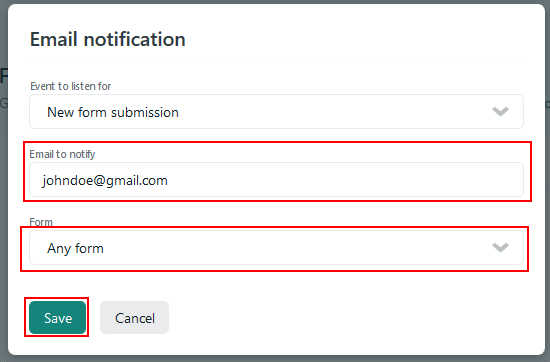
With that, you will always get notified whenever anyone fills your form.
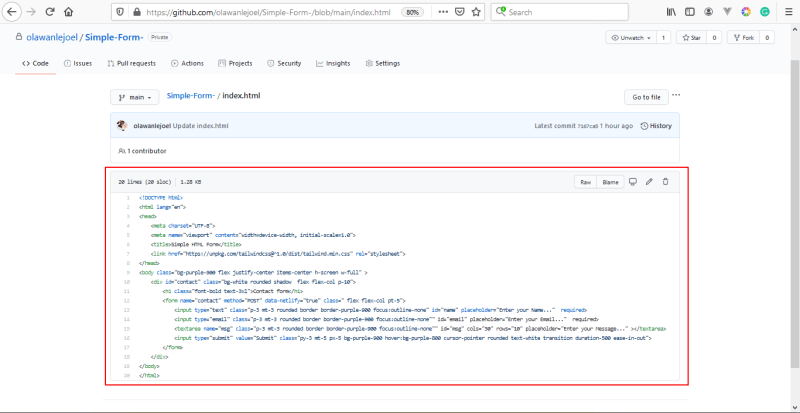
Here is a simple form I hosted on Github and deployed to netlify - https://simplehtmlform.netlify.app/
That will be all for this article, I will also provide useful links in case you want to make use of netlify in vue or react.
As always, any questions or suggestions, please feel free to leave a response or tweet me 🤭! Be sure to connect with me on socials! 😎

Top comments (0)