
This is Part 3 of my tutorial for making a Vue app powered by a Django REST backend. In the first part, we set up just the Vue side. In Part 2, we set up the data model and got it so we could create and clear our Todos in the browser. Part 3 is going to be setting up the Django backend. Initially, this was going to be the last part, and I was going to include the work required to make the front-end API calls to fetch and update the data on the server side. And then as I looked at the changes that I had made, I realized that that was way too much information for a single post. So, you get to have a shorter Part 3 and an additional and pretty short Part 4. Lucky you! Tutorial, now with 33% more posts! This section will assume that you've got a working knowledge of Django or, at the very least, have gone through their Polls Tutorial, or at the very very least, aren't scared to Google your way through a tough spot. If you think I should do a basic tutorial on Django, let me know. I'd be happy to, since usually I learn things way better when I write a blog post about it. Anyways, too much rambling. Let's DO THIS.
0. The Setup
Ok, I'm going to make a few assumptions about things. First, I'm going to assume that you've been following along with the series. Go back and run through Part 1 and Part 2 if you haven't. That will get you setup with with the project file structure we're working with. I'm also going to assume you're using Python 3 (or are comfortable making the transitions between the two -- there shouldn't be much of a difference). First, we are going to need a virtual environment to keep our lives sane.
$ python3 -m venv .venv
# Create a virtual environment in the .venv/ directory
$ source .venv/bin/activate # Mac or Linux
$ .venv/Scripts/activate # Windows
Don't forget to add the .venv directory to your .gitignore file if you're into that kind of thing. If you accidentally commit your virtual environment, you'll hate life. If which pip points you to /path/to/your/todoapp/.venv/pip.exe, you're doing it right. OK, let's install the required packages.
$ pip install django djangorestframework
...
$ pip freeze | tee requirements.txt # Just so we can see them.
Django==1.11.2
djangorestframework==3.6.3
pytz==2017.2
1. Setting Up Django
We're going to have to tweedle a few things. There's a few things that we don't need or are broken in the project template. One of these days I'll open a pull request, but for now, just edit the following lines in your vuedj/settings.py file.
...
INSTALLED_APPS = [
    ...
    'rest_framework',
    'app',
    # Remove django_nose, we won't use a testing framework now.
]
$ python manage.py migrate
...
$ python manage.py createsuperuser
# Fill in the relevant info so you can login to the
# backend in case of emergency
2. The Good Stuff
The Model
Cool. Now we should be able to get to work. Let's create our model. Open up app/models.py.
from django.db import models

class Todo(models.Model):

    text = models.CharField(max_length=200)

    def __str__(self):
        return "Todo: " + self.text
Luckily, we have chosen a very simple object to model. Not exciting if you're coming from a Django background though. Let's get to the good stuff.
The Serializer
Create app/serializers.py.
from .models import Todo
from rest_framework import serializers

class TodoSerializer(serializers.ModelSerializer):
    class Meta:
        model = Todo
        fields = ('text',)
If you're familiar with Class Based Views this should look similar. Most of the heavy lifting is already in the base class provided by the Django Rest Framework (henceforth referred to as DRF because I'm lazy). A serializer is the workhorse of the app, outputting the JSON needed by any good JSON-based REST framework. How does it get used though?
The Views
Let's take a look at app/views.py.
from django.shortcuts import render
from django.http import HttpResponse

from rest_framework import viewsets
from rest_framework.decorators import list_route

from .models import Todo
from .serializers import TodoSerializer

def index(request):
    return render(request, 'index.html')

class TodoViewSet(viewsets.ModelViewSet):
    queryset = Todo.objects.all()
    serializer_class = TodoSerializer

    @list_route(methods=['delete'])
    def clear_todos(self, request):
        todos = Todo.objects.all()
        todos.delete()
        return HttpResponse(status=200)
        # It may be a good idea here to return [].  Not sure.
The index view, we'll use later to display our Vue awesomeness. The DRF ModelViewSet provides the standard REST list, create, retrieve, update, and destroy functionality and ties it to the model. It uses the Serializer we created in serializers.py to create the output. You'll notice that we had to create an additional action since delete many is not usually a standard REST call. rest_framework provides two decorators for adding additional methods to a viewset: the @detail_route and the @list_route depending on whether you want to operate on one or many items. As you can see, we simply delete all Todos in a splendidly Django-esque fashion. The name of this method (clear_todos) will come into play later in our URLs. Speaking of which:
The URLs
Open up vuedj/urls.py. I know usually we create specific urls for our app, but we're skipping that for simplicity.
from django.conf.urls import url, include

from rest_framework import routers

from app import views

router = routers.SimpleRouter()
router.register(r'todos', views.TodoViewSet)

urlpatterns = [
    url(r'^$', views.index, name='home'),
    url(r'^', include(router.urls)),
]
Similar to views.py, we create a route to our index view, and we use the SimpleRouter to create all of the REST url routes we need. Note that we register our viewset with a basename of todos. This affects all of the urls, which you can see in the beautiful table in the DRF docs. Note that our extra view clear_todos gets the route todos/clear_todos. We're actually almost done!
3. Testing It Out
Head to the terminal.
python manage.py makemigrations app
...
python manage.py migrate # To update the DB with the Todos table
...
python manage.py runserver
Head on over to localhost:8000. Blammo! Template error. That's fine, because we know that our Vue app is going to be served via our index view, and we haven't quite tied that up yet. Head to localhost:8000/todos/.
You see a nice API reference. At the bottom you can POST some todos. Do that now.
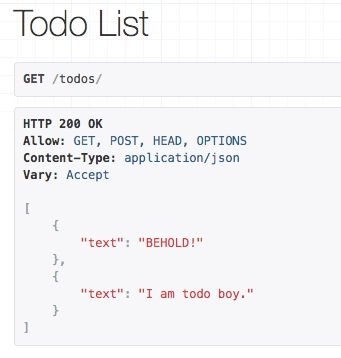
If you don't see multiple todos, try clicking in the url bar and hitting enter (to revisit without resubmitting any POST requests). You should see your todos! To test our clear_todos route, it will be a little tougher because we made it expect a DELETE request only, which is difficult to do in a browser (as far as I know). Open up a separate terminal.
$ python3

>>> import requests # pip3 install requests if you haven't yet
>>> requests.delete('http://localhost:8000/todos/clear_todos/')
<Response [200]> # Success!
Head back and refresh your API page and your Todos are gone! Huzzah! You now have a working API that we'll hit with our front-end in the next and final post. Go team!
4. The Wrap-Up
So hopefully I didn't go to fast. We basically crushed through a Django app at the speed of light. The DRF documentation is the knees of the bees, so if you want to know more, that's the first place you should go. Like I said at the beginning, let me know if a basic Django set of tutorials would be helpful or if you have any other questions with any of this. OR let me know if I did something that could be done better or if I'm spreading something other than best practices!
See you in the next one!
Originally posted on my blog. Cover image credit: Stanley Ndagi

Top comments (1)
Just a note - DRF has updated and if you're using the newer version, the decorator list_route in app/view.py has been replaced by action.
You can read about the change in DRF docs!