Do you start freaking out when you have to use git commands? You're not alone, we've all been there. I still am to be honest 🙈. I am writing this as much for me as for you!
In a previous article, I went over GIT basics. I'd recommend to read it first if you're not too familiar with git.

Today, let's focus on the good practices when collaborating with a team on a project 👯♀️👯♂️.
Why is it a 🔥 topic on a coding project?
Coding a project means you will have to create, edit and eventually delete toooons of files or repositories. If you're on your own, no big deal: you just save the changes, and commit them when you're happy with.
Easy-peasy. Now let's say that you start working with your coding crew on the same project. You'll create a few files and edit them, and the others will do the same on their computers.
How do you access their work & vice-versa?
The magic of remote repositories
Remember the git push command? This is what sends your files from your local repository (your computer) to a remote repository (a storage server).
Everyone having access to this remote repository can then access the modified files.
So if you create and update files on your computer and then git push them on the remote repository, the others are now able to see these modifications and work on it.
In order to get the updates, the others will have to use the git pull command. This command will detect the commits that they don't have on their local machine (new repos, new files, new lines, new code...) and import them. This way, they'll have the files YOU created on THEIR machine.
Team collaboration with git: git branches 🌳
I bet you wouldn't like it if someone was to step on your work and overwrite things you spent hours working on 😡. Basically that's what branches are made for: protect you from that pain!
What are git branches?
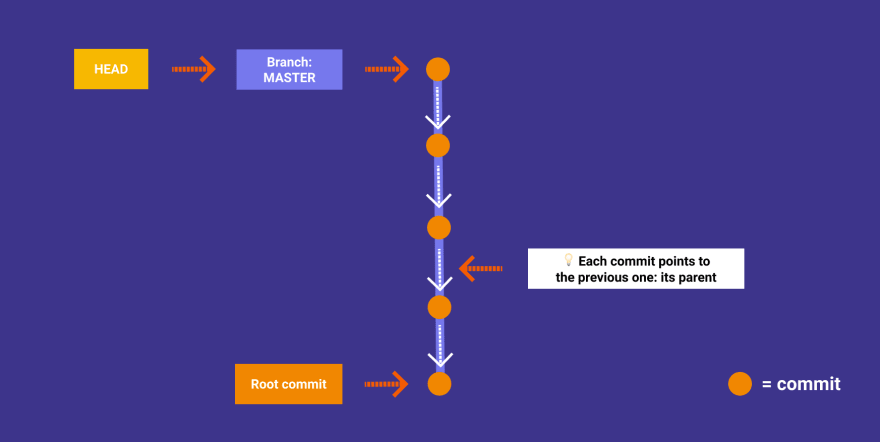
As you start making commits, you’re given a master branch (the default and main branch) that points to the last commit you made.
Every time you commit, the master branch pointer moves forward automatically. That pointer is called the HEAD.
💡 The HEAD is the pointer to the current branch reference.
When you commit or switch to another branch, it moves to point to that new commit object.
Let's pretend you're committing your work regularly on master, your commits would be linear:
Now if you're two to work on it, it's better if you both create a branch. This way, you won't have to worry about what the other is doing. This is usually how branches are schematized:
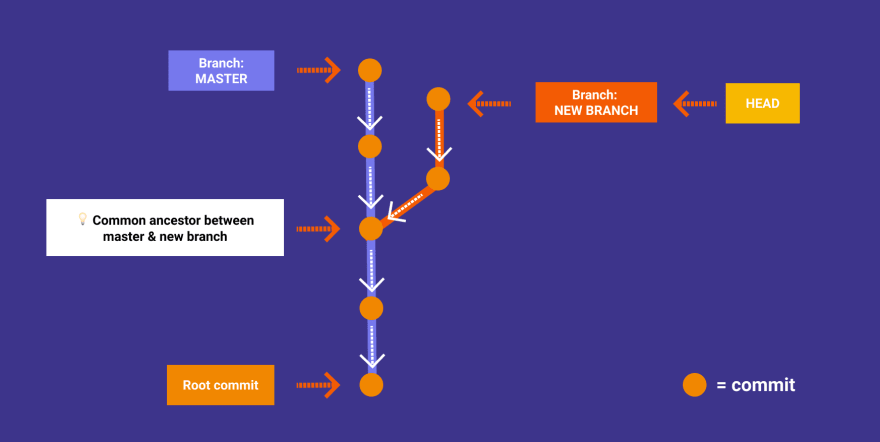
💡 Branches don't represent anything physical. They simply are pointers to a commit.
The basic git branches commands
Get a list of existing branches
git branch: lists all local branches
git branch -a: lists all local + remote branches
Create a branch
- the short way:
git checkout -b <branch name> - in two commands:
git branch <branch name>&git checkout <branch name>
Both will create a branch with defined name AND moves the head to this branch
💡 When you create a new branch and switch to it, you'll find the exact same file system.
Why? Because the new branch is just a pointer to the previous commit.
Delete a branch
git branch -d <branch name>: deletes the specified branch
Merging git branches
So far we have a notion of what git branches are and how they can be useful, how to create them and work on them.
Now if my teammates and I have been respectively working and pushing on our own branches, how do we put our work together? This is where merging comes!

The theory
In a repo, every commit points to the same, original commit: the root commit. This means there will always be a common ancestor for two commits.
When merging two branches, git will look for that common ancestor and compare the filesystems between this commit and the two child commits:
- if both commits impacted an area with different changes: you trapped yourself with a merge-conflict. No worries, you can check and handle it manually
- otherwise: you're good to go, the two branches are merged!
Once the branches are merged, a new commit is made with the changes from both branches integrated into the new snapshot.
The git collaboration workflow & commands
Prepare for merging
git status: to make sure that HEAD is pointing to the correct receiving branch. If needed, execute git checkout <branch name> to switch to the receiving branch.
Make sure you have the latest remote commits
git pull: on both receiving & merging branches
Merging
git merge <branch name>: this will merge the specified branch into your active branch (master by default)
And voilààà your work is merged. Take some rest, you deserve it! 🎉
If you want to continue, then just repeat that process!
Git best practices

I'd recommend the following:
- give your commits explicit names: to be able to return to the one you need if necessary (I am a big fan of commits named "Please work for once" but trust me, they won't help much)
- make a branch for each feature (rather than for each person)
- give the branches explicit names
- clean your branches regularly: check with your mates which branches are not used anymore and delete them
That's it for the basics of collaborating on a development project with git. Thanks to branches, you can develop features independently from the others without overwriting on your teammates' work! 🤝
I hope you got to understand those concepts better and it will help you coding with others.
In the next article(s), I want to cover some more advanced git concepts & commands! Stay tuned if you're interested in that topic 👋

Top comments (0)