
In this tutorial I want to show you learn how to continuously test and deploy serverless functions to Cloudflare. Cloudflare Workers live on the edge of their network and can intercept HTTP requests. With them we can augment websites, create new applications and services, or redirect and load-balance traffic.
As you transition from the “server full” to the serverless mindset, you’ll stop fretting about the how and start thinking in terms of the what. Your focus can move from managing infrastructure—whether they are servers or containers—to writing code. It’s on the cloud provider to figure out how to run it.
Prerequisites
You’ll need to set up a few things before reading on—after all, this is a hands-on tutorial.
Start by signing up with Semaphore and installing the sem cli. We’ll use Semaphore to test and deploy our serverless code. After that, fork the demo and clone it. Once forked, add CI/CD to your repo with:
$ cd semaphore-demo-cloudflare-workers
$ sem init
You’ll also need an Cloudflare account an active domain proxied through the service.
Serverless Framework
Let’s take a few minutes to examine the application. The main function can be found at hello.js:
addEventListener('fetch', event => {
  event.respondWith(handleRequest(event.request));
});

async function handleRequest(request) {
  return new Response('Hello World!');
}
Oh yes, here we have the archetypical hello-world example, only this time in the serverless form. The function replies with “Hello World!” to any HTTP request, and that's about it.
To understand how this serverless deployment works, we must zoom back and learn about the Serverless framework. Initially developed for AWS Lambda, the framework hides all the cloud provider quirks and boils down the description of the deployment into a single manifest file. Since its creation, many other providers like Cloudflare have started supporting it.
Open the manifest, serverless.yml to take a quick look. The service defines the service name and the provider-specific account details. Here is how we make a definition for Cloudflare:
service:
  name: semaphore-demo-cloudflare-workers
  config:
    accountId: $CLOUDFLARE_ACCOUNT_ID
    zoneId: $CLOUDFLARE_ZONE_ID

provider:
  name: cloudflare
  stage: prod

plugins:
  - serverless-cloudflare-workers
Then, we need to define our functions and the events that trigger them. In our example, requests to example.com/hello are replied with the hello function (the .js extension can be omitted):
functions:
  hello:
    name: hello
    worker: hello
    script: hello
    events:
      - http:
          url: example.com/hello
          method: GET
Continuous Integration and Deployment
Like everything, serverless has its downsides. Perhaps the biggest one is that testing gets more challenging. The cloud runtime is hard to replicate in a test environment.
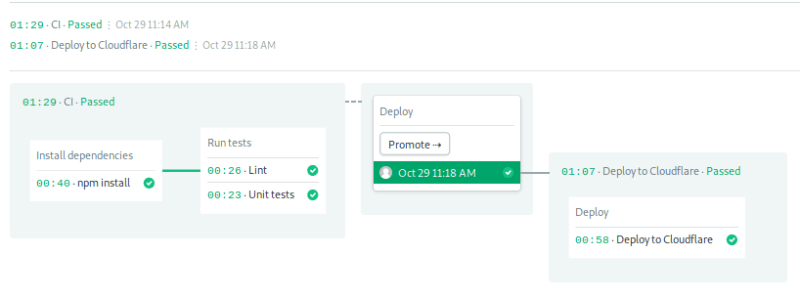
The CI/CD workflow will test the code on every update and then, provided there aren’t any errors, deploy it to Cloudflare.
- CI Pipeline
- ⚙️Install dependencies
- 👟 Run tests
- CD Pipeline
- ☑️ Deploy to Cloudflare
We'll learn about the CI pipeline next.
Testing in Semaphore
Continuous Integration (CI) is all about testing. Let's examine how the CI pipeline does it. Take a peek at the pipeline file located at .semaphore/semaphore.yml.
The intro to the pipeline defines its name and which of the machines types is going to run the jobs.
version: v1.0
name: CI

agent:
  machine:
    type: e1-standard-2
    os_image: ubuntu1804
In Semaphore, the execution order is organized by jobs and blocks. Jobs run in parallel. Once all jobs in a block are done, the next block begins. If any job fails, then the workflow stops with an error.
The prologue is executed before each job; in our case, we’re using nvm to set the active Node.js version and npm to install the modules:
blocks:
  - name: Install dependencies
    task:
      jobs:
        - name: npm install
          commands:
            - checkout
            - nvm use
            - node -v
            - cache restore
            - npm install
            - cache store
Checkout clones the GitHub repository, while cache detects the project structure and figures out which files should be cached for future runs.
The second block has two test jobs:
- Lint code with JSHint.
- Unit tests: replicate Cloudflare runtime with Cloudworker.
  - name: Run tests
    task:
      prologue:
        commands:
          - checkout
          - cache restore
          - nvm use
          - node -v

      jobs:
        - name: Lint
          commands:
            - npm run lint

        - name: Unit tests
          commands:
            - npm test
The final section in the pipeline defines a promotion. A promotion chain pipelines together to create more complex workflows.
promotions:
  - name: Deploy
    pipeline_file: deploy.yml
    auto_promote_on:
      - result: passed
        branch:
          - master
Deploying with Semaphore
Few things feel better than fully tested code. It fills me with determination ♥️ to continue with the deployment. The Continuous Deployment pipeline starts immediately after the integration ends.
You have to customize serverless.yml a bit now. Open the file and locate the url key. Replace example.com with your Cloudflare domain. You may use wildcards such as example.com/* or *.example.com.
Next, open .semaphore/deploy.yml to review the deployment pipeline. I’ll skip the introduction section since we've already seen it and head directly to the block:
blocks:
  - name: Deploy
    task:
      secrets:
        - name: cloudflare

      prologue:
        commands:
          - checkout
          - cache restore
          - nvm use
          - node -v

      jobs:
        - name: Deploy to Cloudflare
          commands:
            - cat serverless.yml | envsubst | tee serverless.yml
            - npm run deploy
            - npm run hello
In this block, we are using the Serverless CLI to deploy. The last command calls the function directly from the cloud to test that it's working.
Push to GitHub & Test
We must share our Cloudflare account details with Semaphore before we can deploy. Semaphore provides secrets as a secure mechanism to store sensitive data.
To get your Cloudflare token:
- My Profile > API Token > Global API Key > Change or View
Copy the token displayed and create a secret to store it:
$ sem create secret cloudflare \
    -e CLOUDFLARE_ACCOUNT_ID=YOUR_ACCOUNT_ID \
    -e CLOUDFLARE_ZONE_ID=YOUR_ZONE_ID \
    -e CLOUDFLARE_AUTH_EMAIL=YOUR_ACCOUNT_EMAIL \
    -e CLOUDFLARE_AUTH_KEY=YOUR_API_TOKEN
The Zone and Account IDs can be found on Cloudflare’s on the bottom right side of the dashboard.
Push the code to GitHub to get the workflow started:
$ git add serverless.yml
$ git commit -m "deploy to cloudflare"
$ git push origin master
You can check the progress on Semaphore; after a few seconds, we should see the deployment block complete. You can click on any block to observe the logs. 👀
Clicking on the last job in the workflow brings up the execution log:
Serverless: Packaging service...
Serverless: Excluding development dependencies...
Serverless: Starting Serverless Cloudflare-Worker deployment.
Serverless: Starting deployment
Serverless: deploying script: hello
Serverless: Finished deployment hello in 1.412 seconds
Serverless: ✅  Script Deployed. Name: hello, Size: 0.19K
Serverless: ✅  Routes Deployed
Serverless: Finished deployment in 18.061 seconds.
Serverless: Finished Serverless Cloudflare-Worker deployment.
exit code: 0 duration: 20s
Let’s see if it’s really working. Try visiting the function URL with your browser or making a request with curl. Replace example.com/hello as appropriate:
$ curl -w "\n" http://example.com/hello
Hello World!
Well, hello to you too, little function. 👋
Servers Have Their Days Counted
You've deployed your first serverless function. We've learned about its strengths and weaknesses, and how to balance them with Semaphore CI/CD. Isn’t its simplicity a breath of fresh air? If you are like me, once you try the serverless route, you’ll wish you could use it for everything. 🏖
Want more practice? Try browsing the Cloudflare gallery, which has a lot of useful templates to explore.
Did you find the post useful? Let me know by hitting those ❤️ and 🦄, following me or by leaving a comment below.
As always, thanks for reading!

Latest comments (0)