
In the previous post, we learned to write our first line of code on a Raspberry Pi 5. I bought my Raspberry Pi 5 last year and didn't touch it until recently. While planning to use this Raspberry Pi to build some cool robotics and networking projects, I soon started facing some obstacles with the operating system itself.
So, in this post, I want to share an overview of the challenges I've faced while working on the Raspberry Pi 5, along with solutions that have worked for me. I hope this will also help anyone who is struggling with their own Raspberry Pi 5 programming.
Table of Contents
- The Raspberry Pi OS
- Taking screenshots on the Raspberry Pi OS
- Screen Blanking
- Text-only Boot
- Closing Thoughts
The Raspberry Pi OS
Now before addressing the challenges, we must understand a few key aspects of the operating system itself.
Raspberry Pi OS is a free and open-source, Linux-based operating system, a port of Debian designed to run on a Raspberry Pi SBC. The version of Pi OS I am running on my Raspberry Pi is based on Debian 12 which I can confirm by typing the following command in a terminal:
hostnamectl | grep -E "Operating System|Kernel|Architecture"
Which will output:
Operating System: Debian GNU/Linux 12 (bookworm)
          Kernel: Linux 6.6.74+rpt-rpi-2712
    Architecture: arm64
With the release of Bookworm in 2023, X11 was replaced by Wayland, which became the default operating mode for Raspberry Pi 4 and 5.
"With the release of Bookworm in 2023, we replaced mutter with a new dedicated Wayland compositor called wayfire and made Wayland the default mode of operation for Raspberry Pi 4 and 5, while continuing to run X on lower-powered models."
X11 and Wayland
X Window System or X11 for short, is the traditional display server protocol that has been used on Linux for decades. On the other hand, Wayland is a modern display server protocol that was designed to replace X11. Wayland also aimed to be to more efficient, secure, and easier to develop and maintain than X11.
In contrast to X11, Wayland employs uses a compositor-based model where the compositor controls the entire display, including rendering windows and graphics. This results in a layer of incompatibility among application packages.
Identifying whether your Raspberry Pi OS is running X11 or Wayland
As mentioned earlier, some X11 applications and utilities are incompatible with the Wayland protocol, and the same is true in reverse. When working on a project that directly uses system commands, it is essential to know whether we are using X11 or Wayland to ensure our code is compatible across different environments.
Now, we can use our trusty grep command to search for the session type in the environment variables. To do so, open a new terminal from your desktop and type the following:
env | grep "XDG_SESSION_TYPE"
If you are using Wayland, this will yield,
XDG_SESSION_TYPE=wayland
If you are using X11, you will see,
XDG_SESSION_TYPE=x11
Taking screenshots on the Raspberry Pi OS
Raspberry Pi OS offers two distinct command-line tools to take screenshots. One is called grim and the other is called scrot. grim is only compatible with a Wayland environment as it was designed to capture images from a Wayland compositor.
On the other hand, scrot is only compatible with an X11 environment. So if we try to use the scrot command in a Wayland environment, it will produce a completely black image! 😯
I was completely clueless why the scrot was not working. Then I realized my Pi OS is running on the Wayland environment 🙈 My suspicion became true when I used the Print Screen key on my keyboard.
The Print Screen key (PrtScn for short) is found on full-size keyboards and is used to take screenshots on all operating systems. But in the case of the Raspberry Pi OS, it's configured to execute grim or scrot command depending on the environment we are using.
Both grim or scrot produce PNG images with a date timestamp filename by default. But there is a major difference between grim or scrot.
When these two commands are executed without arguments, the scrot command will create the image in /home/pi/ directory. But in the case of grim, it will create the image in /home/pi/Pictures/ directory. It is always good to specify the output location when using these two tools.
Specifying output location for grim:
grim path/to/your/image.png
Specifying output location for scrot:
scrot path/to/your/image.png
Screen Blanking
Oh, this is a big one! I screamed when my Raspberry Pi's screen suddenly turned black and the fan started running violently. I was almost certain I had bricked the Pi 😥
I unplugged the Raspberry Pi's power supply to turn it off. When I tried to boot the Pi up, it surprisingly booted.
After about 10 minutes, its screen turned black again. After doing some research, I learned that all I had to do was turn off Screen Blanking in the Raspberry Pi Configuration 😯
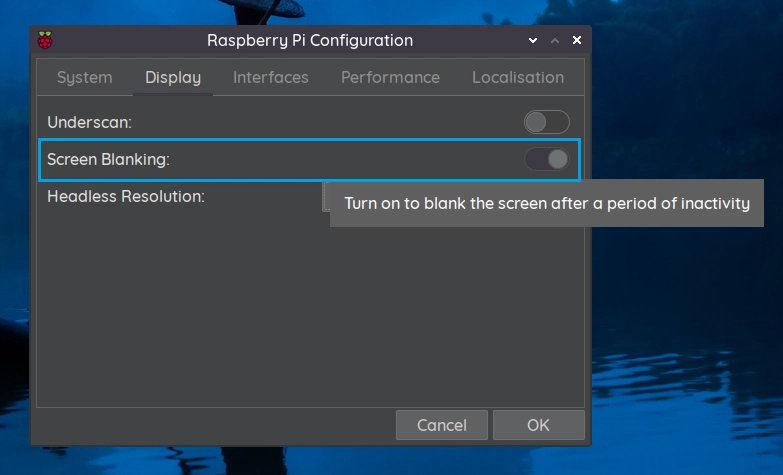
Screen Blanking acts like a screensaver, turning off video output after a period of inactivity.
Here is how I disabled Screen Blanking:
Open the applications menu by clicking the Raspberry Pi icon in the taskbar.
Go to Preferences > Raspberry Pi Configuration. Under the Display tab, toggle Screen Blanking off.
If you intend to use your Raspberry Pi as a standalone device that may remain inactive for long periods, you should disable Screen Blanking.
Text-only Boot
Yesterday, I was testing the performance of my Raspberry Pi by performing daily tasks such as web browsing, coding, and video streaming. However, when I tried to turn the Pi off, it got stuck in the splash screen. It took forever to shut down, so I unplugged the power supply and started investigating.
Some forum posts suggested that the SD card might be corrupted. They recommended reimaging Raspberry Pi OS on a new SD card to resolve the problem. However, since I am using an SSD, I was quite skeptical about the possibility of storage corruption. Nevertheless, I decided to reimage the Raspberry Pi OS using the Raspberry Pi Imager and then booted the Pi.
After using the freshly installed OS, I decided to reboot to see if everything was okay. Now, it got stuck again in the splash screen.
I noticed when I shutdown, there is a text plymouth-poweroff.service at the bottom-left of the screen. When I tried to reboot, the text read plymouth-reboot.service. A quick Google search suggested it could be possible that the plymouth service was corrupted, and reinstalling it might fix the problem. So, I began purging it using the following command:
sudo apt purge plymouth -y
Then I reinstalled plymouth:
sudo apt install plymouth
But the problem was still there. Then I came across another forum post suggesting that the Raspberry Pi might have trouble shutting down all its services, which could cause it to get stuck 🤔
When the splash screen is turned off, we will be able to see which services are blocking the Pi from rebooting or shutting down. There is an option to disable the traditional splash screen boot. Here is how to do that:
- Open a new terminal and type
sudo raspi-config. - Navigate to System Options > Splash Screen.
- You will be prompted whether you want to enable the splash screen, click No. This will enable text-only boot.
- Click Ok, then Finish. You will be prompted to reboot. Click Yes as the changes will take effect after a reboot.
Soon the issue was found. In my previous post, I enabled VNC on the Raspberry Pi for remote desktop access, but the WayVNC service was running continuously, preventing reboot and shutdown. Disabling VNC resolved the problem.
Text-only Boot is extremely helpful for debugging such scenarios.
Closing Thoughts
These are the three challenges I faced and learned from. I hope this post helps anyone going through the same struggles. I have summarized many details to keep this article to the point. Please feel free to ask any questions regarding the article.
Will write soon ✨

Top comments (0)