An Introduction to Webhooks
The Vonage Messages API is phenomenal. I know as advocates we aren’t meant to play favorites, but it is actually my favorite of the Vonage APIs. It enables you to send messages over WhatsApp, Facebook Messenger, Viber, SMS, and MMS very easily. And at other end, it allows you to receive messages over most of those channels (SMS messages are sent back to your account level endpoints).
For your application to receive an inbound message (or the status of an outbound message) from Vonage, your application must have a publicly accessible HTTP endpoint that Vonage can send the message to. This message is called a webhook. We tend to see lots of questions around security and webhooks, so I’m going to show you how you can secure your Messages webhooks. We’re going to accomplish this with a combination of bearer auth and payload validation.
Concerns Around Webhook Security
The biggest question we get surrounding webhooks, beyond what they are, is how to secure webhooks to make sure bad actors aren’t sending malicious webhooks. What can an attacker do if they gain access to our webhook endpoints and have a critical mass of user data to throw at us? It’s a valid concern.
Think about it like this: Alice is an application developer, and she needs to receive a WhatsApp message from Bob. Bob will send a WhatsApp message to Alice’s application. When that WhatsApp message is received, Vonage will send a message to Alice’s HTTP endpoint to notify her application about the inbound message. That endpoint must be publicly available. If Chuck, a malicious hacker, finds Alice’s webhook endpoint, he can now impersonate Bob for incoming messages or falsify statuses about outbound messages.
Authenticate Inbound Webhooks
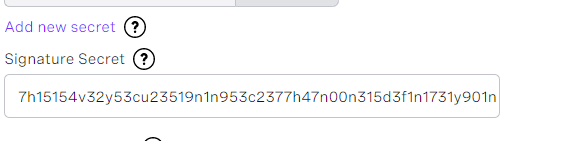
Vonage uses JSON Web Token (JWT) Bearer Authorization for webhooks sent from the Messages API to allow you to easily authenticate the webhook. The bearer token is an HMAC-SHA256 token, meaning verifying the JWT’s validity is as simple as decoding the token with its signing secret. The secret you need to use is the same secret shown in the settings page in the dashboard. It is recommended that this signing secret be at least 32 bits to make it difficult to brute-force attack. Your account’s signature secret is a shared secret between you and Vonage.
_ Note: This feature is not yet available for Messenger webhooks._
Validate the Payload of an Inbound Webhook
In addition to authorizing the token, it’s a good idea to check that the payload of the webhook matches what the token says it should be. JWTs, once decoded, have their own JSON payload—the fields in this JSON are referred to as claims. To guard against an attacker potentially stealing one of your tokens and replaying it, you can use one of these claims, the payload_hash. The payload_hash is an SHA-256 hash of the payload of the webhook. Just by running the payload of the incoming message through an SHA-256 hash and comparing it to the payload_hash claim in the webhook, you can be sure that the token that you are receiving is not a replay.
Check the Time a Token was Generated
Another important claim is the iat—this stands for “issued at,” and it is the UTC Unix timestamp of when the token was generated. You can compare the iat to the current UTC Unix timestamp to check how old the time stamp is in order to guard against potentially stale tokens.
Translate to Code
Let’s take these concepts and convert them to code. I’m going to show you how to do this in Node.js, but these techniques are available in virtually every programming language.
Vonage API Account
To complete this tutorial, you will need a Vonage API account. If you don’t have one already, you can sign up today and start building with free credit. Once you have an account, you can find your API Key and API Secret at the top of the Vonage API Dashboard.
Gather Dependencies
Create a new directory called signed_webhooks and cd into it. In this directory, run npm install dotenv jsonwebtoken js-sha256 express body-parser.
Create Files and Add Configuration
In our signed_webhooks directory, we’re going to create a server.js and a .env file. The server.js file is where our server code is going to go and our .env file is where our configuration is going to live. In the .env file, add just one field, NEXMO_API_SIGNATURE_SECRET, and set that to the signature secret from your dashboard settings page.
Initialize Dependencies
Now that we’ve gathered all of our dependencies and configured our server, we need to add the server code. Let’s start by initializing our dependencies. Add the following to server.js:
require('dotenv').config();
const jwt = require("jsonwebtoken");
const sha256 = require('js-sha256');
const app = require('express')();
const bodyParser = require('body-parser');
const NEXMO_API_SIGNATURE_SECRET = process.env.NEXMO_API_SIGNATURE_SECRET;
if(!NEXMO_API_SIGNATURE_SECRET){
    throw "Missing Signature Secret";
}
This code will bring in all of our dependencies and pull in the signature secret from our environment.
Add Inbound Message Route
Next, we need to set up the route for inbound-message and status. We’ll assume the webhooks we’re receiving are going to be POST requests, so we will add a route to /webhooks/inbound-message and /webhooks/status and and set up POST requests to be routed through our handleWebhook function.
app.use(bodyParser.json())
app.use(bodyParser.urlencoded({
  extended: true
}))
app
    .route('/webhooks/inbound-message')
    .post(handleWebhook);
app
    .route('webhooks/status')
    .post(handleWebhook)
Handle Inbound Messages
When we get an inbound message, we’ll pull the body out and add it to the payload. Then we’ll split the authorization header on whitespace (the authorization header will be of the form “Bearer Token”, so splitting on the white space and taking the token portion will give us the JWT).
With the token retrieved, we can decode the JWT using our signature secret. As we discussed earlier, this decoding action is tantamount to validating the authenticity of the token. If the JWT is not valid or the auth header is malformed, an exception will be raised by the decoding operation, and we will return a 401. If we’re able to decode the token, we have verified the token’s authenticity—thus, if you’re behind TLS and don’t care to validate the payload, you can safely return a 200 at this point. If, however you choose to verify the payload, it’s as simple as running a JSON.stringify on the payload and comparing it to the payload_hash claim of the decoded JWT. If you detect tampering, you can return a 401 from the endpoint to tell folks they aren’t authorized. Finally, we are going to tell our app to listen on a specified port or on port 3000.
All of this is accomplished in the following handleWebhook request:
function handleWebhook(request, response){
    const payload = Object.assign(request.query, request.body)
    try{
        let token = request.headers.authorization.split(" ")[1]
        var decoded = jwt.verify(token, NEXMO_API_SIGNATURE_SECRET, {algorithms:['HS256']});
        if(sha256(JSON.stringify(payload))!=decoded["payload_hash"]){
            console.log("tampering detected");
            response.status(401).send();
        }
        else{
            console.log("Success");
            response.status(204).send();
        }
    }
    catch(err){
        console.log('Bad token detected')
        response.status(401).send()
    }
}
app.listen(process.env.PORT || 3000)
Testing
For testing purposes, we are just going to run locally. Starting the server is simple: run node server.js, and the server will boot up.
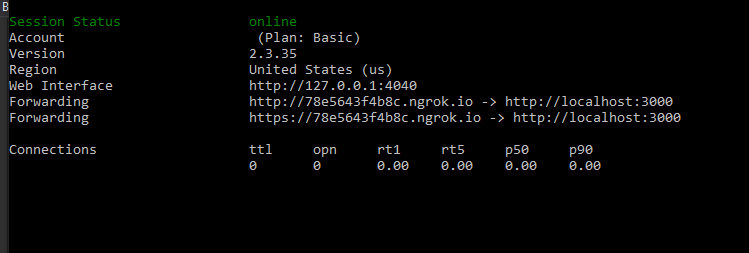
Set Up ngrok
To route webhooks to our server, we are going to use ngrok. Ngrok lets us create a tunnel for our local server. Run the following command.
ngrok http 3000
That will bring up an ngrok session that will look like http://random.ngrok.io—swap out random with whatever the random hash is at the beginning of the URL, then add the route to /webhooks/inbound-message and you will have the URL for your webhooks.
Configure Webhooks
Now that we have a tunnel to our server, the last thing we need to do before we receive messages is to configure our webhooks. For testing purposes, you may want to use the Messages API sandbox—instructions can be found in Martyn’s blog post on the subject or the Messages API Sandbox docs.
For production, you will need to configure your application’s webhooks. You can do this at https://dashboard.nexmo.com/applications/:appid/edit, replacing :appid with your application id. You can also set them with the Nexmo CLI or the Application API.
After editing, your application’s webhook configuration for messages should look like this:
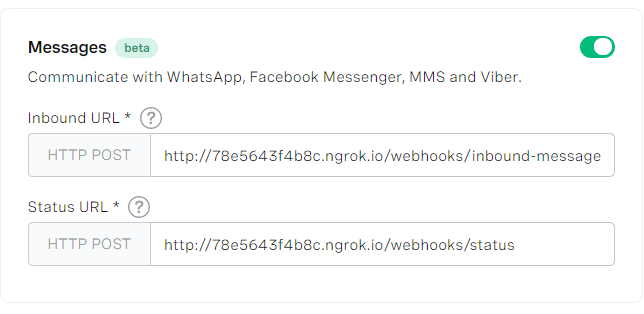
Now that everything is configured, we can test—send a message to either your WhatsApp, Viber, or Facebook Messenger number, and your server will validate the inbound webhooks!
Validating Inbound SMS
Validating inbound SMS is outside of the scope of this post, but we do have a similar methodology for validating inbound SMS messages. You can read about how in our Developer Documentation.
Resources
- The code from this post is available on GitHub.
- A more detailed explainer on how JWT Authentication works is available in our developer docs.
- If you have a JWT you want to manually decode, you can easily do that with jwt.io’s decoder.
The post Validating Inbound Messages From the Vonage Messages API appeared first on Vonage Developer Blog.

Top comments (1)
nice write up! do you know any mobile app to parse JWT?