
In this article, we’ll learn how to build a real-world Ticketing System with Strapi and Vue.js, where users can buy tickets for upcoming events. Our case study will be a system to purchase tickets for upcoming movies.
What You’ll Need for This Tutorial
Table of Contents
- A Brief Intro to Strapi, a Headless CMS
- Scaffolding a Strapi project
- Building the ticket collections
- Building the event collections
- Seeding the database
- Allowing public access
- Building the Vue.js app
- Setting up Tailwind CSS
- Building components and views
- Editing the Strapi Backend Manually
- Conclusion
The completed version of your application should look like the image below:


A Brief Intro to Strapi, a Headless CMS
The Strapi documentation says that Strapi is a flexible, open-source, headless CMS that gives developers the freedom to choose their favorite tools and frameworks and allows editors to manage and distribute their content easily.
Strapi helps us build an API quickly with no hassle of creating a server from scratch. With Strapi, we can do everything literally, and it’s easily customizable. We can add our code and edit functionalities easily. Strapi is amazing, and its capabilities would leave you stunned.
Strapi provides an admin panel to edit and create APIs. It also provides easily-editable code and uses JavaScript.


Scaffolding a Strapi Project
To install Strapi, head over to the Strapi docs at Strapi. We’ll be using the SQLite database for this project. To install Strapi, run the following commands:
    yarn create strapi-app my-project # using yarn
    npx create-strapi-app@latest my-project # using npx
Replace my-project with the name you wish to call your application directory. Your package manager will create a directory with the specified name and install Strapi.
If you have followed the instructions correctly, you should have Strapi installed on your machine. Run the following commands to start the Strapi development server:
    yarn develop # using yarn
    npm run develop # using npm
The development server starts the app on http://localhost:1337/admin.
Building the Event Collections
Let’s create our Event collection type:
- Click on
Content-Type BuilderunderPluginson the side menu. - Under
collection types, clickcreate new collection type. - Create a new
collection-typenamedEvent. - Create the following fields under product content-type:
-
nameasshort text -
dateasDatetime -
imageasmedia(single media) -
priceasNumber(decimal -
tickets-availableasNumber
-
The final Event collection type should look like the image below:

Building the Ticket Collections
Next, we create our Ticket collection type:
- Click on
Content-Type BuilderunderPluginson the side menu. - Under
collection types, clickcreate new collection type - Create a new
collection-typenamedTicket. - Create the following fields under product content-type:
-
reference_numberasUID -
seats_withasNumber -
seats_withoutasNumber -
totalasNumber -
total_seatsasNumber -
eventasrelation(An event has many tickets.)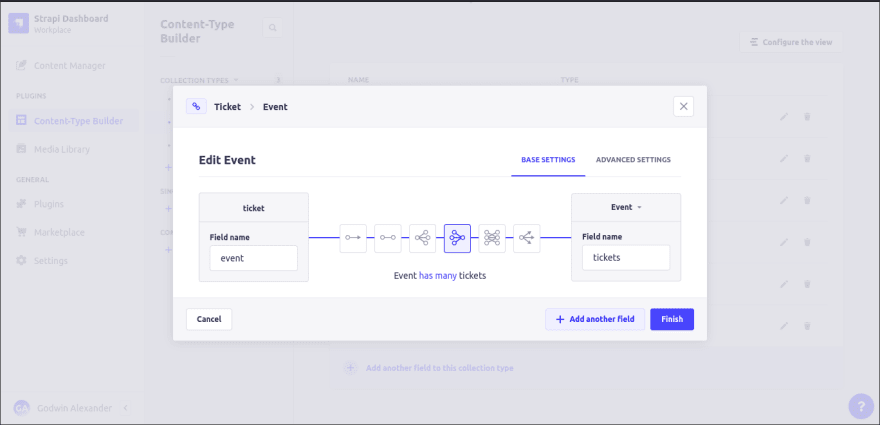
-
The final Ticket collection type should look like the image below:

Seeding the Database
To seed the database, create some data under the Events collection type. In order to do that, follow the steps below:
- Click on
Content Manageron the side menu. - Under
collection types, selectEvent. - Click on
create new entry. - Create as many new entries as desired.
Allowing Public Access
Strapi has user permission and roles that are assigned to authenticated and public users. Since our system does not require user login and sign-up, we need to enable public access for our Content types.
Follow these steps to allow public access:
- Click on
Settingsundergeneralin the side menu. - Under
User and permission plugins, clickRoles. - Click on
public. - Under
permissions, differentcollection typesare listed. Click onEvent, then check bothfindandfindOne. - Next, click on
Ticket. - Check
create,find, andfindOne. - Finally, click
save.
We have successfully allowed public access to our content types; we can now make API calls appropriately.
Building the Vue.js App
Next, we will install and configure Vue.Js to work with our Strapi backend.
To install Vue.js using the @vue/CLI package, visit the Vue CLI docs or run one of these commands to get started.
    npm install -g @vue/cli
    # OR
    yarn global add @vue/cli
Run the following commands to create a Vue.js project once you have installed the Vue CLI on your local machine.
vue create my-project
Replace my-project with the name you wish to call your project.
The above command should start a command-line application that walks you through creating a Vue.js project. Select whatever options you like, but select Router, Vuex, and linter/formatter because the first two are essential in our application. The last thing is to format the code nicely.
After Vue CLI has finished creating your project, run the following command.
    cd my-project
    yarn serve //using yarn
    npm serve //using npm
Finally, visit the following URL: [http://localhost:8080](http://localhost:8080/) to open your Vue.js application in your browser.
Setting up Tailwind CSS
We will use Tailwind CSS as our CSS framework. Let's see how we can integrate Tailwind CSS into our Vue.js Application.
    npm install -D tailwindcss@npm:@tailwindcss/postcss7-compat postcss@^7 autoprefixer@^9
    or
    yarn add tailwindcss@npm:@tailwindcss/postcss7-compat postcss@^7 autoprefixer@^9
In the root of your Vue.js folder, create a postcss.config.js and write the following lines.
    module.exports = {
      plugins: {
        tailwindcss: {},
        autoprefixer: {},
      }
    }
Also, in the root of the Vue.js folder, create a tailwindcss.config.js and write the following lines.
    module.exports = {
      purge: ['./index.html', './src/**/*.{vue,js,ts,jsx,tsx}'],
      darkMode: false, // or 'media' or 'class'
      theme: {
        extend: {},
      },
      variants: {
        extend: {},
      },
      plugins: [],
    }
We have extended the components of the font by adding some fonts which we will use. These fonts have to be installed on your local machine to work appropriately but feel free to use whatever fonts you like.
Finally, create an index.css file in your src folder and add the following lines.
    /* ./src/main.css */
    @tailwind base;
    @tailwind components;
    @tailwind utilities;
Installing Axios for API Calls
We need a package for to make API calls to our Strapi backend, and we'll be using the Axios package for that purpose.
Run the following command to install Axios on your machine.
    npm install --save axios
    or
    yarn add axios
Building Components
In this section, we’ll build the components that make up our vue.js application.
To Build the “EventList” Component:
Create an EventList.vue file located in the src/components folder, and add the following lines of code to the file.
    <template>
      <div class="list">
        <div v-for="(event, i) in events" :key="i" class="mb-3">
          <figure
            class="md:flex bg-gray-100 rounded-xl p-8 md:p-0 dark:bg-gray-800"
          >
            <img
              class="w-24 h-24 md:w-48 md:h-auto md:rounded-none rounded-full mx-auto"
              :src="`http://localhost:1337${event.attributes.image.data.attributes.formats.large.url}`"
              alt=""
              width="384"
              height="512"
            />
            <div class="pt-6 md:p-8 text-center md:text-left space-y-4">
              <blockquote>
                <h1 class="text-xl md:text-2xl mb-3 font-bold uppercase">
                  {{ event.attributes.name }}
                </h1>
                <p class="text-sm md:text-lg font-medium">
                  Lorem ipsum dolor sit amet consectetur, adipisicing elit. Debitis
                  dolore dignissimos exercitationem, optio corrupti nihil veniam
                  quod unde reprehenderit cum accusantium quaerat nostrum placeat,
                  sapiente tempore perspiciatis maiores iure esse?
                </p>
              </blockquote>
              <figcaption class="font-medium">
                <div class="text-gray-700 dark:text-gray-500">
                  tickets available: {{ event.attributes.tickets_available == 0 ? 'sold out' : event.attributes.tickets_available }}
                </div>
                <div class="text-gray-700 dark:text-gray-500">
                  {{ formatDate(event.attributes.date) }}
                </div>
              </figcaption>
              <!-- <router-link to="/about"> -->
              <button :disabled=" event.attributes.tickets_available == 0 " @click="getDetail(event.id)" class="bg-black text-white p-3">
                Get tickets
              </button>
              <!-- </router-link> -->
            </div>
          </figure>
        </div>
      </div>
    </template>
    <script>
    import axios from "axios";
    export default {
      data() {
        return {
          events: [],
        };
      },
      methods: {
        getDetail(id) {
          console.log("btn clicked");
          this.$router.push(`/event/${id}`);
        },
        formatDate(date) {
          const timeArr = new Date(date).toLocaleTimeString().split(":");
          const DorN = timeArr.pop().split(" ")[1];
          return `${new Date(date).toDateString()} ${timeArr.join(":")} ${DorN}`;
        },
      },
      async created() {
        const res = await axios.get("http://localhost:1337/api/events?populate=*");
        this.events = res.data.data;
      },
    };
    </script>
    <style scoped></style>
To Build the “EventView” Component:
Create an EventView.vue file located in the src/components folder, and add the following lines of code to the file.
    <template>
      <div class="">
        <!-- showcase -->
        <div
          :style="{
            backgroundImage: `url(${img})`,
            backgroundColor: `rgba(0, 0, 0, 0.8)`,
            backgroundBlendMode: `multiply`,
            backgroundRepeat: `no-repeat`,
            backgroundSize: `cover`,
            height: `70vh`,
          }"
          class="w-screen flex items-center relative"
          ref="showcase"
        >
          <div class="w-1/2 p-5">
            <h1 class="text-2xl md:text-6xl text-white mb-3 uppercase font-bold my-auto">
              {{ event.attributes.name }}
            </h1>
            <p class="leading-normal md:text-lg mb-3 font-thin text-white">
              Lorem ipsum dolor sit amet consectetur adipisicing elit. Velit natus
              illum cupiditate qui, asperiores quod sapiente. A exercitationem
              quidem cupiditate repudiandae, odio sequi quae nam ipsam obcaecati
              itaque, suscipit dolores.
            </p>
            <p class="text-white"><span class="font-bold">Tickets available:</span> {{ event.attributes.tickets_available }} </p>
            <p class="text-white"><span class="font-bold">Airing Date:</span> {{ formatDate(event.attributes.date) }}</p>
          </div>
        </div>
        <div class="text-center flex justify-center items-center">
          <div class="mt-3 mb-3">
            <h3 class="text-4xl mt-5 mb-5">Get Tickets</h3>
            <table class="table-auto w-screen">
              <thead>
                <tr>
                  <th class="w-1/2">Options</th>
                  <th>Price</th>
                  <th>Quantity</th>
                  <th>Total</th>
                </tr>
              </thead>
              <tbody>
                <tr class="p-3">
                  <td class="p-3">Seats without popcorn and drinks</td>
                  <td class="p-3">${{ formatCurrency(price_of_seats_without) }}</td>
                  <td class="p-3">
                    <select class="p-3" id="" v-model="no_of_seats_without">
                      <option
                        class="p-3 bg-dark"
                        v-for="(num, i) of quantityModel"
                        :key="i"
                        :value="`${num}`"
                      >
                        {{ num }}
                      </option>
                    </select>
                  </td>
                  <td>${{ formatCurrency(calcWithoutTotal) }}</td>
                </tr>
                <tr class="p-3">
                  <td class="p-3">Seats with popcorn and drinks</td>
                  <td class="p-3">${{ formatCurrency(price_of_seats_with) }}</td>
                  <td class="p-3">
                    <select class="p-3" id="" v-model="no_of_seats_with">
                      <option
                        class="p-3 bg-black"
                        v-for="(num, i) of quantityModel"
                        :key="i"
                        :value="`${num}`"
                      >
                        {{ num }}
                      </option>
                    </select>
                  </td>
                  <td>${{ formatCurrency(calcWithTotal) }}</td>
                </tr>
              </tbody>
            </table>
            <div class="m-3">
              <p class="mb-3">Ticket Total: ${{ formatCurrency(calcTotal) }}</p>
              <button
                @click="bookTicket"
                :disabled="calcTotal == 0"
                class="bg-black text-white p-3"
              >
                Book Now
              </button>
            </div>
          </div>
        </div>
        <ticket
          :data="res"
          class="mx-auto h-full z-10 absolute top-0"
          v-if="booked == true"
        />
      </div>
    </template>
    <script>
    import axios from "axios";
    import randomstring from "randomstring";
    import ticket from "../components/Ticket.vue";
    export default {
      data() {
        return {
          quantityModel: [0, 1, 2, 3, 4, 5, 6, 7, 8, 9, 10],
          no_of_seats_without: 0,
          price_of_seats_without: 3,
          no_of_seats_with: 0,
          price_of_seats_with: 4,
          id: "",
          event: {},
          img: "",
          booked: false,
        };
      },
      components: {
        ticket,
      },
      methods: {
        getDetail() {
          console.log("btn clicked");
          this.$router.push("/");
        },
        assignValue(num) {
          console.log(num);
          this.no_of_seats_without = num;
        },
        async bookTicket() {
          console.log("booking ticket");
          console.log(this.booked, "booked");
          try {
            const res = await axios.post(`http://localhost:1337/api/tickets`, {
              data: {
                seats_with: this.no_of_seats_with,
                seats_without: this.no_of_seats_without,
                total_seats:
                  parseInt(this.no_of_seats_without) +
                  parseInt(this.no_of_seats_with),
                total: this.calcTotal,
                event: this.id,
                reference_number: randomstring.generate(),
              },
            });
            this.res = res.data;
            this.res.event = this.event.attributes.name;
            this.res.date = this.event.attributes.date;
            this.booked = true;
            this.no_of_seats_with = 0;
            this.no_of_seats_without = 0;

          } catch (error) {
            return alert(
              "cannot book ticket as available tickets have been exceeded. Pick a number of ticket that is less than or equal to the available tickets"
            );
          }
        },
        formatCurrency(num) {
          if (num.toString().indexOf(".") != -1) {
            return num;
          } else {
            return `${num}.00`;
          }
        },
        formatDate(date) {
          const timeArr = new Date(date).toLocaleTimeString().split(":");
          const DorN = timeArr.pop().split(" ")[1];
          return `${new Date(date).toDateString()} ${timeArr.join(":")} ${DorN}`;
        },
      },
      computed: {
        calcWithoutTotal() {
          return (
            parseFloat(this.no_of_seats_without) *
            parseFloat(this.price_of_seats_without)
          );
        },
        calcWithTotal() {
          return (
            parseFloat(this.no_of_seats_with) * parseFloat(this.price_of_seats_with)
          );
        },
        calcTotal() {
          return this.calcWithoutTotal + this.calcWithTotal;
        },
      },
      async created() {
        this.id = this.$route.params.id;
        try {
          const res = await axios.get(
            `http://localhost:1337/api/events/${this.$route.params.id}?populate=*`
          );
          this.event = res.data.data;
          this.price_of_seats_without = res.data.data.attributes.price;
          this.price_of_seats_with = res.data.data.attributes.price + 2;
          const img =
            res.data.data.attributes.image.data.attributes.formats.large.url;
          this.img = `"http://localhost:1337${img}"`;

        } catch (error) {
          return alert('An Error occurred, please try agian')
        }

      },
    };
    </script>
    <style scoped></style>
Buildthe Ticket Collections
Create a Ticket.vue file located in the src/components folder, and add the following lines of code to the file.
    <template>
      <div
        class="h-full w-full modal flex overflow-y-hidden justify-center items-center"
      >
        <div class="bg-white p-5">
          <p class="m-2">
            Show: <span class="uppercase">{{ data.event }}</span>
          </p>
          <p class="m-2">Date: {{ formatDate(data.date) }}</p>
          <p class="m-2">TicketID: {{ data.reference_number }}</p>
          <p class="m-2">
            Seats without Pop corn and Drinks: {{ data.seats_without }} seats
          </p>
          <p class="m-2">
            Seats with Pop corn and Drinks: {{ data.seats_with }} seats
          </p>
          <p class="m-2">
            Total seats:
            {{ parseInt(data.seats_without) + parseInt(data.seats_with) }} seats
          </p>
          <p class="m-2">Price total: ${{ data.total }}.00</p>
          <router-link to="/">
            <button class="m-2 p-3 text-white bg-black">Done</button>
          </router-link>
        </div>
      </div>
    </template>
    <script>
    export default {
      name: "Ticket",
      data() {
        return {};
      },
      props: ["data"],
      components: {},
      methods: {
        formatDate(date) {
          const timeArr = new Date(date).toLocaleTimeString().split(":");
          const DorN = timeArr.pop().split(" ")[1];
          return `${new Date(date).toDateString()} ${timeArr.join(":")} ${DorN}`;
        },
      },
    };
    </script>
    <style scoped>
    .show_case {
      /* background: rgba(0, 0, 0, 0.5); */
      /* background-blend-mode: multiply; */
      background-repeat: no-repeat;
      background-size: cover;
    }
    .show_img {
      object-fit: cover;
      opacity: 1;
    }
    ._img_background {
      background: rgba(0, 0, 0, 0.5);
    }
    .modal {
      overflow: hidden;
      background: rgba(0, 0, 0, 0.5);
    }
    </style>
Building Views
In this section, we’ll use the components built in the last section to build out the pages on our frontend.
To Build the “Events” View
The Events page makes use of the EventsView.vue component, which we created in the previous section.
Create an Event.vue file located in the src/views folder, and edit the content of the file to the following:
    <template>
      <div class="about">
        <event-view />
      </div>
    </template>
    <script>
    import EventView from "../components/EventView.vue";
    export default {
      name: "Event",
      components: {
        EventView,
      },
    };
    </script>
    <style scoped>
    .show_case {
      /* background: rgba(0, 0, 0, 0.5); */
      /* background-blend-mode: multiply; */
      background-repeat: no-repeat;
      background-size: cover;
    }
    .show_img {
      object-fit: cover;
      opacity: 1;
    }
    ._img_background {
      background: rgba(0, 0, 0, 0.5);
    }
    </style>
To Build the “Home” View:
The Home page makes use of the EventList.vue component, which we created in the previous section.
Create an Home.vue file located in the src/views folder, and edit the content of the file to the following:
    <template>
      <div class="home">
        <h1 class="text-center text-xl mb-3 font-bold mt-4">Upcoming Events</h1>
        <div class="flex self-center justify-center">
          <event-list class="w-5/6" />
        </div>
      </div>
    </template>
    <script>
    // @ is an alias to /src
    import EventList from "../components/EventList.vue";
    export default {
      name: "Home",
      components: {
         EventList,
      },
    };
    </script>
Updating the Vue Router
We created some new view files that we need to make accessible as routes. However, for that to happen, we need to update our router to reflect the changes made.
In order to make the changes to Vue router, follow the steps below:
- Open the
index.jsfile located atsrc/router, and edit the content to the following:
    import Vue from "vue";
    import VueRouter from "vue-router";
    import Home from "../views/Home.vue";
    import Event from "../views/Event.vue";
    Vue.use(VueRouter);
    const routes = [
      {
        path: "/",
        name: "Home",
        component: Home,
      },
      {
        path: "/event/:id",
        name: "Event",
        component: Event,
      }
    ];
    const router = new VueRouter({
      mode: "history",
      base: process.env.BASE_URL,
      routes,
    });
    export default router;
Editing the Strapi Backend Manually
One major advantage of Strapi is that it allows us to edit the controllers, services, and more.
In this section, we’re going to edit the ticket controller in our Strapi backend. We want to carry out some logic when creating a new ticket, such as:
- Checking if the tickets available for an event are enough to cover the creation of new tickets.
- Checking if the tickets available for an event have been exhausted.
Follow the steps below to edit the ticket controller:
- Open the
strapifolder in your favorite code editor. - Navigate to the
src/api/ticketfolder. - Under the
src/api/ticketfolder, click the controllers. - Open up
ticket.js. - Finally, update the content of
ticket.jsto contain the following code:
    'use strict';
    /**
     *  ticket controller
     */
    const { createCoreController } = require('@strapi/strapi').factories;
    module.exports = createCoreController('api::ticket.ticket', ({ strapi }) => ({
        async create(ctx) {
            const event_id = Number(ctx.request.body.data.event)
            // some logic here
            const event = await strapi.service('api::event.event').findOne(event_id, {
                populate: "tickets"
            })
            if(ctx.request.body.data.total_seats > event.tickets_available) {
                return ctx.badRequest('Cannot book ticket at the moment')
            }
            const response = await strapi.service('api::ticket.ticket').create(ctx.request.body)
            await strapi.service('api::event.event').update(event_id, { data: {
                tickets_available: event.tickets_available - ctx.request.body.data.total_seats
            }})
            return response;
          }

    }));
Conclusion
I hope this tutorial has given you an insight into how to build a ticketing system with Strapi. There’s so much more you could add to this application, just think of this as a starting point.

Top comments (1)
In this article, I intended to cover everything related to build a real-world Ticketing System with Strapi and Vue.js, where users can buy, book, sell, and use tickets for upcoming events. make someone obsessed with you