[Caution] Since the purpose of this article is to "try", I won't actually implement the code in Python.
PostScript (8/1): Samples have been released on Pixiv.
I hope that you will understand the simple concept and overall picture of GAN, which is the awesomeness of StyleGAN and the fact that deep learning can do this.
This article is a re-edited version of what I wrote in Qiita. Original Article
First, I will briefly introduce the conceptual things of GAN and StyleGAN (although I was wondering whether to write them in this article). If you want to show the result for the time being, please skip What's ~.
Please note that it may not be an essential understanding because the explanations include mathematical formulas and technical terms as much as possible for easy understanding.
What's GAN?
GAN is an abbreviation for Generative Adversarial Network and is one of the so-called artificial intelligence algorithms.
It is implemented by two neural networks that compete with each other, and taking image generation as an example, two types, a Generator that generates a fake image and a Discriminator that determines whether it is a fake image, compete with each other. It is okay if you have the recognition that the accuracy of generation will be improved by doing so.
The Generator and Discriminator in GAN are often compared to the relationship between a "suspicious person who tells a true lie" and a "police officer who tries to detect the lie".
Since then, research on GAN has progressed, and many more accurate derivations such as DCGAN, GCGAN, and W-GAN have been born.
I think DCGAN is especially famous for learning using CNN (Convolutional Neural Network). I have also tried implementing it using DCGAN before.
What's StyleGAN2?
To explain StyleGAN2 in one word, it is "an improved version of StyleGAN, which is a type of ultra-high image quality GAN."
↓ is the image generated by StyleGAN2.

Obviously, no one took it and the person in the image doesn't really exist.
The advantage of StyleGAN is that it has super high image quality. The above image is 1024 pixels. Amazing ...!
I have also tried image generation with DCGAN using Pytorch, but the limit of learning on a personal computer was at most 128 pixels in height and width. (I may have worked harder, but I have a good memory of the GPU performance and the data set preparation.)
StyleGAN was developed by NVIDIA. NVIDIA, a GPU super-professional who has been working on GeForce and Quadro for many years, is convinced.
Also, inspired by PGGAN (Progressive Growing of GANs), it is characterized by the fact that it does not generate high-quality images at once, but gradually grows from low-quality images to high-quality images.
In other words, once the rough features such as contours are reproduced during the initial low resolution generation, and the detailed features such as eyes and mouth are reproduced during the later high resolution generation, very high quality generation is achieved. I can do it.
It would be nice if AdaIN could talk about StyleGAN in more detail, but if you say this, there is no end to it, so please look at the repository and treatises.
Or google.
[GitHub]https://github.com/NVlabs/stylegan2
[Paper]https://arxiv.org/abs/1912.04958
Try
It's been a long story, but it's the main subject. Let's actually do it.
Make Envinorment
StyleGAN2 is the one that was popular last year, so the environment must be the same as last year (´・ ω ・`)
The following are the operating requirements of the software.
- Python 3.7
- CUDA ToolKit 10.0
- cuDNN 7.4
- Tensorflow 1.14
Since Tensorflow 2.x series cannot be used, Python 3.7 or later cannot be used due to installation with pip etc. It's annoying ...
Install TensorFlow
Please refer to my article below for details on how to install Tensorflow 1.14.
https://0115765.com/archives/1064
I will write it roughly here.
※It seems that Linux + Docker is better, but this time I will try it on Windows for convenience.
Please download (directly link) Python 3.7.9 and install it.
Then download and install CUDA 10.0.
cuDNN7.4 can be downloaded from the official website, but requires an NVIDIA Developer account. Please take it as appropriate.
After DL, move everything inside the folder to C:\Program Files\NVIDIA GPU Computing Toolkit\CUDA\v10.0 add environment variables as below.

Finally, let's install Tensorflow with pip.
pip install -U pip setuptools
pip install -U tensorflow-gpu==1.14 tensorflow_datasets
Operation check
Enter the following in Python's interactive shell.
Check the version with import tensorflow as tf; print (tf.__version__).
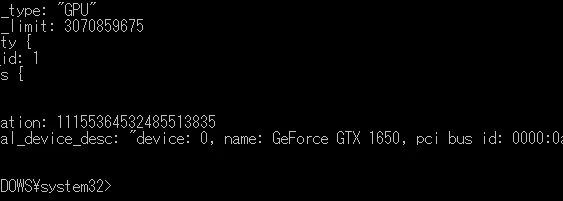
From tensorflow.python.client import device_lib; print (device_lib.list_local_devices ()) to see if CUDA works.

Various DL
As I wrote earlier, it takes a tremendous amount of time and resources to learn because it can output with high image quality. So this time, there is a saint who has published a trained file that he learned with a lot of animation images in advance, so download it from there and use it.
Introduction page | Download link (mega.nz)
Clone the most important Style GAN. (Also, please include the pkl file you downloaded earlier)
git clone https://github.com/NVlabs/stylegan2
cl.exe
A Visual C ++ compiler is required to run StyleGAN2
So please install the C ++ development environment with Visual Studio 2017. It's not 2019, it's 2017! (Angry)
In 2019, I get the following error.
host_config.h(143): fatal error C1189: #error: -- unsupported Microsoft Visual Studio version! Only the versions between 2013 and 2017 (inclusive) are supported!
After installation, just pass the path.
I think it depends on the person, but I found it in cl.exe at C:/Program Files (x86)/Microsoft Visual Studio/2019/Community/VC/Tools/MSVC/14.23.28105/bin/Hostx64/x64にcl.exe.
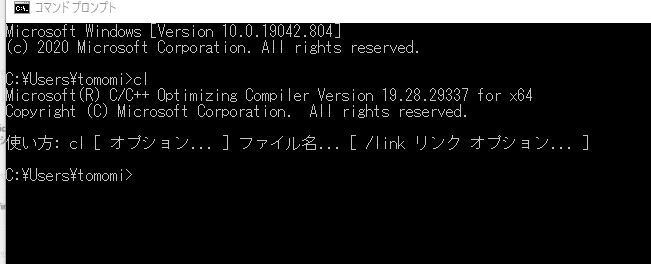
Now that the compiler is usable, enter cl and check.

If it's okay, copy the full path of the directory containing cl.exe to sompiler_bindir_search_path in stylegan2/dnnlib/tflib/custom_ops.py.

Let's Move
I will try it.
run_generator.py in the folder you cloned earlier is a Python file for generating images based on the trained model in pkl format.
Start a command prompt in the StyleGAN directory and enter the following.
python run_generator.py generate-images --network=<pkl file> --seeds=6600-6625
The important parameters are as follows.
-
--seed→ The seed value to be generated. If you set it to ex.6000-6025, 26 cases will be generated. If you set it to135,541,654, 3 images with the corresponding seed value will be generated. ) -
--network→ See trained model.
Results
This time, I generated about 201 seed values of 4000-4200.
The result is posted in the following Git repo.
https://github.com/tomomi0115/stylegan2-generated-image
Here are some of the better ones.

The image size is 512 pixels. By the way, the one on the upper left is the icon of My Twitter @tomox0115.
By the way, 2^32(4,294,967,296) images can be generated.
In conclusion
I'm not writing the code this time, but I tried to generate an image.
I've noticed something now, but it seems that there is also a Pytorch version, so I'd like to implement it with that.
I'm glad if you can use it as a reference...
About Me
I'm writing a blog. I'm an otaku high school student who likes server-side systems such as PHP and JS. I also do some native development in C # and Python.
Please Follow below!
My Blog
Twitter @ichii731
GitHub @ichii731


Top comments (0)