"The field of artificial intelligence (AI) has experienced a sudden explosive boom in recent months, with advancements in machine learning, neural networks, and natural language processing. AI is revolutionizing industries from healthcare to finance to transportation, and its impact is only set to increase in the years to come. The sudden boom in AI is due to a confluence of factors, including the availability of massive amounts of data, the rise of cloud computing, and the development of powerful algorithms. In this article, we will explore the reasons behind the sudden AI boom and its implications for the future and how to utilize this tool as a developer."
If you are reading this then I guess you liked the opening paragraph above, well it was written by the most popular AI tool today **ChatGPT **and this is proof of its capability and the impact it has had over the last few months on most activities surrounding humans and computers in general. As a Software Developer, I became curious as to how AI models could be utilized. In this article, I will share steps and guide you to building your very own text completion chatbot using **Open AI's API **and also make sure you understand some very important concepts.
Before we start, look at the below as your table of contents and guide for this Article:
1. Understanding prompt Engineering.
2. Examples of prompts with chatGPT.
3. Different AI models from OpenAI and uses.
4. Understanding the temperature scale and its effect on AI responses.
5. Choosing your tech stack for the build, Creating Node.js, Express.js server and OpenAI setup.
6. Creating React App and making an API call to the back-end.
**
*7. Receiving responses from the backend.
## Understanding Prompt Engineering
Firstly do not get overwhelmed by the term** "Prompt Engineering"**, it's a simple theoretical concept to grasp. It has to do with effectively querying (asking questions) to an AI to get the desired or even a much better outcome than expected. This is because even though AI models are trained to give humanlike responses there are still limits to their ability to properly understand questions. So even though they are made to be intelligent, there are definitely better ways to ask questions rather than asking a regular person.
## Examples of Prompts with ChatGPT
Let us look at one example below:

Now let us look at a more structured prompt.
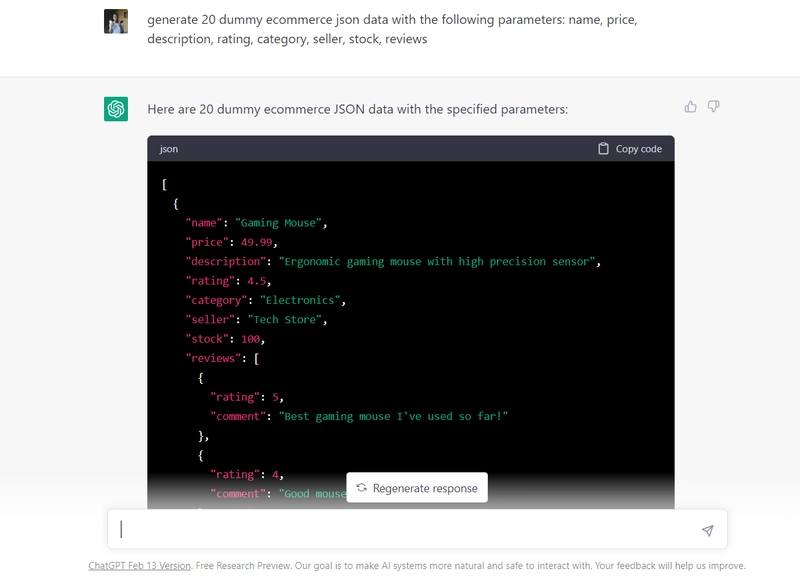
If you look at the two images above clearly, you will see that in the first chatGPT gives a vague response that makes in the first one. In the second image, the response is much more detailed and straight to the point. One can also see that this is partly because of the prompts used, the first one had little detail and so the data was generated based on the little it could grasp. In the second image, the parameters were defined and this goes to show exactly the significance of Prompt Engineering.
## Different AI models from Open AI and their uses.
AI is capable of doing a lot of tasks but in other to improve efficiency and other factors, OpenAI created models named after popular personalities or technical terms. Each of them has a particular field they are trained to perform better at. The image below will show you all the current models.
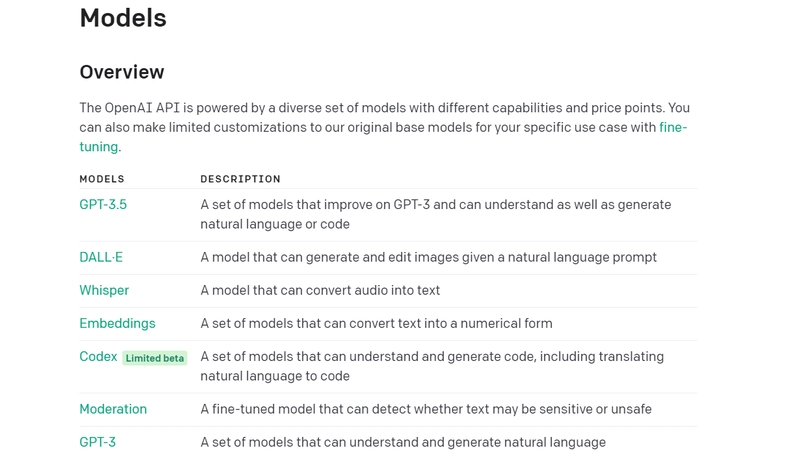
You can also head on to Open AI API site to learn more. The AI model we will use is the text-DaVinci-003 based on GPT-3.
## Understanding the temperature scale and its effect on AI responses.
Just like the prompts enable you to query the AI model, the temperature also has an important role to play in the nature of the responses you get. The temperature scale ranges from 0 to 1 and different temperature values affect the creativity of the AI. Let us look at an example.

If you pay attention to the above image you can see I asked the AI a question "What is the best way to learn to code?" When you look to the right you can see there is a temperature scale and it is set to zero. Now the answer it gives seems fair enough but just hold on till you see the reply with a higher temperature value below.

In this next example, I asked the AI the same question on a temperature scale value of 1 and if you take a look at the answer you will see a difference. The AI is more direct and precise and goes ahead to even mention the programming languages needed to learn to code. Later in this article in your backend build you will find out that you can change the temperature value yourself when working with the API.
In general, the higher the temperature, the more flexible, precise and honest the AI gets with its responses. it is very simple to understand, some developers even argue that the temperature scale of chatGPT is set to a low value as a control measure, but who knows?
## Choosing your tech stack for the build.
As a developer, your tech stack is a combination of languages and tools that you are comfortable building with. I am a MERN stack developer and that means I work with React.js on the front end and Node.js, Express.js on the back end and MongoDB for the databases.
The OpenAI API currently supports Python and Node.js for builds

I will be working with Node.js if you work with python be sure to still follow the steps and you will be fine, so let us get started.
## Setting up Express.js server and API setup
Open your IDE of choice, mine is VS code. Create a project with a folder for the backend and the frontend too.

Initialize your package.json to keep a record of your dependencies by using the following command.
npm init -y
The next step is to install the following packages from npm
npm install openai body-parser dotenv cors
Now we set up our express server and require all our modules for the project.

If you are familiar with APIs you will remember that you usually need an API key for authorization and so you have to generate one. Head over to Open AI and create an account. While you are in click on your profile icon at the top right corner.

You will see options to generate an API key, do this and continue.

Please be mindful that you do not share your API key with anyone as it is personal, as a result of this we will assign this API key to a variable in our .env file which we will create next. This helps with security to ensure unauthorized users do not take advantage of our code.

Now we can refer to the API key as OPENAI_API_KEY, you can also give it any other variable name of your choice.
Now let us write the remaining code for the backend with the documentation as the guide.

All the logic is written in the server.js file for the sake of simplicity in the code. If you do not understand it all do not panic, I will explain everything completely.
In the beginning, we reference the configuration function with the apiKey as its value then we reference the OPENAI_API_KEY just like we defined in our** dotenv **variables.
The next handleError function is for error handling in case we have a bug with the configuration function for the API key.
We later use the body-parser, a node.js body-parsing middleware. Cors is used to limit privileges to routes as a means of security.
The next is the main logic as a post request to the client side for use, for more reference visit Open AI.
## Creating React App and making an API call to the back-end.
In your frontend folder create a react app using npm, npx or yarn depending on your preference and give it a name. I prefer npm because I am accustomed to it and I will call mine alexander-ai.
create-react-app alexander-ai
Clean up your react-app boilerplate code to your liking, the react-app will be a single-page application for simplicity but you can customize your app for more frontend functionality if you wish.
In your App.js file, we use the state hook to manage the state for messages we will send to the server and responses respectively.

Next, we have to make an API call to our backend server to get responses. I will install an npm package called Axios to help me with this.
npm install axios
Now, we make the API call using axios.post, alternatively you can make an API call using the fetch API as seen in the code sample below.

To receive and send responses to the server we design a simple form for input, you can play around with your user interface and make it into a chat app. For simplicity, we will keep it this way.

If you have followed this tutorial up to this point, you should give yourself a pat on the back as you have done well. Now you can go load your react app in your browser and hold a conversation with your chatbot.
For more reference on the source code, you can check my GitHub and Open AI. Follow me if you are interested in topics like this, I hope you come back next time.

Top comments (2)
Always asked what prompt engineering was. This is a load of magical stuff. Good write up, definitely checking it out
Thank you very much, glad you learnt something