Dynamsoft Barcode Scanner API is open source and free to customize. It currently provides two modes: Single and Multiple. In Single mode, the barcode scanner freezes the camera preview and waits for the user to select a barcode if multiple barcodes are detected. In Multiple mode, the scanner instantly returns all barcodes found in the camera preview. A common multi-code scanning scenario is when users want to filter and select only the desired barcode results. This article will guide you on how to merge the functionality of Single and Multiple modes to enable selective multiple barcode scanning.
Android Barcode Scanner Demo Video
Prerequisites
- Obtain a free trial license for Dynamsoft Barcode Reader.
Steps to Customize Barcode Scanner API for Multi-Selection
The BarcodeScanner project created in the previous article will be used as the base. It consists of an application project and a Barcode Scanner API module.
Step 1: Modify the Android Application Project
In this new scenario, only one button is required to trigger the barcode scanning process.
-
Update the layout file
activity_main.xmlto remove the Single mode button and rename the Multiple mode button.
<?xml version="1.0" encoding="utf-8"?> <androidx.constraintlayout.widget.ConstraintLayout xmlns:android="http://schemas.android.com/apk/res/android" xmlns:app="http://schemas.android.com/apk/res-auto" xmlns:tools="http://schemas.android.com/tools" android:id="@+id/main" android:layout_width="match_parent" android:layout_height="match_parent" android:padding="16dp" tools:context=".MainActivity"> <Button android:id="@+id/btn_multi" android:layout_width="wrap_content" android:layout_height="wrap_content" android:text="@string/button_multi_scan" android:textColor="@android:color/white" app:layout_constraintBottom_toBottomOf="parent" app:layout_constraintStart_toStartOf="parent" app:layout_constraintEnd_toEndOf="parent" /> <TextView android:id="@+id/tv_result" android:layout_width="0dp" android:layout_height="0dp" android:textSize="20sp" android:textIsSelectable="true" android:scrollbars="vertical" android:overScrollMode="always" android:padding="16dp" android:background="@android:color/white" app:layout_constraintTop_toTopOf="parent" app:layout_constraintStart_toStartOf="parent" app:layout_constraintEnd_toEndOf="parent" app:layout_constraintBottom_toTopOf="@+id/btn_multi" android:layout_marginBottom="16dp" /> </androidx.constraintlayout.widget.ConstraintLayout> -
Update the
handleButtonClick()method inMainActivity.javato start the barcode scanning process.
private void handleButtonClick(View v) {
    config.setScanningMode(EnumScanningMode.SM_MULTIPLE);
    launcher.launch(config);
}
Step 2: Modify the Barcode Scanner API Module
The workflow of the barcode scanning process is as follows:
- Start the camera preview and detect barcodes.
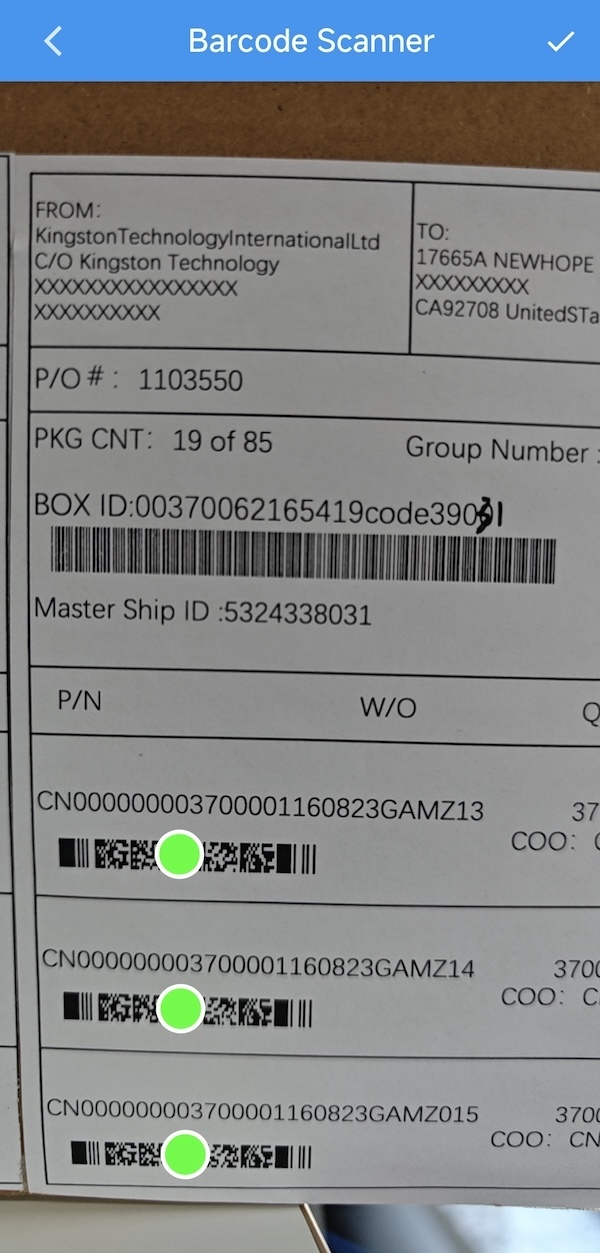
- When the user clicks the Capture button, the barcode scanner freezes the camera preview and displays the detected barcodes with overlay circles.
- Users can remove undesired barcodes by tapping the overlay circles.
- Click the checkmark button to confirm the selected barcodes and return the results to the application.
Navigate to the dbrbundle module to modify the barcode scanner API.
1. Add a Checkmark Button to activity_scanner_barcode.xml
- Download the checkmark icon from Google Fonts and save it as
done.xmlin theres/drawablefolder. -
Add the checkmark button to the top-right corner of the toolbar.
<?xml version="1.0" encoding="utf-8"?>
<RelativeLayout xmlns:android="http://schemas.android.com/apk/res/android"
    xmlns:app="http://schemas.android.com/apk/res-auto"
    android:layout_width="match_parent"
    android:layout_height="match_parent">

    <androidx.appcompat.widget.Toolbar
        android:id="@+id/toolbar"
        android:layout_width="match_parent"
        android:layout_height="?attr/actionBarSize"
        android:background="@color/colorPrimary"
        android:elevation="4dp"
        android:theme="@style/ThemeOverlay.AppCompat.Dark.ActionBar">

        <RelativeLayout
            android:layout_width="match_parent"
            android:layout_height="match_parent">

            <ImageView
                android:id="@+id/iv_back"
                android:layout_width="25dp"
                android:layout_height="25dp"
                android:layout_marginStart="16dp"
                android:layout_marginTop="16dp"
                android:src="@drawable/ic_arrow_left" />

            <TextView
                android:layout_width="wrap_content"
                android:layout_height="wrap_content"
                android:layout_centerInParent="true"
                android:text="Barcode Scanner"
                android:textColor="@android:color/white"
                android:textSize="18sp"
                android:textStyle="bold" />

            <ImageView
                android:id="@+id/btn_check"
                android:layout_width="25dp"
                android:layout_height="25dp"
                android:layout_alignParentEnd="true"
                android:layout_marginEnd="16dp"
                android:layout_marginTop="16dp"
                android:src="@drawable/done" />

        </RelativeLayout>
    </androidx.appcompat.widget.Toolbar>

    <com.dynamsoft.dce.CameraView
        android:id="@+id/camera_view"
        android:layout_width="match_parent"
        android:layout_height="match_parent" />

    <View
        android:id="@+id/touch_view"
        android:layout_width="match_parent"
        android:layout_height="match_parent" />

    <LinearLayout
        android:id="@+id/action_view"
        android:layout_width="wrap_content"
        android:layout_centerHorizontal="true"
        android:layout_height="wrap_content"
        android:layout_alignParentBottom="true"
        android:gravity="center"
        android:layout_marginBottom="90dp">

        <android.widget.Button
            android:id="@+id/btn_torch"
            android:layout_width="40dp"
            android:layout_height="40dp"
            android:background="@drawable/icon_flash_off" />

        <android.widget.Button
            android:id="@+id/btn_toggle"
            android:layout_marginStart="50dp"
            android:layout_width="40dp"
            android:layout_height="40dp"
            android:background="@drawable/toggle_lens" />
    </LinearLayout>

    <Button
        android:id="@+id/btn_capture"
        android:layout_width="wrap_content"
        android:layout_height="wrap_content"
        android:layout_centerHorizontal="true"
        android:layout_above="@id/action_view"
        android:layout_marginBottom="16dp"
        android:text="Capture"
        android:src="@drawable/circle" />
</RelativeLayout>
2. Add a Click Event for the Checkmark Button in BarcodeScannerActivity.java
Declare the checkmark button and implement the click event.
private ImageView btnSave;

@Override
protected void onCreate(@Nullable Bundle savedInstanceState) {
    ...
    btnSave = findViewById(R.id.btn_check);
    ...
}

private void initCaptureButton() {
        ...

        btnSave.setVisibility(View.VISIBLE);
        btnSave.setOnClickListener(v -> {
            BarcodeResultItem[] resultArray = mapResultItem.values().toArray(new BarcodeResultItem[0]);
            if (resultArray.length > 0) {
                resultOK(BarcodeScanResult.EnumResultStatus.RS_FINISHED, resultArray);
                finish();
            }

        });
    }
mapResultItem is a HashMap that stores the detected barcode results. The resultOK() method is used to return the selected barcode results to the application.
3: Draw Overlay Circles for Barcode Selection
-
Register the callback function to handle the barcode detection results:
protected void onResume() { ... mRouter.addResultReceiver(new CapturedResultReceiver() { @Override public void onDecodedBarcodesReceived(@NonNull DecodedBarcodesResult result) { if (isCaptureTriggered) { processResult(result); } } }); ... } -
Freeze the camera preview and draw overlay circles for detected barcodes:
private void processResult (DecodedBarcodesResult result) { if (result.getItems().length > 1) { if (configuration.isBeepEnabled()) { beep(); } mRouter.stopCapturing(); try { mCamera.setScanRegion(null); mCamera.close(); } catch (CameraEnhancerException e) { throw new RuntimeException(e); } runOnUiThread(() -> { btnCapture.setVisibility(View.GONE); mCameraView.setScanLaserVisible(false); btnToggle.setVisibility(View.GONE); btnTorch.setVisibility(View.GONE); }); drawSymbols(result); } } private void drawSymbols(DecodedBarcodesResult scanResult) { runOnUiThread(() -> { btnToggle.setVisibility(View.GONE); btnTorch.setVisibility(View.GONE); }); int matchedStyle = DrawingStyleManager.createDrawingStyle(Color.WHITE, 3, Color.GREEN, Color.WHITE); DrawingLayer layer = mCameraView.getDrawingLayer(DrawingLayer.DBR_LAYER_ID); layer.setDefaultStyle(matchedStyle); ArrayList<DrawingItem> drawingItemArrayList = new ArrayList<>(); mapResultItem = new HashMap<>(); int offsetX = 0; int offsetY = 0; if (scanRegion != null) { if (scanRegion.measuredInPercentage) { Size size = mCamera.getResolution(); offsetX = (int) (scanRegion.left * size.getHeight()); offsetY = (int) (scanRegion.top * size.getWidth()); } else { offsetX = (int) scanRegion.left; offsetY = (int) scanRegion.top; } } BarcodeResultItem[] items = scanResult.getItems(); for (int i = 0; i < items.length; i++) { BarcodeResultItem item = items[i]; int arcCenterX = (item.getLocation().points[0].x + offsetX + item.getLocation().points[2].x + offsetX) / 2; int arcCenterY = (item.getLocation().points[0].y + offsetY + item.getLocation().points[2].y + offsetY) / 2; Point arcCenter = new Point(arcCenterX, arcCenterY); ArcDrawingItem drawingItem = new ArcDrawingItem(arcCenter, radius, EnumCoordinateBase.CB_IMAGE); drawingItem.addNote(new Note("index", i + ""), true); mapResultItem.put(i, item); drawingItemArrayList.add(drawingItem); } layer.setDrawingItems(drawingItemArrayList); } -
Remove undesired barcodes by tapping the overlay circles. Coordinate conversion is required to match the touch event with the barcode location:
mTouchView.setOnTouchListener((v, e) -> {
    if (e.getAction() == MotionEvent.ACTION_DOWN) {
        ArrayList<DrawingItem> items = mCameraView.getDrawingLayer(DrawingLayer.DBR_LAYER_ID).getDrawingItems();
        if (items.size() > 1) {
            for (int index = 0; index < items.size(); index++) {
                DrawingItem item = items.get(index);
                int centerX = ((ArcDrawingItem) item).getCentre().x;
                int centerY = ((ArcDrawingItem) item).getCentre().y;
                float touchX = e.getX();
                float touchY = e.getY();
                Point point = mCamera.convertPointToViewCoordinates(new Point(centerX, centerY));
                float density = getResources().getDisplayMetrics().density;
                if (isPointInCircle(touchX, touchY, point.x / density, point.y / density, 70)) {
                    items.remove(item);
                    mapResultItem.remove(index);
                    mCameraView.getDrawingLayer(DrawingLayer.DBR_LAYER_ID).setDrawingItems(items);
                    break;
                }
            }
        }
    }
    return false;
});

Top comments (0)