In this article we are going to learn about OpenStack networking with Calico.
OpenStack is an open source platform for Cloud computing.
Calico is a networking solution with a focus on simplicity, scalability, and security.
Optimized networking is important for developers because it impacts application performance, security, scalability.
Developers are often faced with networking challenges including complexity in setup, difficulty in managing security policies, performance bottlenecks and difficulty in scaling the networking.
When we look at understanding the integration of OpenStack with Calico. We are looking for Calico networking solution with OpenStack cloud infrastructure
Compared to alternatives like Open vSwitch and Linux Bridge, Calico has excellent policy driven networking , reducing complexity and superior container workload management
Calico can be best used in environments where you are running containerized applications, Kubernetes clusters, and highly scalable cloud deployments that need flexible secure and performant networking
Prerequisites and Environment Setup
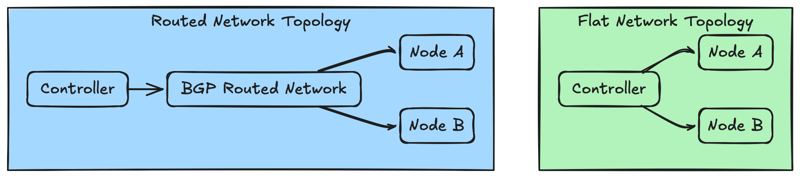
common network topologies for openstack and calico
A. Flat network topology
- All compute nodes and workloads share the same layer 2 network segment
- This is usually used in small deployments and test environments ### B. Routed Network topology
Layer 3 (IP routing) is used between the nodes
Calico leverages BGP to distribute the routing information. This is best for scalable and production environments
OpenStack Controllers --------+
                              |
OpenStack Compute Node A -----+---- Layer 3 Routed network (Calico/BGP) ----+---- Internet
                              |
OpenStack Compute Node B -----+
In the above setup the calico distributes the workload IP routes through BGP dynamically

2.Design Considerations for scalability and performance
A. IP address Planning
- Allocate a large CIDR block scaling needs in the future
- Calico workloads: 172.16.0.0/16
-
VM tenant network 10.0.0.0/16
B. BGP Routing
Calico uses BGP for dynamic route management
Consider setting dedicated Route reflectors in order to improve the scalability
Example of BGP Configuration calico.yaml snippet.
apiVersion: projectcalico.org/v3
kind: BGPPeer
metadata:
  name: bgp-peer-1
spec:
  peerIP: 192.168.10.254
  asNumber: 64512
- To confirm the BGP configuration on nodes
sudo calicoctl node status
C. Network Performance Optimization
Depending on the environment, enable the IP in IP or VXLAN encapsulation. Remember to use IP in IP only if necessary otherwise prefer native routing for performance reasons.
Here is a sample IP-in-IP configuration calico.yaml
apiVersion: projectcalico.org/v3
kind: IPPool
metadata:
  name: default-pool
spec:
  cidr: 172.16.0.0/16
  ipipMode: Always       # or CrossSubnet
  natOutgoing: true
D. Node Placement
- Keep network latency low by deploying compute nodes in the proximity
- Consider dedicated network hardware.
E. Resource Allocation
- Make sure to allocate sufficient CPU resources for Calico. It requires CPU for route calculations and packet processing
- Keep the network MTU consistent
# Adjust MTU Example:
ip link set dev eth0 mtu 1450
- Best Practices for Network Security in Calico Deployments
Calico is policy driven, thus enabling security enforcement at the network layer, this means that it is important for containerized applications
A. Policy driven network isolation
Use calico network policies to implement zero trust security principles
Example of a Calico Network Policy
Allow the communication only between web and DB pods in namespace production
apiVersion: projectcalico.org/v3
kind: NetworkPolicy
metadata:
  name: web-db-policy
  namespace: production
spec:
  selector: app == 'database'
  ingress:
    - action: Allow
      source:
        selector: app == 'web'
  egress:
    - action: Allow
B. Implementing Network Segmentation
- Using namespaces and labels consistently in order to segment workloads logically. for example: create separate tenants, applications or environments
apiVersion: projectcalico.org/v3
kind: NetworkPolicy
metadata:
  name: deny-all-default
  namespace: staging
spec:
  selector: all()
  ingress:
    - action: Deny
  egress:
    - action: Allow
3.Best Practices for Network Security
A. Restrict Default Access
By default, always implement a default deny policy that denies all the traffic and only allow explicitly defined traffic
apiVersion: projectcalico.org/v3
kind: GlobalNetworkPolicy
metadata:
  name: default-deny-all
spec:
  selector: all()
  ingress:
    - action: Deny
  egress:
    - action: Allow
Explicitly enable required traffic afterward.
B. Apply least privilege principle
Allow the necessary protocols, ports and traffic flows
Here we present an example of permitting HTTP on TCP port 80 to frontend
apiVersion: projectcalico.org/v3
kind: NetworkPolicy
metadata:
  name: frontend-allow-http
  namespace: frontend
spec:
  selector: app == 'frontend'
  ingress:
    - action: Allow
      protocol: TCP
      destination:
        ports:
          - 80
Step by Step Integration and Installation of Calico with OpenStack
Installation of Calico Components
Pre-requisites:
- Installed OpenStack (you need Yoga or newer version)
- Administrative access to OpenStack controllers and compute nodes
- Kubernetes cluster set up on the OpenStack nodes, that is required for Calico integration using Kubectl
- Kubernetes need to installed and configured prior to calico integration
Step A: Install Calico on Controller and Compute Nodes
Run the below commands on your OpenStack nodes:
# Download the latest Calico binary:
curl -L https://github.com/projectcalico/calico/releases/latest/download/calicoctl-linux-amd64 -o calicoctl
sudo mv calicoctl /usr/local/bin/
sudo chmod +x /usr/local/bin/calicoctl

# Verify Calico installation:
calicoctl version
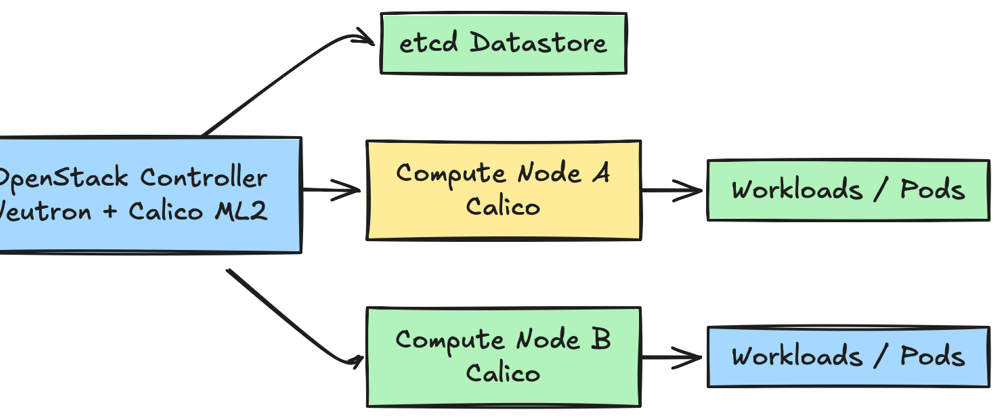
Step B: Configure etc Backend (If etcd is used)
Calico often uses etc as a datastore. Install etcd on the controller node:
sudo apt-get install -y etcd
sudo systemctl enable --now etcd
- Verify etcd service:
sudo systemctl status etcd
Step C: Install Calico Networking Components
Install Calico packages on the OpenStack nodes:
# On Debian nodes:
curl -L https://projectcalico.docs.tigera.io/archive/v3.25/manifests/calico.yaml -o calico.yaml
kubectl apply -f calico.yaml
2.Common Pitfalls and Troubleshooting Tips during Installation
Common Pitfall No.:1 Etcd Connectivity Issues
Ensure etcd is reachable from nodes:
curl -L http://<ETCD_IP>:2379/version
Troubleshooting
verify that the firewall rules, DNS and reachability.
Common Pitfall No.:2 Calico binary version mismatch
Check versions consistently
calicoctl version
Neutron configuration for Calico
Neutron plugin is explicitly required for integrating Calico with OpenStack
Step by Step Neutron Integration
Step 1: Install the Calico ML2 plugin on Controller
Run the command on the OpenStack Controller node
sudo apt install -y neutron-server python3-networking-calico
Step 2: Configure neutron.conf on the controller node
edit the configuration file:
sudo nano /etc/neutron/neutron.conf
Edit the following lines
[DEFAULT]
core_plugin = ml2
service_plugins = router
allow_overlapping_ips = True
transport_url = rabbit://openstack:RABBIT_PASS@controller

[database]
connection = mysql+pymysql://neutron:NEUTRON_DBPASS@controller/neutron
remember to replace the transport_url with the actual details.
Configure the ML2 plugin for Calico (ml2_conf.ini)
sudo nano /etc/neutron/plugins/ml2/ml2_conf.ini
Update configurations precisely
[ml2]
type_drivers = flat,vlan,vxlan
tenant_network_types = vxlan
mechanism_drivers = calico

[ml2_type_flat]
flat_networks = provider

[ml2_type_vxlan]
vni_ranges = 1:10000

[securitygroup]
enable_ipset = True
Explanation of essential parameters
type_drivers: Specifics allowed in the network types (VLAN, VXLAN, Flat)
mechanism_drivers : Calico replaces other mechanisms like openvswitch or linuxbridge
Configure Calico specific parameters in calicoctl.cfg
Create the configuration at etc/calico/calicoctl.cfg
apiVersion: projectcalico.org/v3
kind: CalicoAPIConfig
metadata:
spec:
  datastoreType: "etcdv3"
  etcdEndpoints: "http://<ETCD_IP>:2379"
replace the etcd IP address
Test the Calico connectivity
calicoctl get nodes
Restart Neutron services to apply changes
sudo systemctl restart neutron-server
sudo systemctl status neutron-server
Verify Integration Status
Check if the neutron agent status to make sure that Calico is registered
openstack network agent list
Calico agent must appear active
Common pitfalls and troubleshooting tips
Agent Registration Issues
- Make sure that the Calico agent is running
sudo systemctl status calico-node
- Check Logs
journalctl -u neutron-server -f
journalctl -u calico-node
Common Errors
- Neutron Server not starting
- Verify that the correct mechanism_driveres = calico
- Calico agent is not listed in the neutron agents
- Make sure that the network connectivity and etcd datastore configuration
Example of a Developer Friendly Configurations
Here is a Quickstart YAML file example with a default IP pool configuration default-pool.yaml
apiVersion: projectcalico.org/v3
kind: IPPool
metadata:
  name: default-ipv4-pool
spec:
  cidr: 10.10.0.0/16
  ipipMode: Always
  natOutgoing: true
Apply the pool using
calicoctl apply -f ippool.yaml
Troubleshooting tips and Common pitfalls
Pitfall 1 Calico workloads cannot communicate
- Check IP in IP encapsulation settings and IP forwarding
sysctl net.ipv4.ip_forward
sysctl -w net.ipv4.ip_forward=1
Pitfall 2 Incorrect MTU settings
- Adjust the MTU settings according to the network encapsulation overhead
ip link set eth0 mtu 1450
Pitfall 3 BGP route propagation issues
Check BGP sessions and routes using bird tool.
birdc show protocols
birdc show route

Top comments (1)
Thank you for reading. I hope you like the article