
Original Post: https://bezkoder.com/jwt-json-web-token/
Authentication is one of the most important parts in almost applications, from desktop app to web app or mobile app. This tutorial is an In-depth Introduction to JWT (JSON Web Token) that helps you know:
- Session-based Authentication vs Token-based Authentication (Why JWT was born)
- How JWT works.
- How to create a JWT.
- How we can secure our app and validate JWT.
Session-based Authentication & Token-based Authentication
For using any website, mobile app or desktop app… You almost need to create an account, then use it to login for accessing features of the app. We call that action is Authentication.
So, how to authenticate an account?
First, we’re gonna take a look at a simple method that popular websites used in the past: Session-based Authentication.
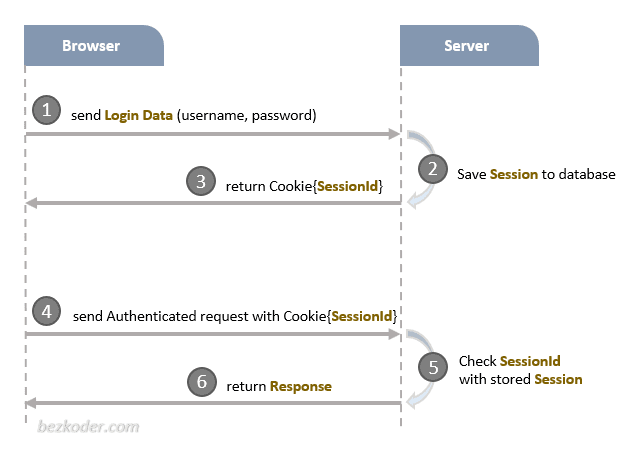
In the image above, when a user logs into a website, the Server will generate a Session for that user and store it (in Memory or Database). Server also returns a SessionId for the Client to save it in Browser Cookie.
The Session on Server has an expiration time. After that time, this Session has expired and the user must re-login to create another Session.
If the user has logged in and the Session has not expired yet, the Cookie (including SessionId) always gos with all HTTP Request to Server. Server will compare this SessionId with stored Session to authenticate and return corresponding Response.
It’s OK. But why do we need Token-based Authentication?
The answer is we don’t have only website, there are many platforms over there.
Assume that we has a website which works well with Session. One day, we want to implement system for Mobile (Native Apps) and use the same Database with the current Web app. What should we do? We cannot authenticate users who use Native App using Session-based Authentication because these kinds don’t have Cookie.
Should we build another backend project that supports Native Apps?
Or should we write an Authentication module for Native App users?
That’s why Token-based Authentication was born.
With this method, the user login state is encoded into a JSON Web Token (JWT) by the Server and send to the Client. Nowaday many RESTful APIs use it. Let’s go to the next section, we’re gonna know how it works.
How JWT works
Now look at the flow below:

You can see that it’s simple to understand. Instead of creating a Session, the Server generated a JWT from user login data and send it to the Client. The Client saves the JWT and from now, every Request from Client should be attached that JWT (commonly at header). The Server will validate the JWT and return the Response.
For storing JWT on Client side, it depends on the platform you use:
- Browser: Local Storage
- IOS: Keychain
- Android: SharedPreferences
That is overview of a Token-based Authentication flow. You will understand it more deeply with the next section.
How to create a JWT
First, you should know three important parts of a JWT:
- Header
- Payload
- Signature
Header
The Header answers the question: How will we calculate JWT?
Now look at an example of header, it’s a JSON object like this:
{
  "typ": "JWT",
  "alg": "HS256"
}
– typ is ‘type’, indicates that Token type here is JWT.
– alg stands for ‘algorithm’ which is a hash algorithm for generating Token signature. In the code above, HS256 is HMAC-SHA256 – the algorithm which uses Secret Key.
Payload
The Payload helps us to answer: What do we want to store in JWT?
This is a payload sample:
{
  "userId": "abcd12345ghijk",
  "username": "bezkoder",
  "email": "contact@bezkoder.com",
  // standard fields
  "iss": "zKoder, author of bezkoder.com",
  "iat": 1570238918,
  "exp": 1570238992
}
In the JSON object above, we store 3 user fields: userId, username, email. You can save any field you want.
We also have some Standart Fields. They are optional.
-
iss(Issuer): who issues the JWT -
iat(Issued at): time the JWT was issued at -
exp(Expiration Time): JWT expiration time
You can see more Standard Fields at:
https://en.wikipedia.org/wiki/JSON_Web_Token#Standard_fields
Signature
This part is where we use the Hash Algorithm that I told you above.
Look at the code for getting the Signature below:
const data = Base64UrlEncode(header) + '.' + Base64UrlEncode(payload);
const hashedData = Hash(data, secret);
const signature = Base64UrlEncode(hashedData);
Let’s explain it.
– First, we encode Header and Payload, join them with a dot .
data = '[encodedHeader].[encodedPayload]'
– Next, we make a hash of the data using Hash algorithm (defined at Header) with a secret string.
– Finally, we encode the hashing result to get Signature.
Combine all things
After having Header, Payload, Signature, we’re gonna combine them into JWT standard structure: header.payload.signature.
Following code will illustrate how we do it.
const encodedHeader = base64urlEncode(header);
/* Result */
"eyJ0eXAiOiJKV1QiLCJhbGciOiJIUzI1NiJ9"

const encodedPayload = base64urlEncode(payload);
/* Result */
"eyJ1c2VySWQiOiJhYmNkMTIzNDVnaGlqayIsInVzZXJuYW1lIjoiYmV6a29kZXIiLCJlbWFpbCI6ImNvbnRhY3RAYmV6a29kZXIuY29tIn0"

const data = encodedHeader + "." + encodedPayload;
const hashedData = Hash(data, secret);
const signature = base64urlEncode(hashedData);
/* Result */
"crrCKWNGay10ZYbzNG3e0hfLKbL7ktolT7GqjUMwi3k"

// header.payload.signature
const JWT = encodedHeader + "." + encodedPayload + "." + signature;
/* Result */
"eyJ0eXAiOiJKV1QiLCJhbGciOiJIUzI1NiJ9.eyJ1c2VySWQiOiJhYmNkMTIzNDVnaGlqayIsInVzZXJuYW1lIjoiYmV6a29kZXIiLCJlbWFpbCI6ImNvbnRhY3RAYmV6a29kZXIuY29tIn0.5IN4qmZTS3LEaXCisfJQhrSyhSPXEgM1ux-qXsGKacQ"
How JWT secures our data
JWT does NOT secure your data
JWT does not hide, obscure, secure data at all. You can see that the process of generating JWT (Header, Payload, Signature) only encode & hash data, not encrypt data.
The purpose of JWT is to prove that the data is generated by an authentic source.
So, what if there is a Man-in-the-middle attack that can get JWT, then decode user information? Yes, that is possible, so always make sure that your application has the HTTPS encryption.
How Server validates JWT from Client
In previous section, we use a Secret string to create Signature. This Secret string is unique for every Application and must be stored securely in the server side.
When receiving JWT from Client, the Server get the Signature, verify that the Signature is correctly hashed by the same algorithm and Secret string as above. If it matches the Server’s signature, the JWT is valid.
Important!
Experienced programmers can still add or edit Payload information when sending it to the server. What should we do in this case?
We store the Token before sending it to the Client. It can ensure that the JWT transmitted later by the Client is valid.
In addition, saving the user’s Token on the Server will also benefit the Force Logout feature from the system.
Conclusion
There will never be a best method for authentication. It depends on the use case and how you want to implement.
However, for app that you want to scale to a large number of users across many platforms, JWT Authentication is preferred because the Token will be stored on the Client side.
Happy Learning, see you again!
Further Reading
Back-end
- Spring Boot, MySQL: JWT Authentication with Spring Security
- Spring Boot, PostgreSQL: JWT Authentication with Spring Security
- Spring Boot, MongoDB: JWT Authentication with Spring Security
- Node.js + MySQL: User Authentication & Authorization with JWT
- Node.js + MongoDB: User Authentication & Authorization with JWT
- Node.js + PostgreSQL: User Authentication & Authorization with JWT
Front-end
- Vue.js JWT Authentication with Vuex and Vue Router
- Angular 8 JWT Authentication example with Web Api
- Angular 10 JWT Authentication example with Web Api
- Angular 11 JWT Authentication example with Web Api
- React JWT Authentication (without Redux) example
- React + Redux: JWT Authentication example
Architecture

Top comments (2)
Great!
Thanks! :)