
Introduction
Table Of Contents
- Prerequisites
- Step 1 — Remote State with Storage Account
- Step 2 — Remote State with Terraform Cloud
- Step 3 — Accessing Outputs from Remote State
- Step 4 — Partial State Configuration
- Conclusion
In Terraform, the state file keeps track of the current state of the infrastructure that is being deployed and managed. All infrastructure details are recorded, which means sensitive information like passwords and secrets may also be stored in the state file. Because of this, it is vital to store the state file in a secure place, not locally on a laptop. This is where remote state comes into play. Remote state allows Terraform to store the state file in a remote location like an AWS S3 bucket or Azure Storage Account. HashiCorp also offers their own free remote state storage solution in Terraform Cloud. Most of these remote state locations provide some sort of authentication method and encryption at rest, which is much more secure than storing the state file locally on a laptop.
Not only does storing state remotely provide the benefit of security, but it also provides state locking. When teams using Terraform start to grow, it's common for multiple users to be applying Terraform code against the same state. This can turn into a conflict and cause the state to become corrupt. State locking is a feature that locks the state file when someone is applying changes so that multiple users can't modify the state at the same time.
In this guide, we will go over how to set up remote state with an Azure Storage Account and Terraform Cloud.
Prerequisites
Before you begin, you'll need to set up the following:
- Azure subscription.
- Azure Cloud Shell. Be sure to check out the prerequisites on "Getting Started with Terraform on Azure: Deploying Resources" for a guide on setting up Azure Cloud Shell.
Step 1 — Remote State with Storage Account
When you store the Terraform state file in an Azure Storage Account, you get the benefits of RBAC (role-based access control) and data encryption. To set up the resource group for the Azure Storage Account, open up an Azure Cloud Shell session and type in the following command:
az group create --location westus2 --name rg-terraformstate
Next, we create our Storage Account using az storage account create:
Note: Make sure to use an externally unique name for the storage account, or Azure will error out when deploying one.
az storage account create --name terrastatestorage2134 --resource-group rg-terraformstate --location westus2 --sku Standard_LRS
Now that we have the Storage Account created, we can create a blob storage container to store the state file:
az storage container create --name terraformdemo --account-name terrastatestorage2134
Now that our Azure Storage Account is set up, we will need to create a backend block in our Terraform configuration file. The backend tells Terraform where to store the state, either locally or in a remote location. If a backend is not declared, the state is stored locally by default.
We start with a terraform block, which is used for providing instructions to the Terraform tool. In our case, we are telling Terraform to store it's state file remotely. Next is the backend block with the azurerm backend type. This backend type requires the resource group for the storage account, the storage account name, the blob container name, and the name of the state file:
terraform {
  backend "azurerm" {
    resource_group_name  = "rg-terraformstate"
    storage_account_name = "terrastatestorage2134"
    container_name       = "terraformdemo"
    key                  = "dev.terraform.tfstate"
  }
}
Note: Since we are using Azure Cloud Shell and are automatically authenticated to Azure CLI, there is no need to configure any sort of additional steps for accessing the Azure Storage Account. We could also authenticate to the storage account with an MSI, Storage Key, or SAS token. Check out the azurerm backend documentation for the configuration arguments for authenticating with these methods.
We will save the configuration below to a main.tf file in Azure Cloud Shell:
#Set up remote state
terraform {
  backend "azurerm" {
    resource_group_name  = "rg-terraformstate"
    storage_account_name = "terrastatestorage2134"
    container_name       = "terraformdemo"
    key                  = "dev.terraform.tfstate"
  }
}

#configure azurerm provider
provider "azurerm" {
  version = "1.38"
}

#create resource group
resource "azurerm_resource_group" "rg" {
    name     = "rg-remotestatedemo"
    location = "westus2"
}
Now when we run a terraform init and then terraform apply we can see our resource group is created and the state file is saved in the Azure Storage Account:

Now that we've set up remote state with an Azure Storage account let's take a look at setting up a remote state in Terraform Cloud.
Step 2 — Remote State with Terraform Cloud
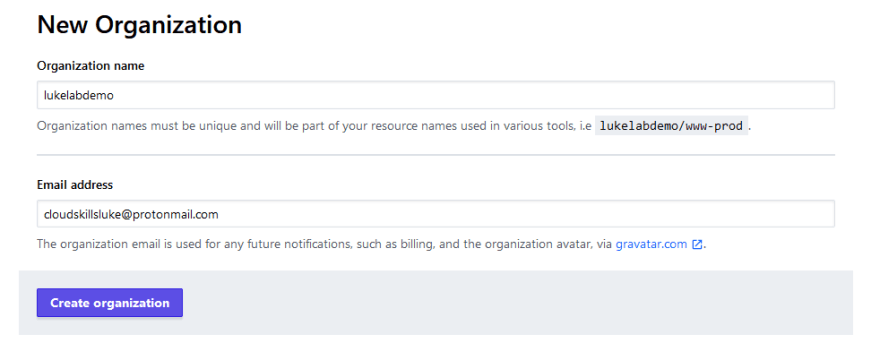
Terraform Cloud is a hosted service that allows for Terraform users to store their state files remotely as well as collaborate on their Terraform code in a team setting. It is also free for small teams. If you don't have a Terraform Cloud account, go ahead and set one up. Once you sign up and verify your account, you will be prompted to create an organization:
Next, select the user profile in the upper right corner and choose User Settings:

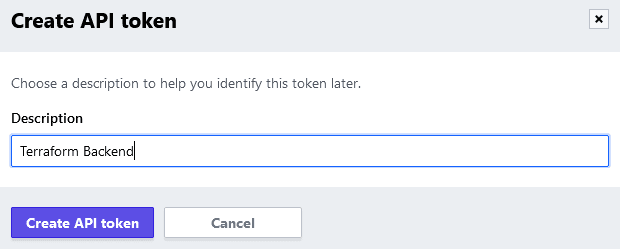
Select Tokens on the left hand side to create a user token. Click the Create an API token button:

Now we will need to label our API token. In this example, since we are using the token to authenticate the backend to Terraform Cloud, we will name this API token "Terraform Backend". Select Create API token to obtain the key:
Copy the key. Best practices would be to store this key in an Azure Key Vault or a secret management system. We will not be able to look up the value of this token, HashiCorp does not save this part of the key in their system. Select Done once you have copied the key to use for later:

Now that we set up our Terraform Cloud environment and created an API token for authenticating the backend, we should have everything we need to store our state in Terraform Cloud. Let's take a look at what the backend configuration looks like in our Terraform configuration.
The backend configuration looks similar to when we configured Terraform to use an Azure Storage Account for remote state. However, this time the backend type will be set to remote. We will also need an organization argument to specify that we want to use the Terraform Cloud organization that we just created as the remote state location. Lastly, we will need to use a workspace block to specify the name of the workspace that we want to create:
terraform {
  backend "remote" {
    organization = "lukelabdemo"

    workspaces {
      name = "terraformdemo"
    }
  }
}
Workspaces in Terraform Cloud are the way that the system organizes infrastructure. When running Terraform locally, we split up environments by folders, and Terraform executes against the files in that folder. There is not an elegant way to do this with a hosted solution like Terraform Cloud, which is why workspaces are needed. Use workspaces to separate an environment just like you would use directories to split up a Terraform environment locally:
lukeapp-dev
    └── main.tf
    └── variables.tf
    └── terraform.tfvars
lukeapp-prod
    └── main.tf
    └── variables.tf
    └── terraform.tfvars
Now that we have our backend configuration defined, how do we use the API token to authenticate? Previously in Terraform, there used to be an environment variable called TFE_TOKEN that we could just set the token key as and Terraform would automatically use it to authenticate to Terraform Cloud. However, this solution is no longer recommended because there is also a Terraform Enterprise on-premise solution. There is not a built-in way to distinguish between the two, and the token could potentially be sent to Terraform Cloud when it was meant for the on-premise Terraform Enterprise server. Aso, interpolations are not allowed in backend configurations. So using a variable for the token in the backend config and referencing the variable in the token argument would not be an option in this case.
HashiCorp recommends using the Terraform CLI configuration file to store the token. The CLI configuration file is a .terraformrc file or terraform.rc file in Windows. It contains per-user setting configurations for the Terraform CLI. In Windows, this file is located in the %APPDATA% location of the user. In all other platforms, the file is in the $HOME directory of the user. In many cases, this file will need to be manually created since it doesn't usually already exist.
In Azure Cloud Shell we can configure this file through the bash command line. This syntax is also handy for automating the configuration of the Terraform CLI in a CI/CD pipeline. We are using tee to create a ./terraformrc file in the $HOME directory. The ./terraformrc file is configured with the token code set as an argument in a credentials block:
tee -a $HOME/.terraformrc << END
credentials "app.terraform.io" {
  token = "TR2LrFWwfzzqfg.atlasv1.zH5UbacqWMKL1GzzPM6DFwK4qUy3HpZypyiBXJczi8Qy4El1m0N1xUVG3sduEX3TgUo"
}
END
When we run cat against the file, we can see that our token is now in the Terraform CLI file for authenticating to app.terraform.io. This tells Terraform to use the API token for that hostname:

Note: Since the token is stored in plain text, it is best practice to secure the endpoint that is using the token. In a CI/CD pipeline, we would want to create a task to remove the .terraformrc file as a cleanup task.
Below is the complete Terraform configuration for using Terraform Cloud as remote state. Save the code below to a main.tf file in its own directory in Azure Cloud Shell:
#Set up remote state
terraform {
  backend "remote" {
    organization = "lukelabdemo"

    workspaces {
      name = "terraformdemo"
    }
  }
}

#configure azurerm provider
provider "azurerm" {
  version = "1.38"
}

#create resource group
resource "azurerm_resource_group" "rg" {
    name     = "rg-remotestatetfc"
    location = "westus2"
}
When we run terraform init we can see that the workspace is automatically created in Terraform Cloud by selecting the Workspaces menu:

At this moment, if we do a terraform apply on our current configuration. We would see the following error:
Error: Error building AzureRM Client: Azure CLI Authorization Profile was not found. Please ensure the Azure CLI is installed and then log-in with `az login`.

  on main.tf line 13, in provider "azurerm":
  13: provider "azurerm" {
This is because Terraform Cloud doesn't just store remote state; it will also remotely execute the Terraform code on its own disposable VM environment, which is called a run. We have two options for executing our Terraform configuration. We can remotely execute our Terraform code in Terraform Cloud; or we can choose to disable this feature and execute our code in Azure Cloud Shell, which will only use the remote state feature of Terraform Cloud. Below are the steps on how to do either a local execution or a Terraform Cloud execution:
Local Execution
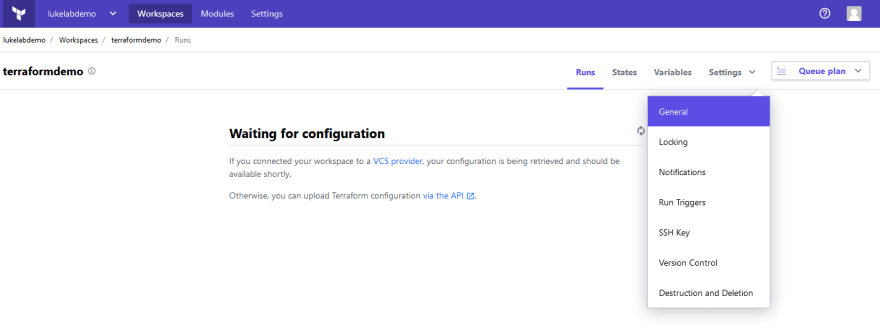
To execute our Terraform code in the Azure Cloud Shell session, we need to change the setting on our newly created Terraform Cloud workspace to local execution. By default, all Terraform Cloud workspaces default to remote execution. To change this setting, navigate to the Workspaces menu and select the workspace to modify. In our case, its terraformdemo. On the right-hand side select Settings and choose General:
In General Settings under Execution Mode select Local and click the Save settings button:

When we return to Azure CloudShell and run our terraform apply on our configuration, it will execute in the local shell like normal. Now we can apply Terraform code in this workspace locally unless we change it back to remote. The change we just made to the Terraform Cloud workspace must be made for every new workspace created if the intent is just to use Terraform Cloud to store remote state. There is currently no way to configure this through the Terraform command line yet. This is a pain for automating as it requires manual intervention to change the execution mode settings each time. A trick that can be used to work around this awkward stage with Terraform Cloud is to create another directory called init:
init
    └── main.tf
lukeapp-prod
    └── main.tf
    └── variables.tf
    └── terraform.tfvars
Inside the init folder is a main.tf file that includes the following configuration, which will create the Terraform Cloud workspace if it doesn't exist and change it to local execution mode upon creation:
variable "workspace"{}

terraform {
  backend "local" {
  }
}

#Terraform Cloud provider
provider "tfe" {
  hostname = "app.terraform.io"
}

#Collect all Terraform Cloud workspaces
data "tfe_workspace_ids" "all" {
  names        = ["*"]
  organization = "lukelabdemo"
}

#Check if Workspace still exists
locals{
  check =  lookup(data.tfe_workspace_ids.all.ids, var.workspace, "None")
}

#Create Workspace if it does not exist
resource "tfe_workspace" "test" {
  count = local.check == "None" ? "1" : "0"
  name         = var.workspace
  organization = "lukelabdemo"
  operations = false
}
Using this workaround in a CI/CD pipeline, we could add a step for setting up the workspace separately and run terraform apply first using -var to specify the workspace name to create:
terraform apply -var='workspace=lukeapp-prod'
We could then run the standard configuration of our code using the newly created workspace as the remote state, and the workspace will already be configured with local execution mode.
Terraform Cloud Execution
To remotely execute our Terraform code through Terraform Cloud's environment, we need to configure Azure Authentication in Terraform Cloud. This can be done through environment variables. We will also need to set up a service principal account to authenticate as. To set up a service principal account open up an Azure Cloud Shell session and type in the following command:
az ad sp create-for-rbac -n "TerraformSP" --role contributor \
  --scopes /subscriptions/f7c32571-81bd-4e97-977b-sf2s8s4bae3
Note: In this example, we are configuring the service principal with contributor rights at the root of the subscription. In a real-world production environment, it's best practice to use the least privileges and smallest scope where possible.
We should get the following output:
{
  "appId": "ee38c4bf-1c1a-41df-82c8-5bdb1e7be8be",
  "displayName": "TerraformSP",
  "name": "http://TerraformSP",
  "password": "98fc8ef0-6451-40ad-b0f7-89de76911f0a",
  "tenant": "24e2975c-af72-454e-8dc0-234F3S342"
}
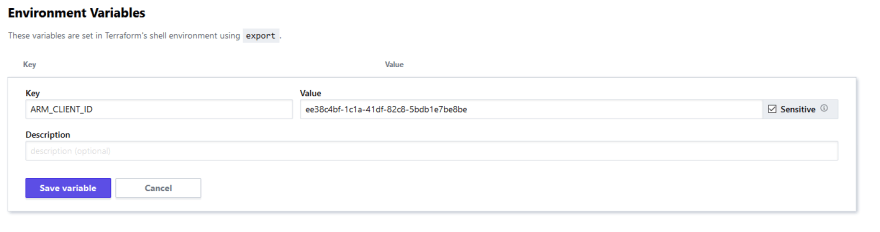
The output corresponds to the following environment variables that are required for the azurerm Terraform provider to authenticate with Azure:
ARM_CLIENT_ID="ee38c4bf-1c1a-41df-82c8-5bdb1e7be8be"
ARM_CLIENT_SECRET="98fc8ef0-6451-40ad-b0f7-89de76911f0a"
ARM_SUBSCRIPTION_ID="f7c32571-81bd-4e97-977b-sf2s8s4bae3"
ARM_TENANT_ID="24e2975c-af72-454e-8dc0-234F3S342"
To set up these environment variables in Terraform Cloud, select the terraformdemo workspace and then select the Variables tab. Under Environment Variables choose Add Variable:

We will need to add each variable, its best practice to mark these as sensitive with the checkbox. Click Save variable to save it. Then add the rest of the required environment variables:
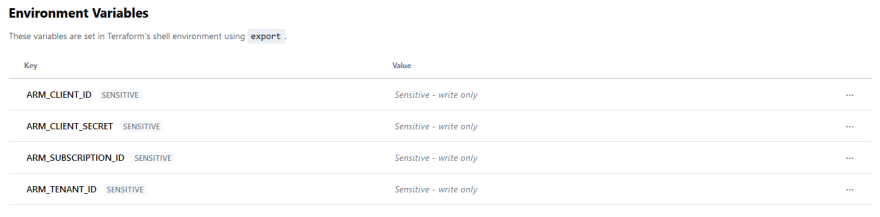
We should have four environment variables saved when complete:
Now we are ready to run our configuration in Terraform Cloud. In Azure Cloud Shell run terraform apply on the configuration that is using the Terraform Cloud remote state. We will see the following output with a link:
Preparing the remote apply...

To view this run in a browser, visit:
https://app.terraform.io/app/lukelabdemo/terraformdemo/runs/run-tDkgKaJcyskSd2QQ

Waiting for the plan to start...
If we navigate to the provided link, we will be able to see the current run of our configuration in Terraform Cloud. The run will display the plan output of our configuration. We can also either Confirm & Apply from within Terraform Cloud, or confirm from the Azure Cloud Shell session. The output in the Azure Cloud Session is streamed back to the local console, so we could either manage the terraform apply through either Terraform Cloud or Azure Cloud Shell:

Terraform Cloud shell has additional features like providing costs of resources during terraform plan. There is also a configuration governance feature called Sentinel, which is very powerful. However, a significant confining element of using the Terraform Cloud for runs is that there are networking constraints. If we were using Terraform provisioners that require access to some network components like SSH into a VM, it would not be possible to use Terraform runs since the Terraform code is executed in HashiCorp's own VM environment.
Step 3 — Accessing Outputs from Remote State
Not only can remote state be used for storing information. But it can also be used for retrieving it as well. Terraform can reference the output information from other states.
We can use a data source block to allow for information to be collected and used within the Terraform configuration. Each provider typically offers its own set of data sources. To reference other state files from Terraform Cloud, we would need to modify our current configuration to include an output. In this example, we created an output block containing the resource group that is created in the configuration:
#Set up remote state
terraform {
  backend "remote" {
    organization = "lukelabdemo"

    workspaces {
      name = "terraformdemo"
    }
  }
}

#configure azurerm provider
provider "azurerm" {
  version = "1.38"
}

#create resource group
resource "azurerm_resource_group" "rg" {
    name     = "rg-remotestatetfc"
    location = "westus2"
}

#output
output "rg" {
  value = azurerm_resource_group.rg
}
To reference that output from another Terraform configuration. We will use a data source block for the terraform_remote_state type and name it terraformdemo. We also need to include the backend type that we are sourcing from along with the required arguments for the specific backend type. In this case, we need the organization and workspace. In our example, we are creating a virtual network and referencing the resource group information from the Terraform Cloud remote state in the previous configuration. We are referencing the output in our expression using data.terraform_remote_state.terraformdemo.outputs:
data "terraform_remote_state" "terraformdemo" {
  backend = "remote"
  config = {
    organization = "lukelabdemo"
    workspaces = {
      name = "terraformdemo"
    }
  }
}

#Create virtual network
resource "azurerm_virtual_network" "vnet" {
    name                = "vnet-terraformtfctest"
    address_space       = ["10.0.0.0/22"]
    location            = data.terraform_remote_state.terraformdemo.outputs.rg.location
    resource_group_name = data.terraform_remote_state.terraformdemo.outputs.rg.name
}
The same concepts apply for an Azure Storage Account backend type. To access the backend of our Azure Storage Account, we follow the same format but reference the azurerm backend type with it's required arguments:
data "terraform_remote_state" "terraformdemo" {
  backend = "azurerm"
  config = {
    resource_group_name  = "rg-terraformstate"
    storage_account_name = "terrastatestorage2134"
    container_name       = "terraformdemo"
    key                  = "dev.terraform.tfstate"
  }

}

#Create virtual network
resource "azurerm_virtual_network" "vnet" {
    name                = "vnet-terraformsatest"
    address_space       = ["10.1.0.0/22"]
    location            = data.terraform_remote_state.terraformdemo.outputs.rg.location
    resource_group_name = data.terraform_remote_state.terraformdemo.outputs.rg.name
}
Referencing remote state outputs can make it easier to combine resources from separate environments or projects. However, this causes a tight coupling between the state files and can cause issues with the maintenance of our configurations. This forces us to ensure that both projects are compatible with each other and always have the proper outputs. This is not practical or scalable in large environments managed by Terraform. Instead, have the config look up the data source by name or tag or another means. This also helps when building integrations tests for your Terraform configurations.
Step 4 — Partial State Configuration
When omitting required arguments in a Terraform backend configuration, this puts the state into what is called a partial configuration. This is extremely useful for keeping sensitive information out of source control. It is also great for configuring a Terraform backend in a CI/CD pipeline. For example, if we were to configure an Azure Storage Account remote state backend, we could simply use the following in our backend block:
terraform {
  backend "azurerm" {}
}
We could then fill in the necessary arguments through variables in our CI/CD system to populate a backend.hcl file:
#backend.hcl
resource_group_name  = "rg-terraformstate"
storage_account_name = "terrastatestorage2134"
container_name       = "terraformdemo"
key                  = "dev.terraform.tfstate"
We can then specify that file during the terraform init using the -backend-config option to specify the location of our backend.hcl:
terraform init -backend-config=backend.hcl
This will feed all of the required backend arguments into the empty backend "azurerm" block without having to state them in the configuration itself. We could also take the command line approach as well:
terraform init \
    -backend-config="resource_group_name=rg-terraformstate" \
    -backend-config="storage_account_name=terrastatestorage2134" \
    -backend-config="container_name=terraformdemo" \
    -backend-config="key=dev.terraform.tfstate"
Partial backend configurations are meant to separate sensitive authentication information from our Terraform code. Use them wisely!
Conclusion
In this article, we learned about Terraform Remote State. It is the backbone of Terraform and requires careful consideration when planning where and how to manage the Terraform state file. We also learned how to use an Azure Storage Account for storing our state files remotely. We also explored using Terraform Cloud for just remote state as well as remotely executing our code in Hashicorp's environment.
In the next article, we will dig into modules which are an absolute must when developing-production grade Terraform code.

Oldest comments (2)
If you have a partial state configuration, how do you check the terraform state list of the file so you can destroy it etc.
betterprogramming.pub/infra-ci-cd-...