
I wrote this article with VS Code, on my Mac, and published it by running git push. All my DEV posts are tracked by Git, and I can manage them from my local machine.
Below, I'll tell you why I set this up, and show you how easy it is to configure for your own posts.
How this works
I'll show you the finished product first so you see how this works end-to-end.
First, I create a new Markdown file:
---
title: My First DEV Post
---

Hello, world!
and push it to Github:
git add my-first-post.md
git commit -m "Adding first post"
git push
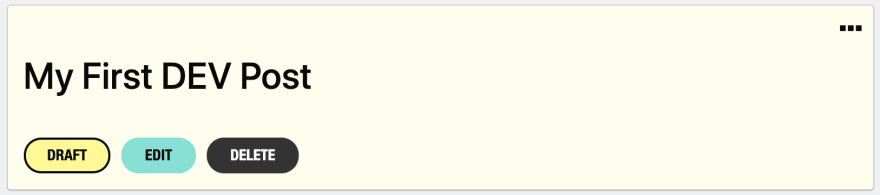
As soon as I push, this Pipedream workflow creates a draft of that post in my DEV account:
I can edit and git push again, and the draft will update. When I'm ready to publish, I add published: true to the top of my YAML front matter:
---
published: true
title: My First DEV Post
---

Hello, world!
Then run:
git add my-first-post.md
git commit -m "Publishing first post"
git push
and it's published:

How cool is that!
Why manage DEV posts in a Git repo?
I like writing code in VS Code, with all its keyboard shortcuts, plugins, and other goodies I've added to make it my own. When I write Markdown in the DEV editor, I miss my local setup. That's the primary reason I set this up: I get to write articles in my own editor, with my own shortcuts and tools.
But storing your articles in a Github repo carries other benefits:
- Every change you make to an article is tracked by Git. You can compare the changes you made between versions, or revert to an older version. If you make your repo public, anyone can open a pull request to fix typos, broken links, and more.
- You can run Git hooks or Github Actions to automate basic tasks: for example, you could run a script to validate your Markdown or spell check it before your change gets commited your repo.
- You can trigger other, more complex automations on every
git pushusing Pipedream workflows. For example, once you publish your article to DEV, you could automatically post its link to Twitter.
How to set this up
To get started, you'll need a Github account and a DEV API key.
First, create a new Github repo to manage your DEV posts:

Then clone the repo locally:
git clone git@github.com:[YOUR_USERNAME]/dev-to-posts.git
Next, you'll configure a Pipedream workflow to publish your articles using the DEV API.
Pipedream is an integration platform for developers. For this flow, Pipedream works like Github Actions: each time you push new Markdown files to your repo, the workflow runs. Pipedream workflows are written using pre-built actions and custom Node.js code, each of which can connect to hundreds of API integrations. You can run this workflow for free on Pipedream's free tier.
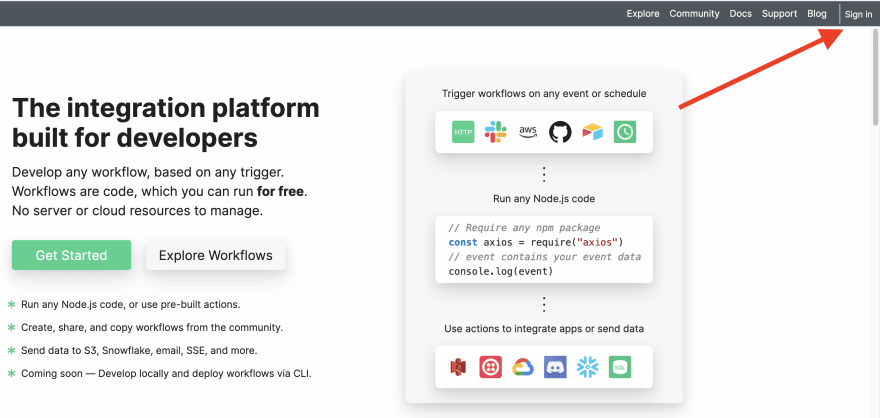
Visit https://pipedream.com and press the Sign In button in the top-right to sign up for a Pipedream account:
Once you've signed up, open this DEV workflow and click Copy near the top-right. This creates a copy of my workflow in your account, that will run for your DEV repo.
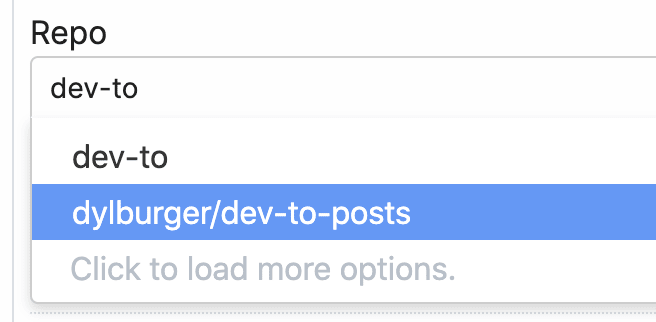
First, you'll be asked to configure the Trigger step. This workflow runs every time Markdown files are added or modified in your repo. You'll just need to connect your Github account and select your repo from the dropdown menu:
Then click Create Source at the bottom right of the trigger step. This will configure a webhook in your Github repo that notifies this workflow anytime a push happens.
You'll also need to turn this trigger step On to make sure it runs automatically on new pushes:

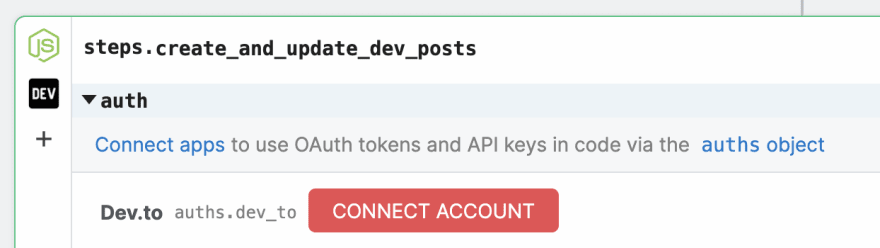
The next step of the workflow - create_and_update_dev_posts - runs Node.js code to push this Markdown to the DEV API. If you add a new article to your repo, the workflow creates a new DEV article. If you're pushing an update to an existing article, the workflow updates that DEV article.
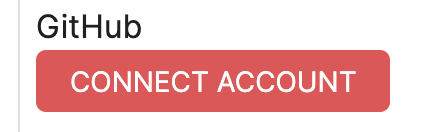
To get this step working, you'll just need to connect your DEV API key. Press the Connect Account button near the top of this step. Like in the trigger step, this will prompt you to enter your DEV API key:
 .
.
Now you're ready to push your first article. Create a new Markdown file in the Git repo you cloned above, adding the following contents:
---
title: My First DEV Post
---

Hello, world!
Add, commit, and push this file to Github:
git add my-first-post.md
git commit -m "Adding first post"
git push
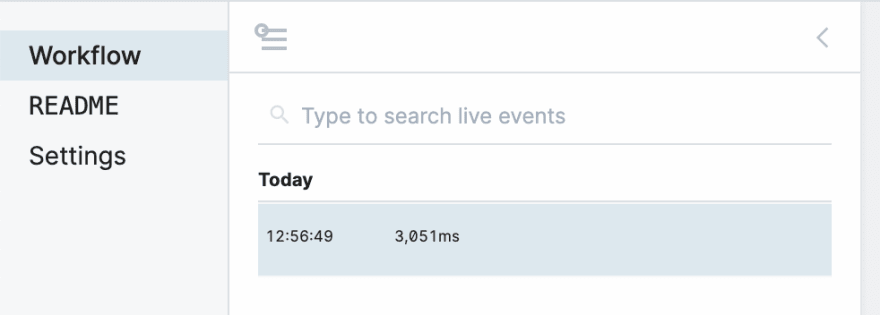
As soon as you push these changes, you should see a new event appear in your Pipedream workflow:
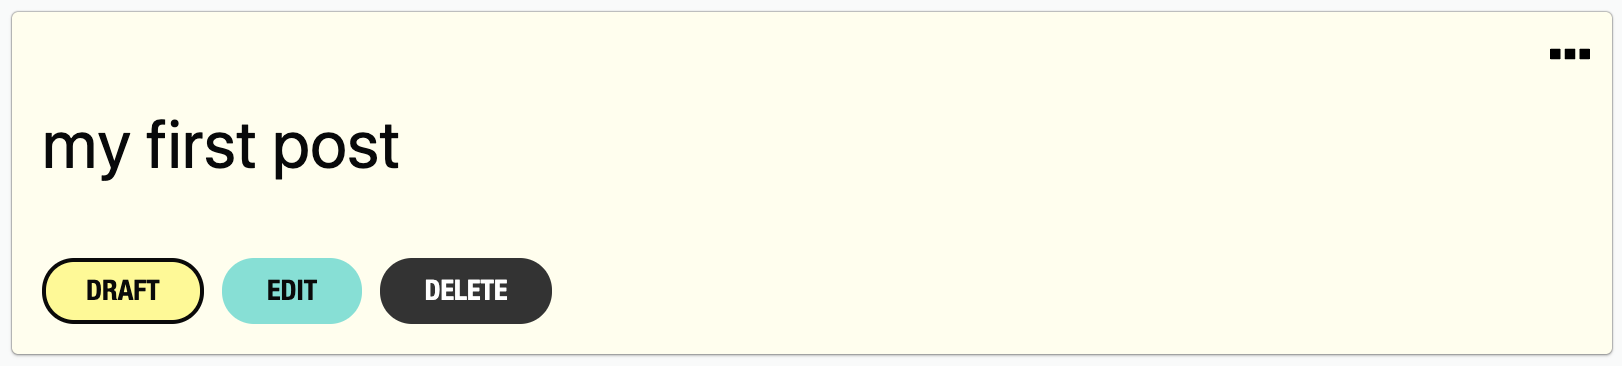
This triggers the workflow, creating a new draft article in DEV:
To publish the article, add published: true to the YAML front matter section at the top of your file:
---
title: My First DEV Post
published: true
---
Then run:
git add my-first-post.md
git commit -m "Publishing first post"
git push
You should see your brand new article show up, published, in DEV:
To unpublish, set the published flag to false:
---
title: My First DEV Post
published: false
---
Since you own this copy of the Pipedream workflow, you can modify the code in any way you'd like. You could update the DEV step to change how articles get published, or add a step to send a message to Slack, or post a tweet, any time you publish a new article. If you make any edits, share them in the comments below or publish your own article about it!
The rest of this post addresses other details of the integration, like managing images in articles, and other YAML front matter you can use to change details of your posts.
Making changes to articles in the DEV UI
Any change you make to articles in the DEV UI will get overwritten unless you also make those changes to the file in your repo.
How to include images in posts
Currently, DEV doesn't have an API for uploading images, so I'm using Cloudinary to host mine, referencing the Cloudinary URL in my Markdown:
In theory, this workflow could be changed to reference local images in your article Markdown:

Once you commit the images to your repo, the Pipedream workflow could upload the images to Cloudinary directly, and change the article references to point to the hosted version, instead.
Remember — the Pipedream workflow you copied above is yours to modify. You can add any logic you'd like to that workflow, uploading images to Cloudinary or another hosting provider, or include anything else custom to your publishing process.
Default branch only
The workflow processes commits on the default repo branch only (master, unless you've changed it). Commits to other branches are ignored, until they're merged to your default branch.
One Markdown file : One post
Each Markdown file you push to your DEV repo generates its own DEV post. Your files must have a .md extension for them to be processed. Any non-Markdown files are ignored by the workflow.
Front Matter
The Pipedream workflow uses the same YAML front matter that DEV supports to update the published state, title, tags, and more.
None of the front matter variables are required. If you include no front matter, your article will be saved to DEV as a draft, with a title based on the filename (see below).
Titles
The title front matter variable is always used if present.
If title is absent, the workflow will use the filename of the article, converting hyphens and underscores as spaces. Case is preserved:
my-first-post.md -> my first post
My_First_Post.md -> My First Post
My First Post.md -> My First Post
If you rely on this convention and then later want to set the title front matter variable, the workflow will update the title according to the variable's value, and use that instead of the filename moving forward.

Top comments (19)
I'm seeing the errors in my trigger code, but I see
getFileContents()in my code anddefault_branchis in the response I get back from GitHub. What's wrong with the pipeline configuration?I apologize, for some reason the trigger step was using old code. If you don't mind, try clicking on the Configuration tab on that screen to view the source's code, then paste in the code for the newest version. Then you'll see an option to Update Code to the right. Try pushing a new commit after that.
I updated the workflow to use the newest version, too, so you can also copy it anew and that should work.
Appreciate you letting me know! Please tell me if this doesn't fix it or if you have any other issues.
github.com/dylburger/dev-to-posts/...
getContents()is not a valid function. Checking the Octokit API,getContent()is the method you're looking for.Nice catch. It's funny because the plural method still worked for me - did it fail for you?
At any rate, newest version of the code should reference
getContent.Yeah it failed for me, I got a null error when it ran.
Does the code with
getContentwork for you now?Yup. Thanks!
Great thanks for the back and forth and for reporting these errors.
Niceeeee. Thanks for writing!
I write my dev posts in the terminal using vim and then publish it using an API wrapper I made, with python.
That’s awesome. Do you run a Python script after editing or did you set it up as a Vim plugin to run commands to publish?
I just edit it with vim(actually neovim) and then run the script. I just need to mention the name of the file.
Nice this sounds like ittt but for pros 👍
This is awesome. Want to get back into posting on here so will look to set this up soon🤩
This is awesome! Thanks for sharing!
Thank you Carl!
Thank you for sharing! I've been writing my drafts in google docs and manually copying, pasting and editing in the markdown. Def trying this out
This is so helpful, thanks for sharing Dylan!!!
Thank you for the kind note, Isabel!