Intro
Why validate?
Before we even get started I know there is someone thinking, " Why should I bother with validations in the backend? Validations should be done in the front end, after all, we have inbuilt HTML5 form validations, why must I validate twice?
Well, it is good practice when designing your API to always design it in isolation never make any assumptions, cause, in all honesty, you never know who is going to consume your API.
So in a RESTful API, you typically have at least one HTTP POST method that accepts a payload of user data in json format. Now the question arises how then do we ensure that the data we receive is of the desired type and in the correct format before we persist that data in our application's database?
To do that we use middleware functions normally referred to as validators. The goal is to ensure that your application's validators cover all edge cases so as to protect the integrity of your database. And to do that you use either regular expressions or alternately handy modules like @hapi/joi which make input validations in Javascript easy, seamless and fast.
What then is @hapi/joi
From the official documentation from npmjs, @hapi/joi is defined as:"
The most powerful schema description language and data validator for JavaScript.
joi is part of the hapi ecosystem and was designed to work seamlessly with the hapi web framework and its other components (but works great on its own or with other frameworks)..."
Well to break it down, @hapi/joi is a module that is used to define a schema or blueprint of Javascript objects. Once the schema is defined, you then can use Joi's handy methods that come bundled with it, to validate any other objects against the schema. It was designed for the hapi ecosystem but works well with other frameworks of which for our purposes we will use it in an express server.
Getting Started
In your project set up a basic express server, and then install @hapi/joi by running the command npm i @hapi/joi on the terminal. This will install the current latest version of @hapi/joi of which at the time of publishing this article was version 16.1.7
In the root of your project create files:
- schema.js
- validators.js
In the file schema.js we will define our schema and in the file validators.js we will define our validator middleware functions.
A schema can be defined as either a Joi type or a simple Javascript object whose keys are joi types.
What are Joi types
Joi has inbuilt types e.g. Joi.object(), Joi.string(), Joi.array(), Joi.date() etc. More types are found listed in the official documentation.
Defining a schema
In practical applications, the schema is usually defined as a Joi object, whose keys have values which are Joi types and have optional constraints chained to them. Below are two ways I use to define a validation schema in schema.js
Method One
Method Two
The above schema definitions are equal whatever method you use totally depends on personal preference.
Validating a request body payload
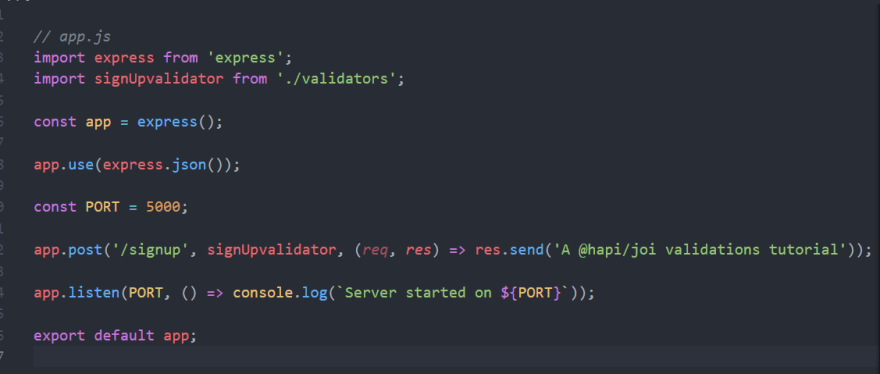
Before we are able to perform any validations we should be able to communicate with our server, and to do that on app.js we add a route localhost:5000/signup as shown in the figure below:
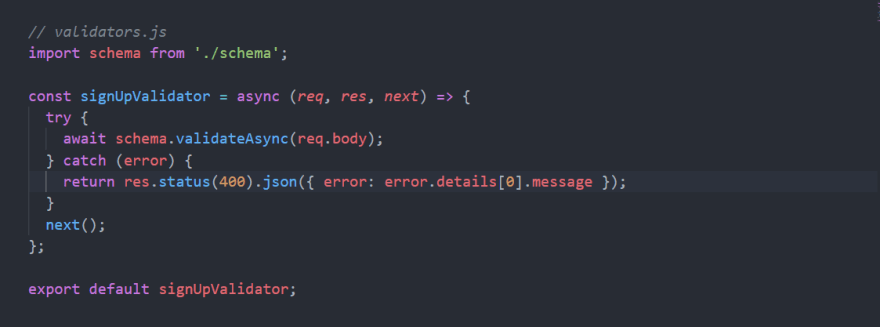
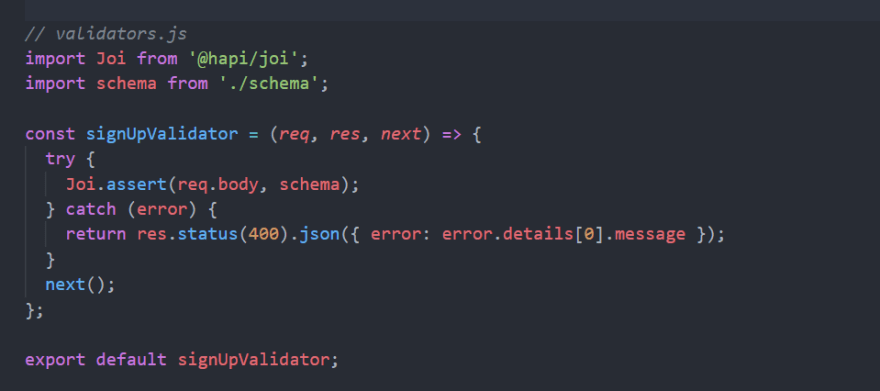
When it comes to performing actual validations the Joi module provides various different methods we can use to validate our data as shown below:
Synchronous validations
Async validations
Validating schema by using Joi.assert()
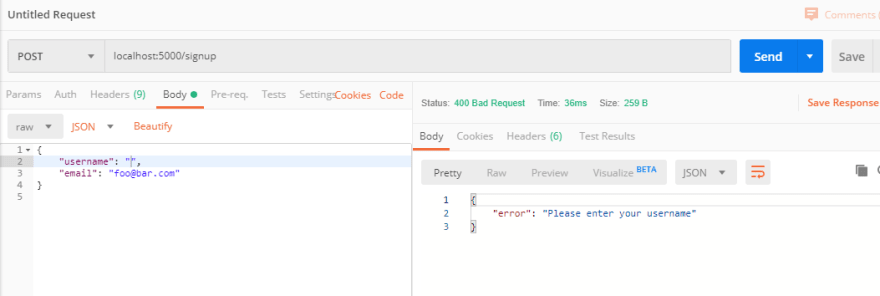
When we run our server and send a payload via Postman as shown in the figure below using any of the above validators we get the same output. Joi by default aborts validations once the first rule is broken.
Alt Text
Alternately if you want to list all the validation errors in the payload, you can pass an option of { abortEarly: false }, to any of the above-listed Joi validator methods, this is usually handy for debugging purposes. For example:

If we start the server and on Postman send the same payload as above to the endpoint POST localhost:5000/signup, as a response we get a detailed error message:
{
    "error": {
        "_original": {
            "username": "",
            "email": ""
        },
        "details": [
            {
                "message": "\"username\" is not allowed to be empty",
                "path": [
                    "username"
                ],
                "type": "string.empty",
                "context": {
                    "label": "username",
                    "value": "",
                    "key": "username"
                }
            },
            {
                "message": "\"email\" is not allowed to be empty",
                "path": [
                    "email"
                ],
                "type": "string.empty",
                "context": {
                    "label": "email",
                    "value": "",
                    "key": "email"
                }
            }
        ]
    }
}
Custom Error Messages
So far we have been sending default Joi error messages in the response object which look like:
{
    "error": "\"username\" is not allowed to be empty"
}
The error message above is difficult to understand for the end-user. Error messages must be short and easy to understand. So to customize error messages on our schema definition in schema.js
As you can see above in the schema we modified the value of the username key and added an extra rule/constraints messages().
messages() takes an object as an argument, whose keys are validation error types and their corresponding values are custom error messages.
Now to view our customized error messages on the response object:
We start our server then on Postman, in the payload we post an empty string as a username. The response:
And then, we intentionally post an invalid type as a username to test the other custom error message, which in this case is a number. The response:
So our error messages have been successfully customized.
Validating strings
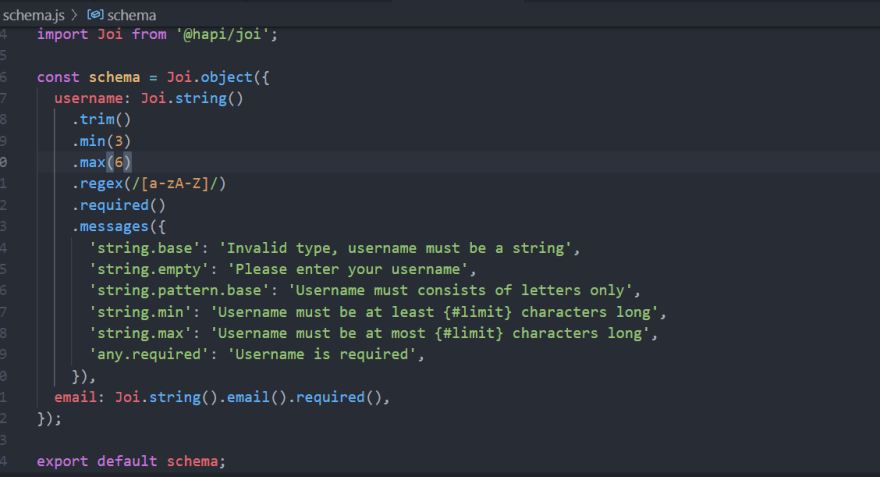
The Joi module provides several constraints we can use to increase validations on string data types which allow us to cover more edge cases. The most common ones I often use are in the example below:
In the example in the figure above:
-
string.trim()removes any whitespace before and after theusername -
string.min()specifies the minimum number of characters forusername -
string.max()specifies the maximum number of characters forusername -
string.regex()specifies a regular expression theusernamemust match against.
Validating numbers
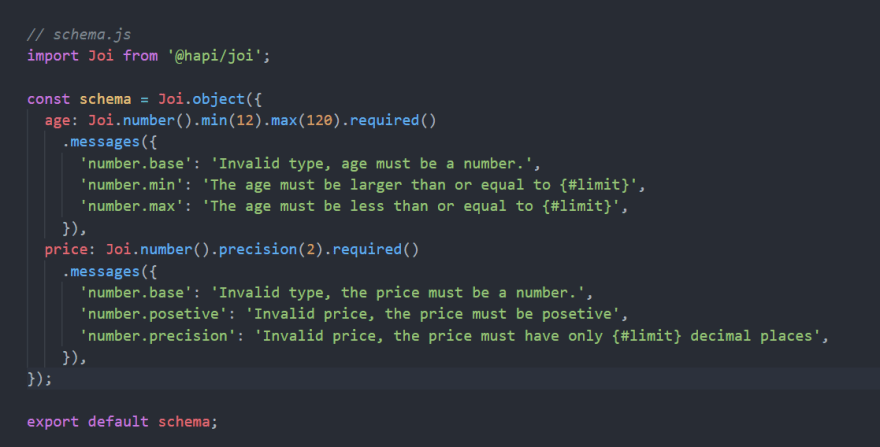
The important thing to note when validating numbers is to pass the option
{ convert: false } to your default Joi validator functions. It's especially effective when validating decimals.
In the example in the figure above:
-
number.min()specifies the minimum number forage -
number.max()specifies the maximum number forage -
number.positive()specifies that only positive numbers are accepted for theprice -
number.precision(limit)specifies the maximum permissible number of decimal places for theprice.
Note The purpose of this article was to hopefully get you started on using the Joi modules for validations, it does not in any way cover everything about performing validations using the module, to learn more, I encourage you to go over the official documentation..
Thank you for reading my article, if you loved it please like it below, and follow me on Twitter. Increasing my Twitter following will help me land my dream job as a technical writer. If you have any comments and suggestions please let me know.






Top comments (6)
Hi Jacqueline, thanks a lot for your post. If you want to have an even faster validation think of using joi.validate or joi.validateAsync instead of joi.assert: github.com/hapijs/joi/issues/2340
Thank you, I will sure check it out.
thanks so much Jacquie, this is the very meaningful post.
Thanks for this post. Really great
Thank you for this post. It's better than the official documentation tbh.
Thanks that really means a lot to me.