Delving into the world of Containers and Container Orchestration, one might wonder what these terms mean.
Containers are a way to package software in a format that can run isolated on a shared operating system. Unlike Virtual Machines, containers do not bundle a full operating system - only libraries and settings required to make the software work.
Container Orchestration automates the provisioning, deployment, networking, scaling, availability, and lifecycle management of containers.
In this article, I will demo how to containerize an application and deploy on a kubernetes cluster.
Prerequisites
- Docker installed on your local machine - which will be used to build image and push to a registry.
- Azure account with active subscription
- Terraform installed - an IAC tool that will be used to provision infrastructure on a cloud provider (Azure in this demo)
- Code Editor or IDE with a terminal- which will be used to write code that will be containerized.
- Azure CLI - to connect to kubernetes cluster.
Steps
There are 4 main steps which include:
Writing code for the application that will be containerized with docker
This section involves writing the code in a preferred programming language (I will be using node js).
Using terraform to provision infrastructure to Azure
Terraform is an infrastructure as code tool used to provision resources, instead of using the azure portal to create my resources, I will be using terraform, see terraform code
To make this creation possible, the following terraform commands will be used:
terraform init: initializes a working directory that contains terraform configuration files (note that a terraform file has a .tf extension)

- Formatting and validating my code using the command below

terraform plan: used to preview the action terraform would take to modify your infrastructure.


terraform apply: similar to terraform plan but actually carries out the planned changes to each resource using the relevant infrastructure provider's API.


![]()
I created a resource group, container registry and azure kubernetes service on azure.
Using Docker to containerize the application and pushing to a registry
Dockerizing an application requires a Dockerfile which is a template that contains all the commands a user could call on the command line to build an image after which the image will be pushed to a container registry.
To push to a container registry, a connection first need to be established before login to the container registry.
I will head over to azure => container registry => settings => access keys


- Navigate to your project directory via terminal and login using the details from the step above
docker login <login server> --username <username> --password <password>

- Build docker image using this command
docker build -t <name>:<tag> .where.is the current directory.

- Check the image exists using
docker imagescommand ( this lists all available images, the first image is my newly created image).

- Push the image to ACR using
docker push <name>:<tag>

- Going over to azure portal => container registry, to verify the push is successful.

Deploying the web application to azure kubernetes cluster
- Having created an azure kubernetes cluster using terraform, go over to azure portal to verify.

- I will be using azure CLI to get credentials so as to connect to my cluster using the commands below
az login
az aks get-credentials --resource-group <resourcegroupname> --name <clustername> (this command downloads credentials and configures the kubernetes CLI to use them)


- Verifying connection to my cluster using
kubectl get nodesto return a list of the cluster nodes (note that I declared 1 cluster node and status = ready).

- Create a deployment using a YAML manifest file that will roll out a replicaset to bring up specified number of instances of a specified pod and create a service (which enables network access to a set of pods) using
kubectl apply -f <deploymentfile-name>.

A kubernetes deployment tells kubernetes how to create or modify instances of the pods that hold a containerized application.
- To get more details about the deployment, use
kubectl describe deployments <deploymentname>command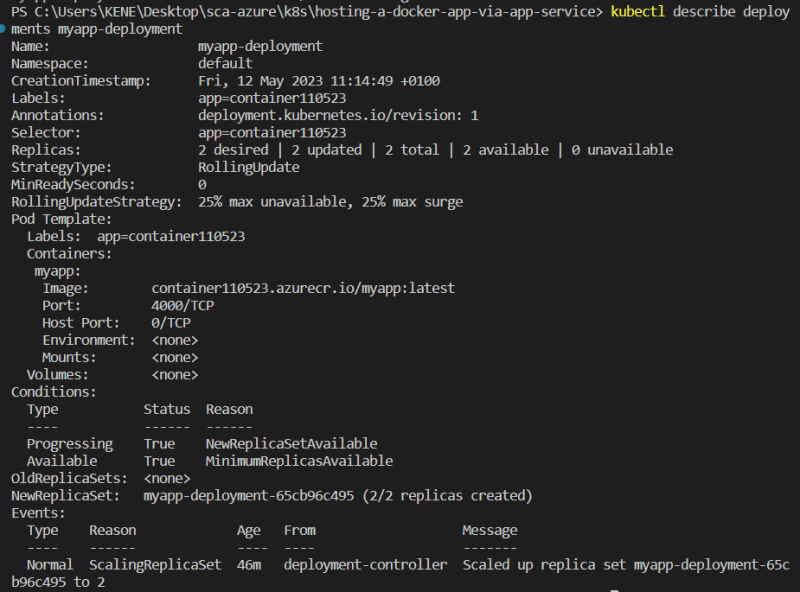
- Using the commands below to get deployments, replicasets (a deployment automatically creates a replica set), service and pods (pod name usually starts with the deployment name).

- Notice there are 2 pods, this is because my deployment file specified 2 replicas


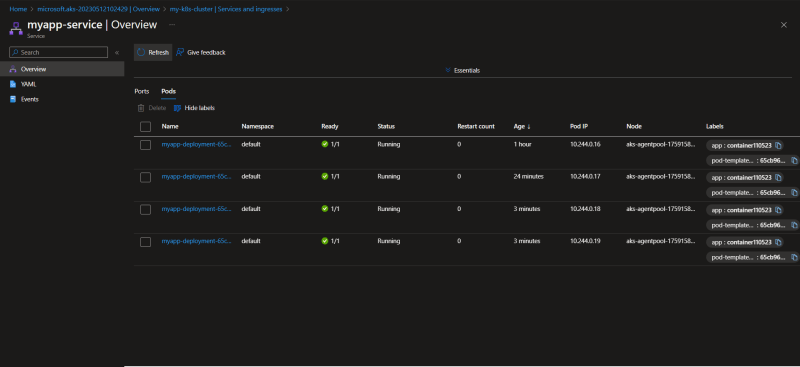
- Checking azure portal => kubernetes cluster => kubernetes resources => services and ingresses to view ports and pods.


- Using external IP of the service with port to access the app

- A use case of replicas (which specifies the number of pods that will run concurrently) can be seen when a pod is deleted and a new pod is automatically created based on the number of replicas stated in the manifest file, as shown below


-
kubectl get alllists all objects created at once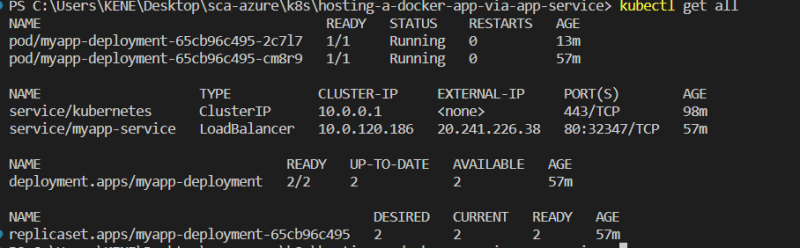
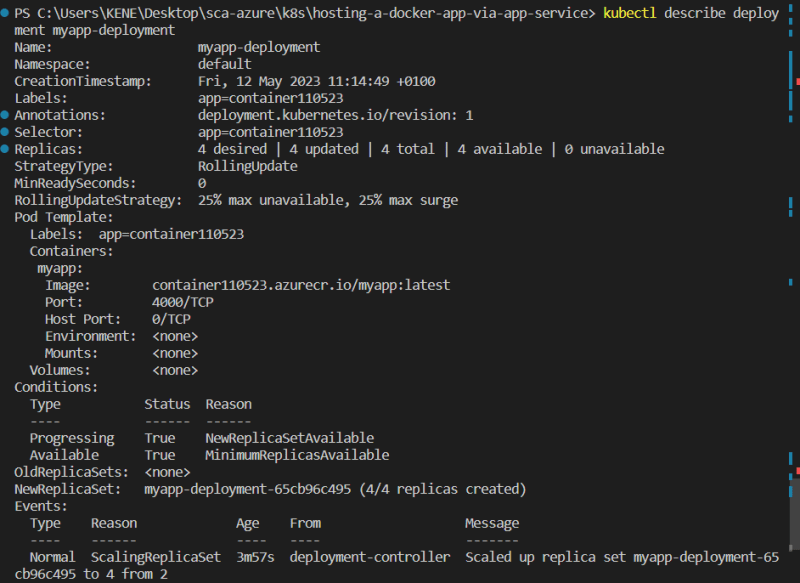
- A deployment can also be updated to either increase or decrease number of instances by changing the replica value or changing the version of a container image, the former can be done using the command below:

- The updated number of pods on AKS.
- A list of updated pods

- Cleaned up my resources using
terraform destroycommand.
Thank you for reading and I hope you learned something new, project code can be found on my repo

Top comments (0)