User authentication is a crucial part of any modern web application, especially APIs that require secure access. Instead of traditional username-password logins, integrating Google OAuth allows users to authenticate seamlessly with their Google accounts. This enhances security, improves user experience, and eliminates the hassle of managing passwords.
In this guide, we’ll walk through how to add Google OAuth authentication to a Django REST API. By the end, users will be able to log in with Google, receive a JSON Web Token (JWT), and access protected API endpoints securely.
We'll cover:
✅ Setting up Google OAuth credentials in the Google Developer Console
✅ Configuring Django REST Framework with JWT authentication
✅ Implementing backend routes to handle Google login
Let’s dive in!
Why Google OAuth for a Django REST API?
For an API focused on project collaboration, Google OAuth with DRF offers:
- Seamless Sign-In: Users log in with Google, skipping manual signup.
- API Security: JWTs protect endpoints like /projects/ or /contributions/.
- Developer Appeal: A trusted, scalable authentication method. This setup enhances user experience, making it quick and reliable for users to access your API.
Setting Up the Project
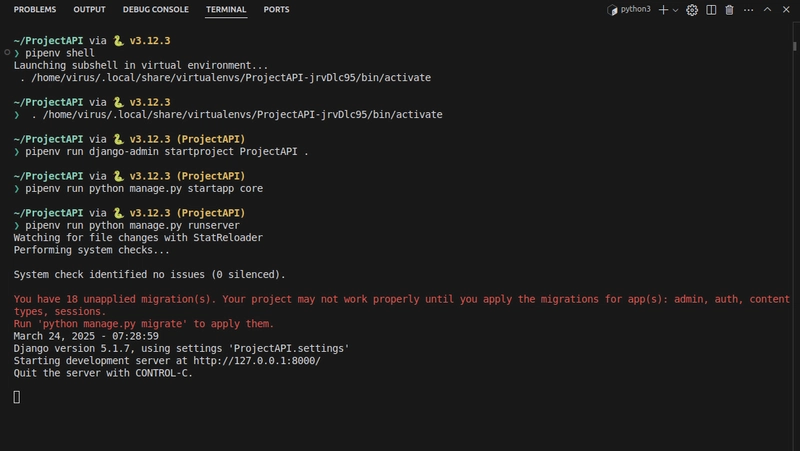
Let’s create a Django REST API from scratch, using Pipenv for environment management to keep dependencies clean.
Initial Setup
Create a Project Directory:
mkdir ProjectAPI
cd ProjectAPI
Install Dependencies:
Add Django, DRF, and OAuth tools:
pipenv install django djangorestframework django-allauth djangorestframework-simplejwt python-decouple
Activate the Virtual Environment
pipenv shell
Start the Django Project:
pipenv run django-admin startproject ProjectAPI .
Note: The . keeps the project files in the current directory.
Add an App:
pipenv run python manage.py startapp core
Test the Setup:
pipenv run python manage.py runserver
Visit http://localhost:8000/ to confirm it’s working.
Task 1: Set Up Google OAuth Credentials
Google OAuth starts with registering your app in the Developer Console.
Steps:
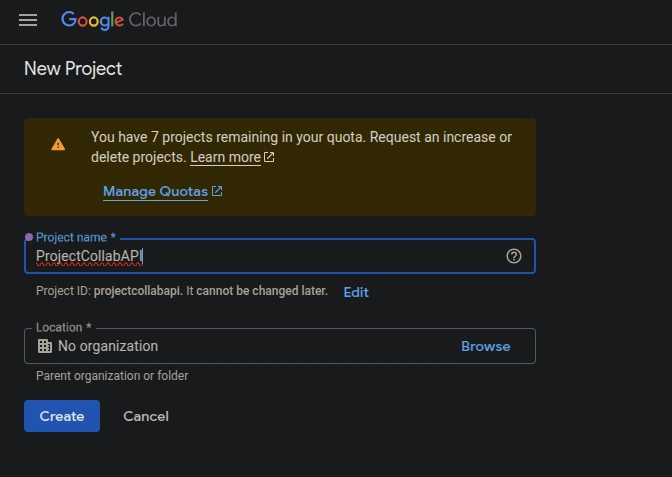
Step 1. Create a Project:
- Visit Google Cloud Console.

Create a project (e.g., "ProjectCollabAPI").
Choose the Organization and Location (if applicable).
Click Create.
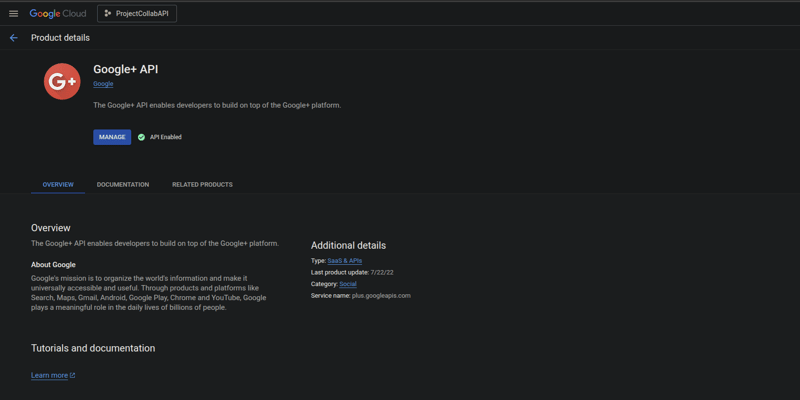
Step 2. Enable APIs:
- In the Google Cloud Console, select the project you just created.
- Navigate to APIs & Services > Library.
- Search for "Google+ API" or "People API" .
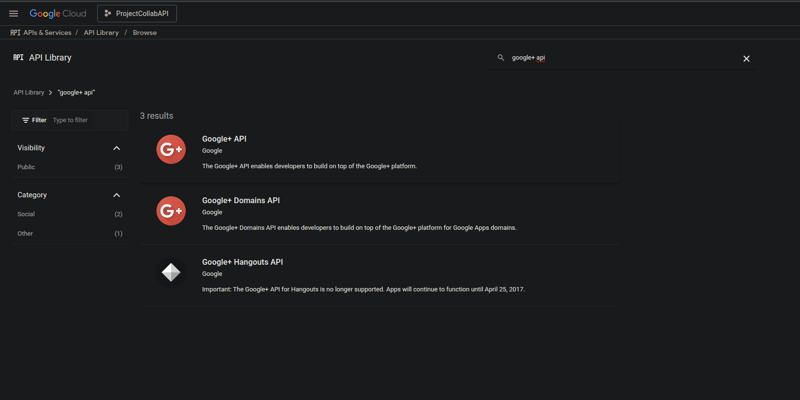
and click "Enable." This allows your app to access user info.
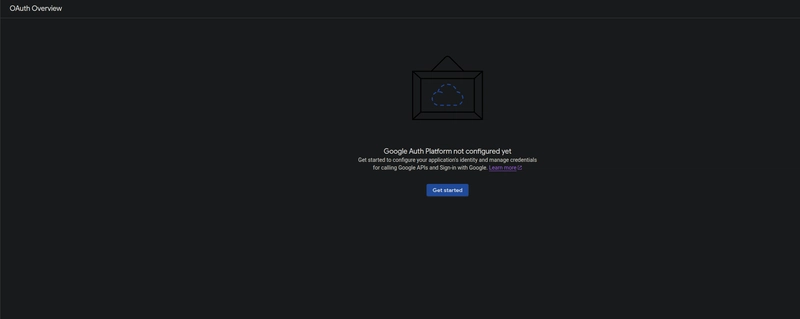
Step 3. Configure OAuth Consent Screen:
Still on the "APIs & Services", go to the "OAuth consent screen."
You will see a "Google Auth Platform not configured yet" message with a "Get started" button—this is normal for a new project. Click "Get started."
Choose User Type:
Select "External" to allow any Google account to sign in (good for testing). Click "Create."
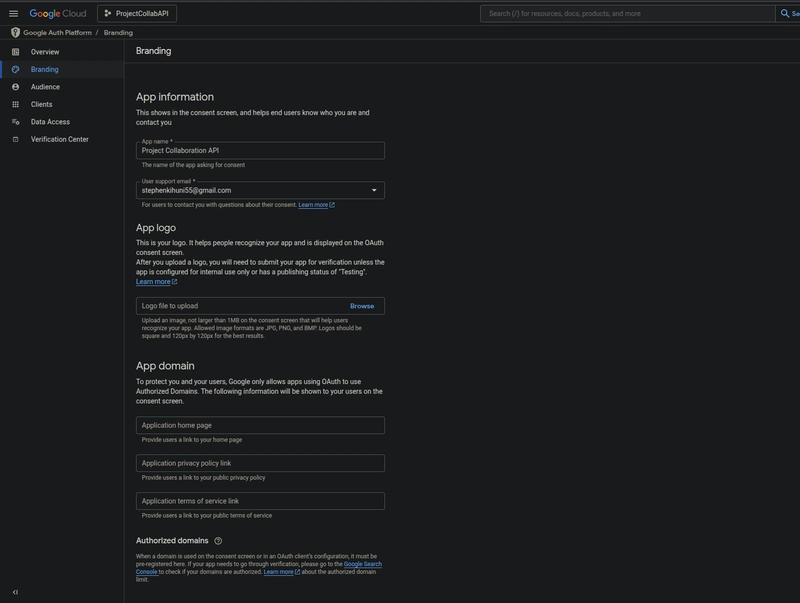
Add app Information:
- App Name: Enter "Project Collaboration API."
- User Support Email: Use your Gmail address.
App Logo (optional): Upload a 512x512px image (e.g., a handshake icon).
App Domain (optional): Skip for now unless you have a production domain.
Developer Contact Information: Add your email.
Click "Save and Continue."
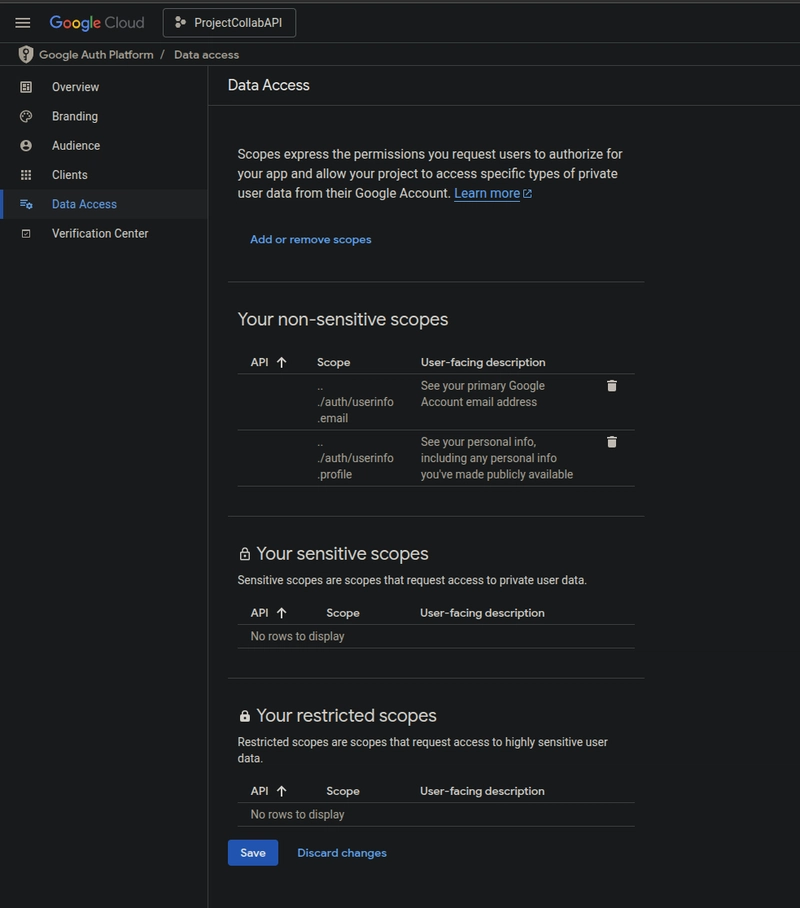
Scopes:
Click "Add or Remove Scopes."
Add profile and email (e.g., https://www.googleapis.com/auth/userinfo.profile, https://www.googleapis.com/auth/userinfo.email) to access basic user info.
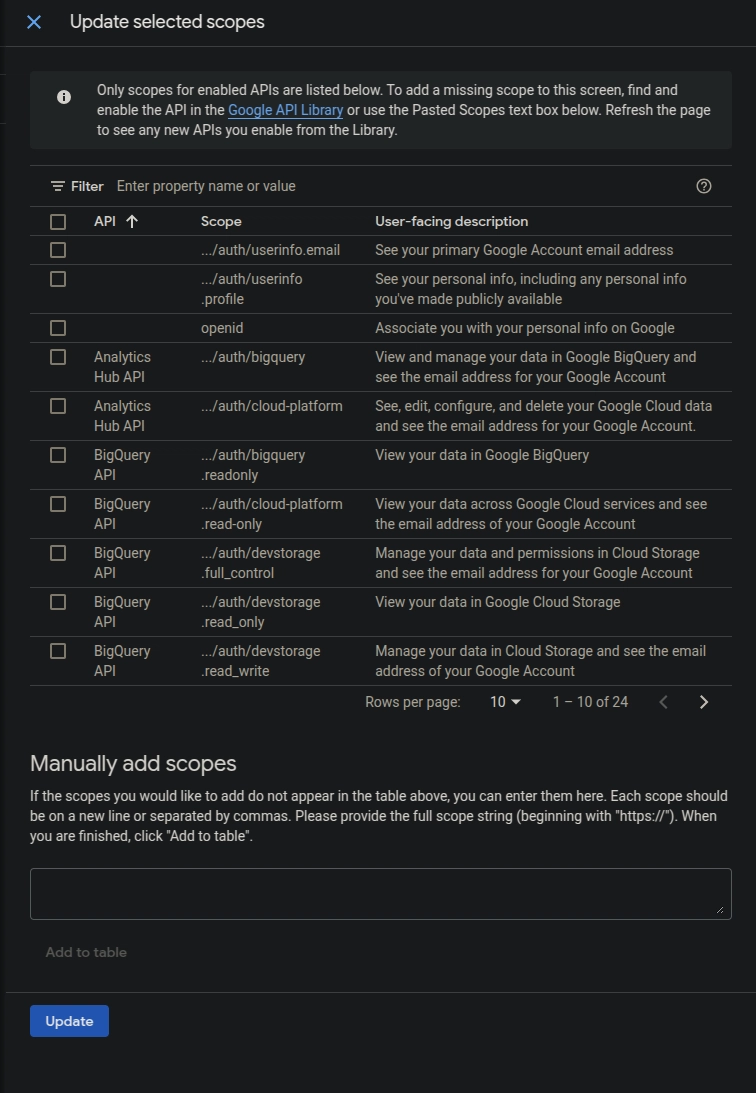
Click "Update," then "Save and Continue."
Test Users (optional):
If prompted, add your Gmail as a test user for development.
Click "Save and Continue."
Step 4. Create Credentials:
In the left sidebar, go to "APIs & Services" > "Credentials."
- Click "Create Credentials" > "OAuth 2.0 Client IDs."
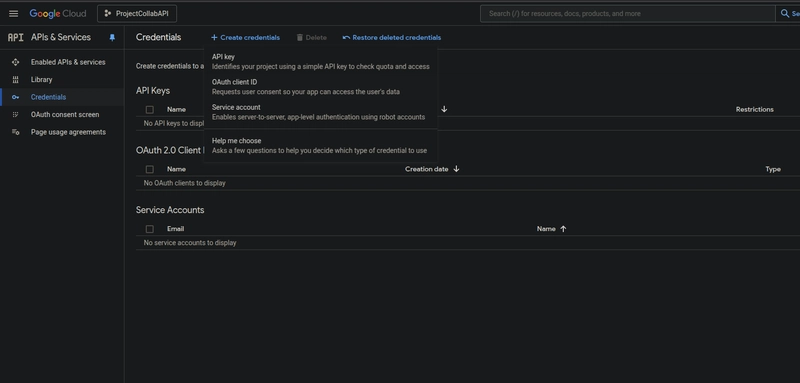
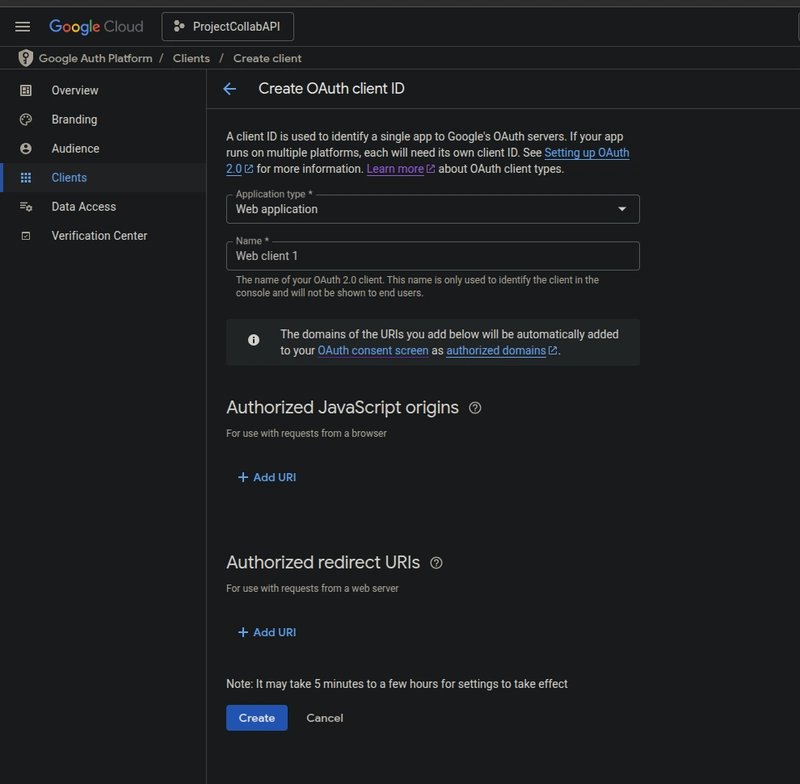
- Select "Web application."
- Set "Authorized redirect URIs" to:
- http://localhost:8000/auth/google/login/callback/ (for the default Django development server port using localhost).
- http://127.0.0.1:8000/auth/google/login/callback/ (if you access via 127.0.0.1).
- Add additional URIs if you use a different port (e.g., http://localhost:8080/auth/google/login/callback/, http://127.0.0.1:8080/auth/google/login/callback/).
Note: The callback path /auth/google/login/callback/ is the default path used by django-allauth for the Google provider when the base path is /auth/. This path is determined by django-allauth’s URL patterns for the Google provider.
- Click "Create" and note your Client ID and Client Secret.
Secure Storage
In .env (create this file in ProjectAPI/):
GOOGLE_CLIENT_ID=your-client-id-here
GOOGLE_CLIENT_SECRET=your-client-secret-here
In ProjectAPI/settings.py:
python
from decouple import config
GOOGLE_CLIENT_ID = config('GOOGLE_CLIENT_ID')
GOOGLE_CLIENT_SECRET = config('GOOGLE_CLIENT_SECRET')
Task 2: Configure JWT for Authenticated Users
For an API app, JWTs provide stateless authentication, ideal for securing endpoints after Google sign-in. Let’s configure the necessary settings in ProjectAPI/settings.py.
Update settings.py
Add the following to enable Django’s authentication, DRF, allauth for Google OAuth, and SimpleJWT for token-based API access:
INSTALLED_APPS = [
    'django.contrib.admin',
    'django.contrib.auth',
    'django.contrib.contenttypes',
    'django.contrib.sessions',
    'django.contrib.messages',
    'django.contrib.staticfiles',
    'django.contrib.sites',
    'rest_framework',
    'rest_framework_simplejwt',
    'allauth',
    'allauth.account',
    'allauth.socialaccount',
    'allauth.socialaccount.providers.google',
    'core',
]

SITE_ID = 1
AUTHENTICATION_BACKENDS = [
    'django.contrib.auth.backends.ModelBackend',
    'allauth.account.auth_backends.AuthenticationBackend',
]
REST_FRAMEWORK = {
    'DEFAULT_AUTHENTICATION_CLASSES': (
        'rest_framework_simplejwt.authentication.JWTAuthentication',
    ),
}

SOCIALACCOUNT_PROVIDERS = {
    'google': {
        'SCOPE': ['profile', 'email'],
        'AUTH_PARAMS': {'access_type': 'online'},
    }
}

MIDDLEWARE = [
 ...
    'allauth.account.middleware.AccountMiddleware',  # Required for allauth
]
...
Understanding the Settings
Let’s break down what each part does:
INSTALLED_APPS:
-
'django.contrib.auth': Enables Django’s user authentication system (e.g., User model, login/logout). -
'django.contrib.contenttypes': Supports generic relationships, used by other apps. -
'django.contrib.sessions': Manages user sessions during the OAuth flow (even though we’ll use JWTs for API access). -
'django.contrib.messages': Handles one-time messages (e.g., success notifications). -
'django.contrib.staticfiles': Manages static files for the minimal frontend. -
'django.contrib.sites': Required by allauth to associate users with a site. -
'rest_framework':Adds DRF for API functionality. -
'rest_framework_simplejwt': Provides JWT authentication for DRF. -
'allauth', 'allauth.account', 'allauth.socialaccount': Core allauth packages for authentication and social logins. -
'allauth.socialaccount.providers.google': Enables Google OAuth support. -
'core': Your custom app for API logic.
SITE_ID = 1:
- Identifies the site your app runs on, required by
allauth—the default SITE_ID of 1 matches the first site in the django_site table (created during migration).
AUTHENTICATION_BACKENDS:
-
'django.contrib.auth.backends.ModelBackend': Default Django backend for username/password authentication. -
'allauth.account.auth_backends.AuthenticationBackend':Handles allauth’s authentication, including Google OAuth.
REST_FRAMEWORK:
-
'DEFAULT_AUTHENTICATION_CLASSES':Sets JWT as the default authentication method for DRF. After Google sign-in, users get a JWT to access API endpoints.
SOCIALACCOUNT_PROVIDERS:
Configures Google OAuth settings for
allauth.'SCOPE': ['profile', 'email']: Requests the user’s name and email.
'AUTH_PARAMS': {'access_type': 'online'}: Ensures the OAuth flow is for online access (no refresh tokens needed).MIDDLEWARE:
'allauth.account.middleware.AccountMiddleware': Required bydjango-allauth(version 0.53.0+) to manage user authentication flows, such as Google OAuth. It must come afterAuthenticationMiddleware.
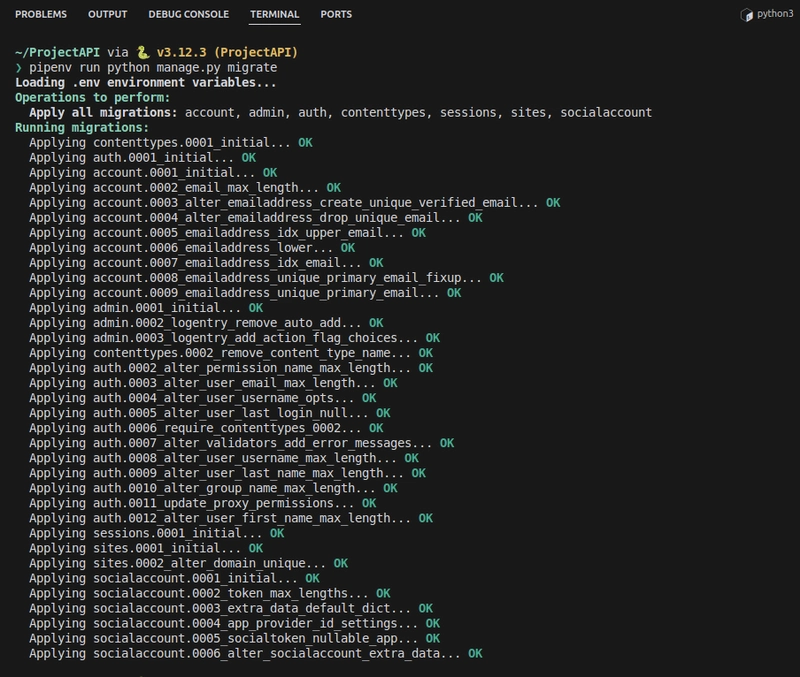
Migrate
Run migrations to apply these changes:
pipenv run python manage.py migrate
Troubleshooting
Error: allauth.account.middleware.AccountMiddleware missing:
- If you see ImproperlyConfigured: allauth.account.middleware.AccountMiddleware must be added to settings.MIDDLEWARE, ensure you’re using django-allauth version 0.53.0 or higher (check with
pipenv run pip show django-allauth). Add the middleware as shown above, after AuthenticationMiddleware.
Error: ModuleNotFoundError: No module named 'requests':
- The requests library is required by
allauth.socialaccount.providers.googleto make HTTP requests to Google’s OAuth endpoints. Install it with:
pipenv install requests
Error: ModuleNotFoundError: No module named 'cryptography':
- The cryptography library is required by
allauthfor secureJWThandling in Google OAuth. Install it with:
pipenv install cryptography
Configure the Google SocialApp in the Database
Before you can use Google OAuth, you need to configure a SocialApp in the database to store your Google OAuth credentials. django-allauth uses this to authenticate with Google.
Step 1. Create a Superuser:
To access the Django admin interface, create a superuser account:
pipenv run python manage.py createsuperuser
Follow the prompts to set a username, email, and password.
Step 2. Access the Admin Interface:
Start the server:
pipenv run python manage.py runserver
Visit http://localhost:8000/admin/ and log in with your superuser credentials.
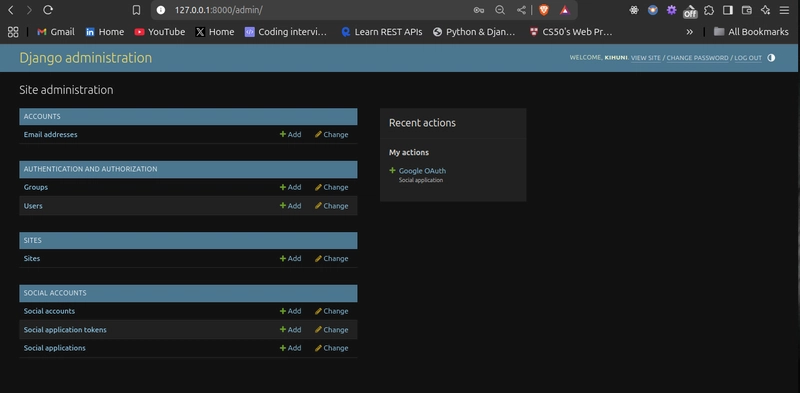
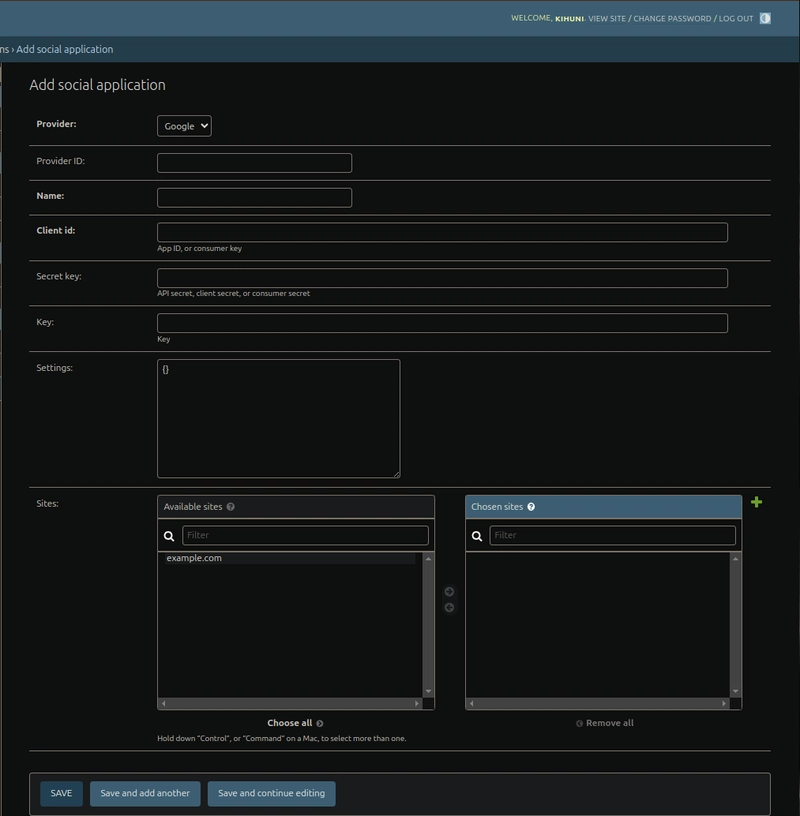
Step 3. Add a Google SocialApp:
In the admin interface, under Social Accounts, click Social applications > Add social application.
Fill in the form:
- Provider: Select "Google".
- Name: Enter "Google OAuth".
- Client ID: Enter the GOOGLE_CLIENT_ID from your .env file.
- Secret key: Enter the GOOGLE_CLIENT_SECRET from your .env file.
- Key: Leave blank.
- Sites: Move the site with SITE_ID=1 (e.g., example.com) to the "Chosen sites" box.
- Click Save.
This step ensures django-allauth can find the Google credentials when initiating the OAuth flow.
Task 3: Implement Backend Routes
We’ll set up routes for Google login, token issuance, and a sample /projects/ endpoint.
URLs
In ProjectAPI/urls.py:
from django.contrib import admin
from django.urls import path, include

urlpatterns = [
    path('admin/', admin.site.urls),
    path('auth/', include('allauth.urls')),
    path('api/', include('core.urls')),
]
In core/urls.py:
from django.urls import path
from . import views

urlpatterns = [
    path('', views.home, name='home'),
    path('token/', views.get_jwt_token, name='get_token'),
    path('projects/', views.projects, name='projects'),
]
Views
In core/views.py:
from django.shortcuts import render
from rest_framework.decorators import api_view, permission_classes
from rest_framework.permissions import IsAuthenticated
from rest_framework.response import Response
from rest_framework_simplejwt.tokens import RefreshToken
def home(request):
return render(request, 'core/home.html')
@api_view(['GET'])
def get_jwt_token(request):
if not request.user.is_authenticated:
return Response({"error": "Please sign in first"}, status=401)
refresh = RefreshToken.for_user(request.user)
return Response({
'refresh': str(refresh),
'access': str(refresh.access_token),
})
@api_view(['GET'])
@permission_classes([IsAuthenticated])
def projects(request):
data = {
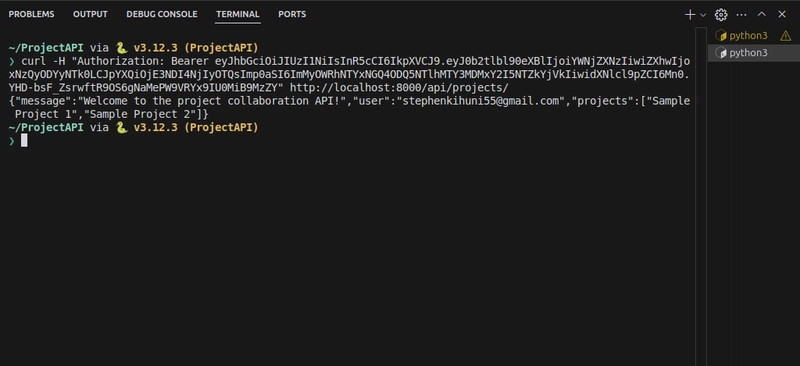
"message": "Welcome to the project collaboration API!",
"user": request.user.email,
"projects": ["Sample Project 1", "Sample Project 2"]
}
return Response(data)
Custom Adapter
In core/adapters.py. Add:
from allauth.socialaccount.adapter import DefaultSocialAccountAdapter

class CustomSocialAccountAdapter(DefaultSocialAccountAdapter):
    def save_user(self, request, sociallogin, form=None):
        user = super().save_user(request, sociallogin, form)
        sociallogin.state['next'] = '/api/token/'
        return user
In settings.py. Add:
SOCIALACCOUNT_ADAPTER = 'core.adapters.CustomSocialAccountAdapter'
The custom adapter controls what happens after a user logs in with Google. Here’s what it does:
Why It’s Needed:
By default, after a Google login, django-allauth redirects the user to a default URL (e.g., /accounts/profile/) or a URL specified in the
nextparameter of the login request.In an API app, you want the user to be redirected to
/api/token/to immediately obtain a JWT for API access, rather than a generic page.
How It Works:
- CustomSocialAccountAdapter: This class inherits from DefaultSocialAccountAdapter, the default adapter for social logins in allauth.
save_user Method:
- Called by
allauthwhen a user logs in with Google to create or link a Django User. - super().save_user(request, sociallogin, form): Calls the default save_user method to handle user creation/linking.
- sociallogin.state['next'] = '/api/token/': Sets the redirect URL to /api/token/ after login. The sociallogin.state dictionary is used by allauth to manage redirect state.
SOCIALACCOUNT_ADAPTER Setting:
- Tells
allauthto use your custom adapter (core.adapters.CustomSocialAccountAdapter) instead of the default one.
Role in the Flow:
- After the user logs in with Google and is redirected back to
/auth/google/callback/, allauth uses the custom adapter to set the redirect to /api/token/. - At
/api/token/, the get_jwt_token view issues a JWT, which the user can use to access protected endpoints like/api/projects/.
Troubleshooting
Error: SocialApp.DoesNotExist:
If you see this error when trying to log in with Google, it means the Google SocialApp is not configured in the database. Ensure you’ve completed adding a Google SocialApp via the Django admin interface, including your GOOGLE_CLIENT_ID and GOOGLE_CLIENT_SECRET.
Frontend
Create templates/core/:
home.html:
<!DOCTYPE html>
<html>
<head><title>Project Collaboration API</title></head>
<body>
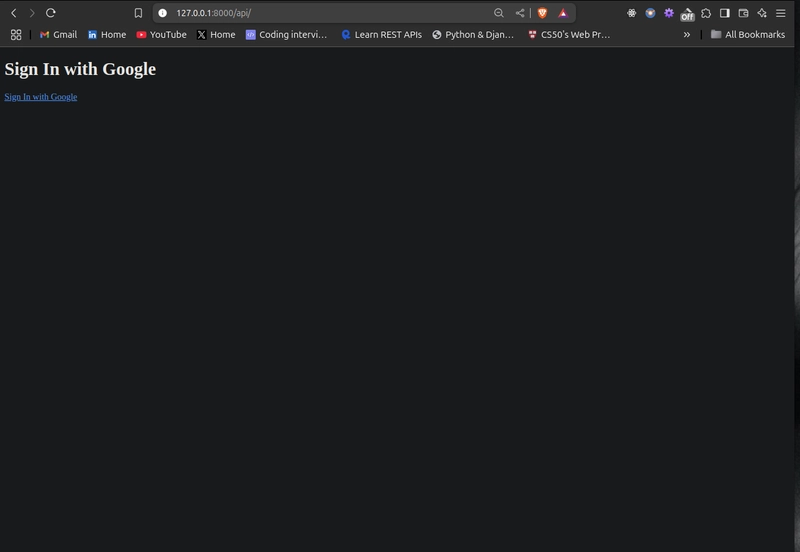
<h1>Sign In with Google</h1>
{% if user.is_authenticated %}
<p>Welcome, {{ user.first_name }}! <a href="/api/token/">Get JWT Token</a></p>
<p><a href="/auth/logout/">Logout</a></p>
{% else %}
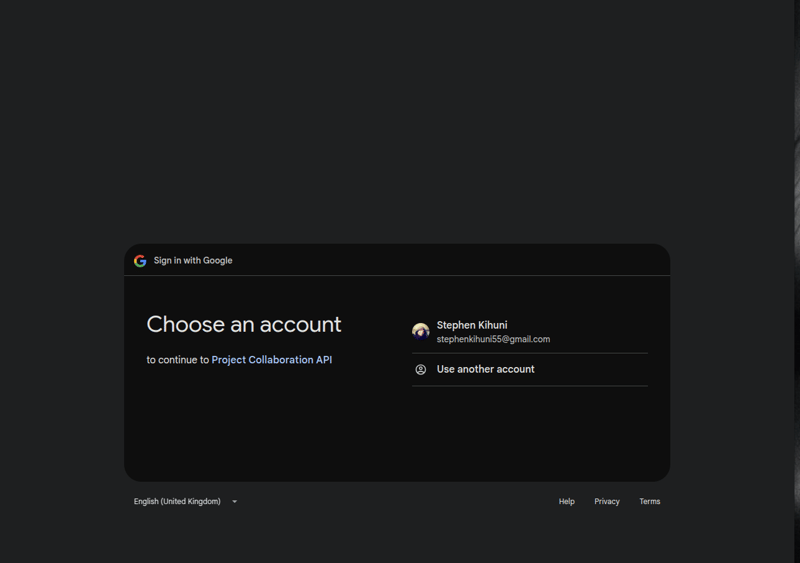
<p><a href="/auth/google/login/?process=login">Sign In with Google</a></p>
{% endif %}
</body>
</html>
In settings.py:
TEMPLATES = [
    {
        'BACKEND': 'django.template.backends.django.DjangoTemplates',
        'DIRS': [BASE_DIR / 'templates'],
        'APP_DIRS': True,
        ...
    },
]
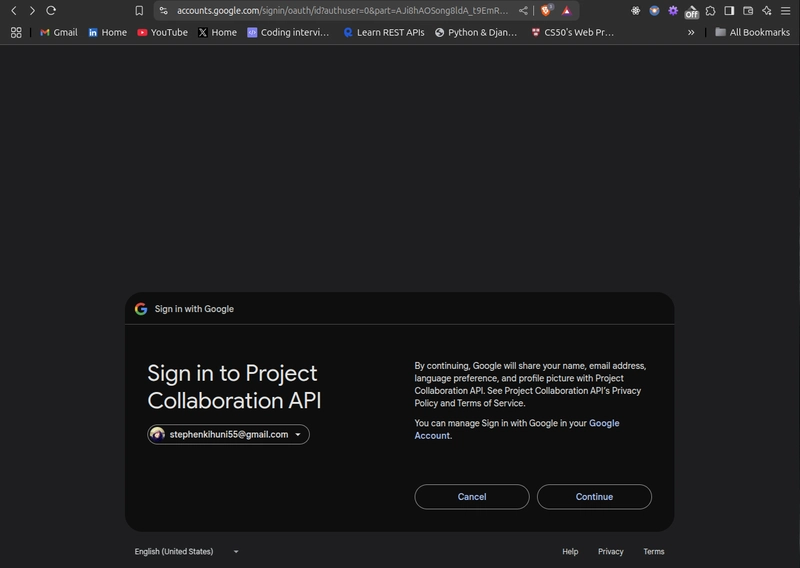
The Flow
- Sign-In:
/auth/google/login/→ Google →/auth/google/login/callback/. - Token: Redirects to
/api/token/for aJWT(thanks to the custom adapter). - API: Use the access token in
Authorization: Bearer <token>for/api/projects/.
Testing the Authentication
Activate Pipenv:
pipenv shell
Run the server:
python manage.py runserver
Visit http://localhost:8000/api/, and sign in.
Get your JWT, and test /api/projects/:
curl -H "Authorization: Bearer <access_token>" http://localhost:8000/api/projects/
Conclusion
You’ve now added Google OAuth to a Django REST API, creating a seamless sign-in option that boosts user experience.
Summary
- We Set up Google OAuth credentials.
- Configured JWT for authenticated users.
- Configured the Google SocialApp in the database.
- Implemented backend routes for login and API access.
- This foundation is ready for project collaboration features—expand it with your endpoints! Check out Django-Allauth Docs or DRF Docs for more.
What I Offer
Need a custom API solution? Here’s what I bring:
- Custom Django REST APIs: Secure, scalable backends tailored to your needs.
- Fast API Development: Using DRF and GraphQL for rapid builds.
- Authentication & Security: JWT, OAuth2, rate limiting, CORS, API keys.
- Database Optimization: Tuning PostgreSQL, MySQL, Redis, or MongoDB.
- Third-Party API Integrations: Stripe, Twilio, OpenAI, Zapier, Google Maps, and more.
- Real-time Features: WebSockets and Celery for dynamic apps.
- Comprehensive API Documentation: Swagger, OpenAPI, or Postman for clarity.
- Let’s build something amazing together!

Top comments (2)
Great blog post. I will definitely try this out.
I am glad you found it helpful.