
Welcome back, to our Django REST Framework (DRF) series! Over the past six parts, we’ve built a Task Manager API using Django REST Framework (DRF)
- Part 1: we set up Django and DRF.
- Part 2: added CRUD operations for tasks.
- Part 3: secured it with token authentication.
- Part 4: personalized it with user-owned tasks.
- Part 5: optimized it with filtering, pagination, and search.
- Part 6: locked it down with security best practices like rate limiting, CORS, and HTTPS readiness.
Now, in Part 7—the final part of this series—we’ll make our API developer-friendly by adding interactive API documentation using OpenAPI and Swagger ui. By the end, you’ll have an API with documentation that developers can use to understand and test your endpoints interactively.
Table of Contents
- Why API Documentation Matters
- Step 1: Install drf-spectacular
- Step 2: Configure drf-spectacular in Settings
- Step 3: Set Up Swagger UI
- Step 4: Enhance Documentation with Descriptions
- Step 5: Test the Interactive Documentation
- Conclusion
- What’s Next?
Why API Documentation Matters
API documentation is a bridge between your API and its users (developers). Good documentation:
- Explains what each endpoint does, its parameters, and expected responses.
- Reduces the learning curve for developers integrating with your API.
- Provides an interactive interface (via Swagger UI) for testing endpoints without external tools like Postman.
- Builds trust by making your API professional and transparent.
We’ll use OpenAPI (a standard for API specifications) and Swagger UI (a tool to visualize and interact with the API) to generate our documentation. The drf-spectacular library will help us create an OpenAPI schema for our DRF API and integrate Swagger UI seamlessly.
Step 1: Install drf-spectacular
drf-spectacular is a library for generating OpenAPI schemas with DRF. It’s well-maintained and supports advanced features like schema customization.
Install the Package
In your project directory, activate your virtual environment (if not already activated) and install drf-spectacular:
pip install drf-spectacular
Add it to your INSTALLED_APPS in taskmanager/settings.py:
INSTALLED_APPS = [
    ...

    'drf_spectacular',  # Add drf-spectacular for OpenAPI schema generation
    ...
]
Step 2: Configure drf-spectacular in Settings
Let’s configure drf-spectacular to generate an OpenAPI schema for our API. We’ll also set it as the default schema generator for DRF.
Update taskmanager/settings.py
Add the following to your REST_FRAMEWORK settings:
REST_FRAMEWORK = {
...

# Use drf-spectacular for schema generation
'DEFAULT_SCHEMA_CLASS': 'drf_spectacular.openapi.AutoSchema',

...
}
Add drf-spectacular settings to customize the API documentation:
SPECTACULAR_SETTINGS = {
    'TITLE': 'Task Manager API',
    'DESCRIPTION': 'A RESTful API for managing tasks, built with Django REST Framework. Features include CRUD operations, user authentication, filtering, pagination, search, and security best practices.',
    'VERSION': '1.0.0',
    'SERVE_INCLUDE_SCHEMA': True,  # Include the schema in the Swagger UI
    'SWAGGER_UI_SETTINGS': {
        'deepLinking': True,
        'displayOperationId': True,
        'defaultModelsExpandDepth': 1,
        'defaultModelExpandDepth': 1,
    },
}
- 'DEFAULT_SCHEMA_CLASS': Tells DRF to use
drf-spectacular’sschema generator instead of the default. - SPECTACULAR_SETTINGS:
- TITLE, DESCRIPTION, and VERSION define metadata for your API.
- SERVE_INCLUDE_SCHEMA: Ensures the OpenAPI schema is accessible via Swagger UI.
- SWAGGER_UI_SETTINGS: Customizes the Swagger UI interface for better usability.
Step 3: Set Up Swagger UI
drf-spectacular provides built-in views for Swagger UI, Redoc (another documentation UI), and the raw OpenAPI schema. We’ll set up Swagger UI to provide an interactive interface for testing our API.
Update taskmanager/urls.py
Modify your project’s URL configuration to include drf-spectacular’s views:
from django.contrib import admin
from django.urls import path, include
from drf_spectacular.views import SpectacularAPIView, SpectacularSwaggerView

urlpatterns = [
    path('admin/', admin.site.urls),
    path('api/', include('tasks.urls')),  # Your existing API routes
    path('api/schema/', SpectacularAPIView.as_view(), name='schema'),  # Endpoint for the OpenAPI schema
    path('api/docs/', SpectacularSwaggerView.as_view(url_name='schema'), name='swagger-ui'),  # Swagger UI
]
- SpectacularAPIView: Provides the raw OpenAPI schema at /api/schema/.
- SpectacularSwaggerView: Renders the Swagger UI at /api/docs/, using the schema from /api/schema/.
Step 4: Enhance Documentation with Descriptions
To make the documentation more informative, let’s add descriptions to our serializers and views using drf-spectacular’s @extend_schema decorator. This step is optional but recommended for clarity.
Update tasks/serializers.py
Add a docstring to the TaskSerializer to provide a description that will appear in the OpenAPI schema:
from rest_framework import serializers
from django.contrib.auth import get_user_model
from .models import Task

User = get_user_model()

class LoginSerializer(serializers.Serializer):
    """Serializer for login credentials."""
    username = serializers.CharField(max_length=150)
    password = serializers.CharField(max_length=128, write_only=True)

class TokenSerializer(serializers.Serializer):
    """Serializer for the token response."""
    token = serializers.CharField()

class TaskSerializer(serializers.ModelSerializer):
    """Serializer for Task objects, including validation for the title field."""
    class Meta:
        model = Task
        fields = ['id', 'title', 'description', 'completed', 'created_at', 'created_by']
        read_only_fields = ['id', 'created_at', 'created_by']

    def validate_title(self, value):
        if len(value) < 3:
            raise serializers.ValidationError("Title must be at least 3 characters long.")
        if not value.replace(' ', '').isalnum():
            raise serializers.ValidationError("Title must be alphanumeric with optional spaces.")
        return value

class UserSerializer(serializers.ModelSerializer):
    """Serializer for User objects during registration."""
    class Meta:
        model = User
        fields = ['id', 'username', 'password']
        extra_kwargs = {'password': {'write_only': True}}

    def create(self, validated_data):
        user = User.objects.create_user(**validated_data)
        return user
The docstring (Serializer for Task objects, including validation for the title field.) will be used by drf-spectacular as the serializer’s description in the OpenAPI schema.
Update tasks/views.py
Add descriptions to the views using @extend_schema:
from rest_framework import generics, views
from .models import Task
from .serializers import TaskSerializer, UserSerializer, LoginSerializer, TokenSerializer
from django.contrib.auth import authenticate
from rest_framework.permissions import IsAuthenticated, AllowAny
from rest_framework.authentication import TokenAuthentication
from rest_framework.authtoken.models import Token
from rest_framework.response import Response
from rest_framework import status
from django_filters.rest_framework import DjangoFilterBackend
from rest_framework.pagination import PageNumberPagination
from rest_framework.filters import SearchFilter
from .pagination import CustomPageNumberPagination
from drf_spectacular.utils import extend_schema, OpenApiResponse

class RegisterView(views.APIView):
    permission_classes = [AllowAny]
    serializer_class = UserSerializer

    @extend_schema(
        summary="Register a new user",
        description="Create a new user account. Requires a username and password in the request body.",
        request=UserSerializer,
        responses={
            201: OpenApiResponse(response=TokenSerializer, description="User created successfully"),
            400: OpenApiResponse(description="Invalid data"),
        },
    )
    def post(self, request):
        serializer = UserSerializer(data=request.data)
        if serializer.is_valid():
            user = serializer.save()
            token, _ = Token.objects.get_or_create(user=user)
            return Response({'token': token.key}, status=status.HTTP_201_CREATED)
        return Response(serializer.errors, status=status.HTTP_400_BAD_REQUEST)

class LoginView(views.APIView):
    permission_classes = [AllowAny]
    serializer_class = LoginSerializer

    @extend_schema(
        summary="Login to get a token",
        description="Authenticate a user and return a token. Requires username and password.",
        request=LoginSerializer,
        responses={
            200: OpenApiResponse(response=TokenSerializer, description="Token retrieved successfully"),
            400: OpenApiResponse(description="Invalid credentials"),
        },
    )
    def post(self, request):
        serializer = LoginSerializer(data=request.data)
        if serializer.is_valid():
            username = serializer.validated_data['username']
            password = serializer.validated_data['password']
            user = authenticate(username=username, password=password)
            if user:
                token, _ = Token.objects.get_or_create(user=user)
                return Response({'token': token.key}, status=status.HTTP_200_OK)
        return Response({'error': 'Invalid Credentials'}, status=status.HTTP_400_BAD_REQUEST)

@extend_schema(
    summary="List or create tasks",
    description="Retrieve a paginated list of tasks for the authenticated user or create a new task. Supports filtering by completed status (e.g., ?completed=true) and search by title (e.g., ?search=urgent). The title must be at least 3 characters long and alphanumeric (spaces allowed) when creating a task.",
)
class TaskListCreateView(generics.ListCreateAPIView):
    serializer_class = TaskSerializer
    permission_classes = [IsAuthenticated]
    authentication_classes = [TokenAuthentication]
    filter_backends = [DjangoFilterBackend, SearchFilter]
    filterset_fields = ['completed']
    search_fields = ['title']
    pagination_class = CustomPageNumberPagination

    def get_queryset(self):
        if getattr(self, "swagger_fake_view", False):  # Handle schema generation
            return Task.objects.none()  # Return empty queryset for schema generation
        return Task.objects.filter(created_by=self.request.user).order_by('-created_at')

    def perform_create(self, serializer):
        serializer.save(created_by=self.request.user)

@extend_schema(
    summary="Retrieve, update, or delete a task",
    description="Retrieve, update, or delete a specific task by ID, if it belongs to the authenticated user.",
)
class TaskDetailView(generics.RetrieveUpdateDestroyAPIView):
    serializer_class = TaskSerializer
    permission_classes = [IsAuthenticated]
    authentication_classes = [TokenAuthentication]

    def get_queryset(self):
        return Task.objects.filter(created_by=self.request.user)
The @extend_schema decorators provide summaries and descriptions for the combined actions of each generic view, aligning with your implementation.
Step 5: Test the Interactive Documentation
Let’s access the Swagger UI and test our API endpoints interactively.
Start the Server
Ensure your server is running:
python manage.py runserver
Access Swagger UI
Open your browser and navigate to:
http://127.0.0.1:8000/api/docs/
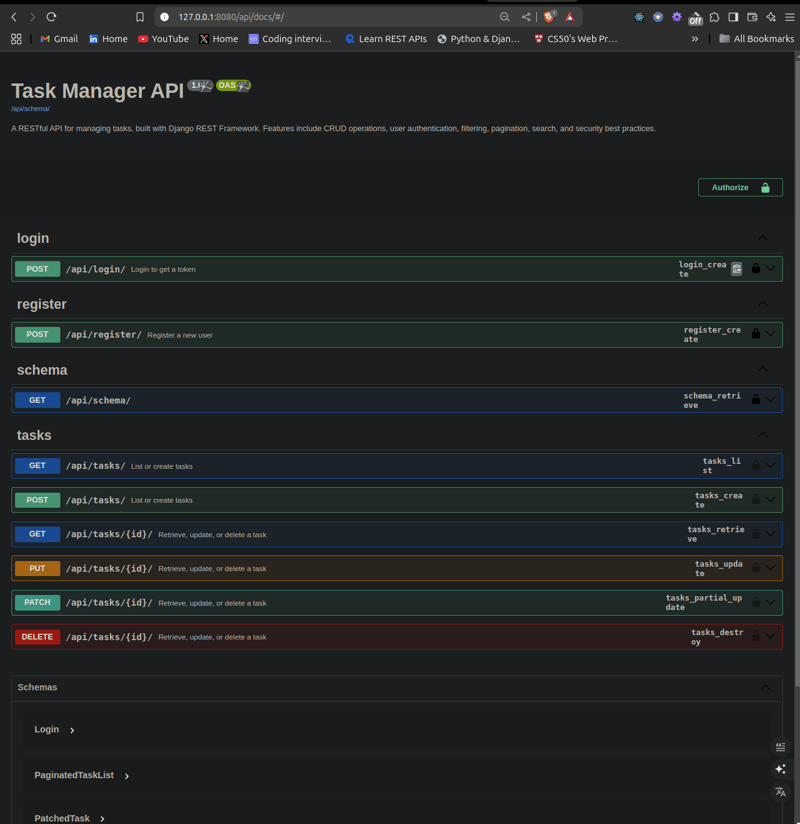
You should see the Swagger UI interface with the title Task Manager API and a description matching what you set in SPECTACULAR_SETTINGS.
1. Test an Endpoint
Authenticate:
- Use the http://127.0.0.1:8000/api/login/ endpoint to get a token:
- Click on POST /api/login/.
- Click Try it out.
In the request body, enter:
{
    "username": "user1",
    "password": "pass123"
}
Click Execute.
Copy the token from the response (e.g., token1).

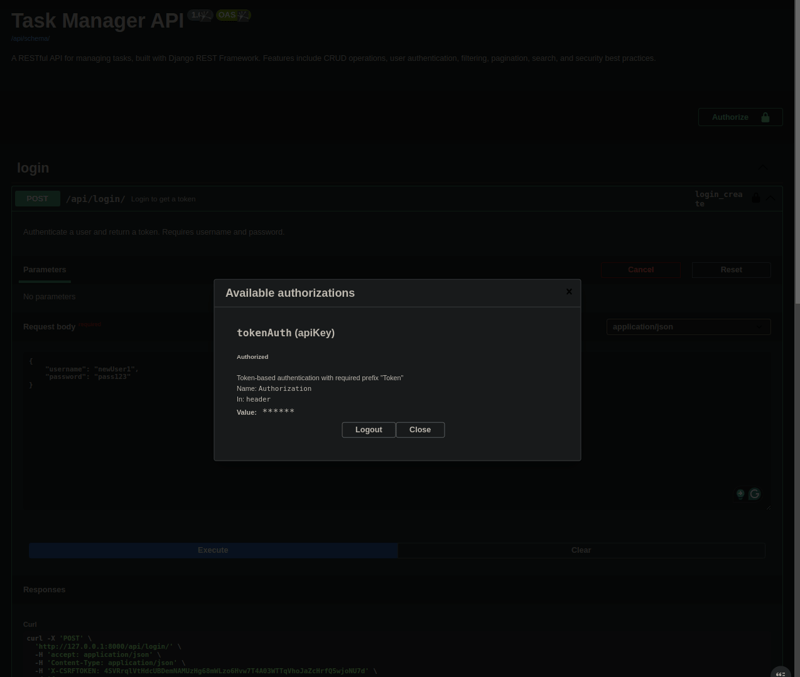
Authorize Swagger UI:
Click the Authorize button (top right).
Enter Token (e.g., Token token1) in the Value field and click Authorize.
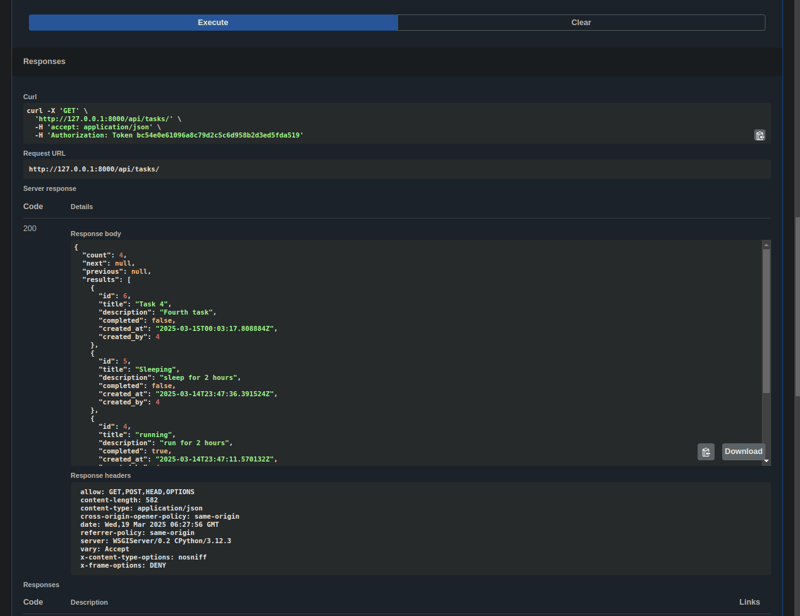
2. List Tasks:
Go to GET /api/tasks/.
Click Try it out and Execute.
Expect a 200 OK response with a paginated list of tasks for the authenticated user.
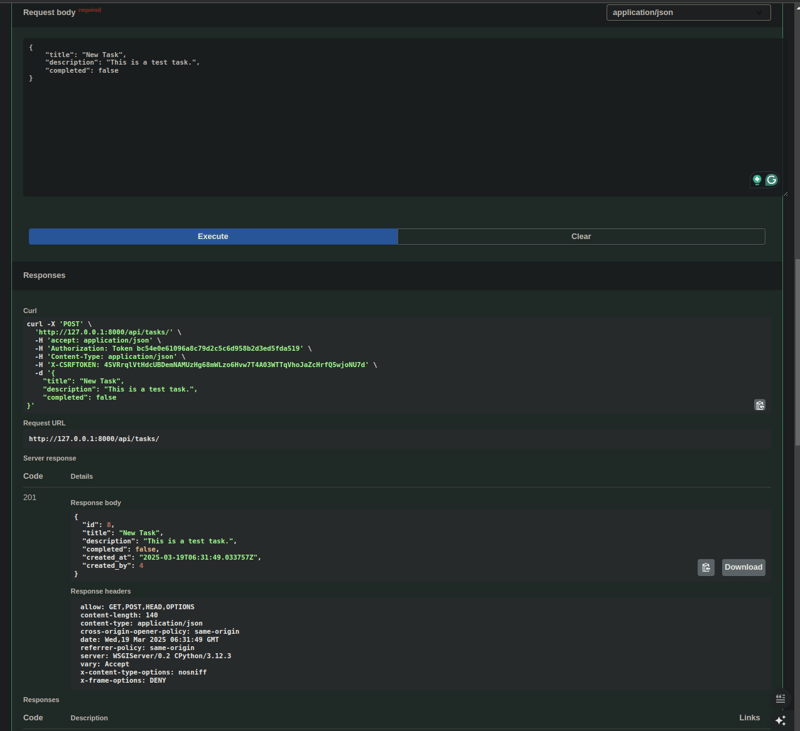
3. Create a Task:
Go to POST /api/tasks/.
Click Try it out.
Enter a task in the request body:
{
    "title": "New Task",
    "description": "This is a test task.",
    "completed": false
}
Click Execute.
Expect a 201 Created response with the new task’s details.
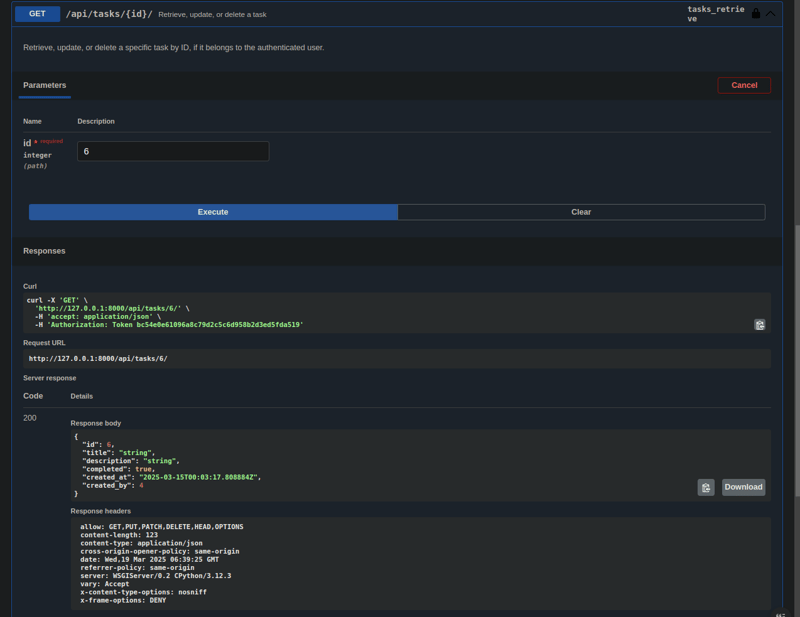
4. Get a Task:
Go to GET /api/tasks/{id}/.
Add query ID (e.g., 6).
Click Execute.
Conclusion
Congratulations! You’ve built a fully functional, secure, well-documented Task Manager API with Django REST Framework! Over this series, you’ve learned how to:
- Set up a Django project with DRF (Part 1).
- Implement CRUD operations for tasks (Part 2).
- Secure the API with token authentication (Part 3).
- Personalize tasks for users using generic views (Part 4).
- Optimize with filtering, pagination, and search (Part 5).
- Add security best practices like rate limiting and HTTPS (Part 6).
- Generate interactive API documentation with OpenAPI and Swagger (Part 7).
Summary
- Installed
drf-spectacular - Configured OpenAPI schema generation
- Set up Swagger UI
- Enhanced documentation with descriptions for generic views
- Tested the interactive documentation
What’s Next?
This series has ended, but your journey as an API developer is just beginning! Here are some ideas to take your Task Manager API to the next level:
- Deploy to Production: Deploy your API on a platform like Render, Heroku, or AWS. Use a production-grade server like Gunicorn with Nginx, and enable HTTPS with a free SSL certificate from Let’s Encrypt.
- Add More Features: Implement task categories, due dates, or reminders. Add email notifications for task updates using Django’s email backend.
- Build a Frontend: Create a frontend using React, Vue.js, or Angular to consume your API and provide a user-friendly interface for managing tasks.
- Explore Advanced DRF Features: Dive into DRF’s advanced features like custom permissions, nested serializers, or WebSocket support for real-time updates.
Thank you for following along with this series! I hope you’ve enjoyed building this API as much as I’ve enjoyed guiding you through it.
Loved this series? Share your feedback, questions, or what you’d like to see next in the comments below

Top comments (0)