Welcome back, to our Django REST Framework (DRF) tutorial series!
- Part 1: we set up Django and Django Rest Framework (DRF).
- Part 2: we implemented CRUD operations for tasks.
- Part 3: focused on securing the API with token authentication.
- Part 4: we personalized the application by allowing users to manage their tasks.
- Part 5: optimized the API with filtering, pagination, and search features.
What’s in Part 6?
In this section, we will enhance the security of our Task Manager API by implementing best practices, including rate limiting, CORS configuration, input validation, secure error handling, and logging. By the end, your API will be more resilient against threats and abuse.
Table of Contents
- Step 1: Implement Rate Limiting
- Step 2: Configure CORS for Safe Cross-Origin Requests
- Step 3: Enhance Input Validation
- Step 4: Secure Error Handling
- Step 5: Deploy with HTTPS (Preparation)
- Step 6: Set Up Logging for Monitoring
- Step 7: Test with Postman
- Conclusion
- What’s Next?
Step 1: Implement Rate Limiting
Rate limiting helps prevent API abuse by restricting the number of requests a user can make within a specific period. DRF’s built-in throttling feature makes this easy to configure.
Update taskmanager/settings.py
Add the following settings:
REST_FRAMEWORK = {
    'DEFAULT_AUTHENTICATION_CLASSES': (
        'rest_framework.authentication.TokenAuthentication',
    ),
    'DEFAULT_PERMISSION_CLASSES': (
        'rest_framework.permissions.IsAuthenticated',
    ),
    'DEFAULT_THROTTLE_CLASSES': [
        'rest_framework.throttling.UserRateThrottle',
        'rest_framework.throttling.AnonRateThrottle',
    ],
    'DEFAULT_THROTTLE_RATES': {
        'user': '100/minute',  # Authenticated users
        'anon': '50/minute',   # Anonymous users
    },
}
- UserRateThrottle: Limits authenticated users by user ID.
- AnonRateThrottle: Limits anonymous users by IP address.
Adjust these values based on your API’s needs.
Step 2: Configure CORS for Safe Cross-Origin Requests
CORS (Cross-Origin Resource Sharing) allows web applications from different domains to access your API. We’ll use django-cors-headers for this.
Install the package:
pip install django-cors-headers
Update taskmanager/settings.py:
Add corsheaders to INSTALLED_APPS:
INSTALLED_APPS = [
    ...
    'corsheaders',
]
Add CorsMiddleware to MIDDLEWARE (place on the top):
MIDDLEWARE = [
    'corsheaders.middleware.CorsMiddleware',
    'django.middleware.security.SecurityMiddleware',
    ...
]
Configure allowed origins:
CORS_ORIGIN_WHITELIST = (
    'http://localhost:3000',  # Example frontend origin
)
Note: For development, you can use CORS_ORIGIN_ALLOW_ALL = True, but disable it in production for security reasons.
Step 3: Enhance Input Validation
Input validation prevents invalid data and injection attacks. We’ll enhance the TaskSerializer with custom rules for the title field.
Update tasks/serializers.py
Add validation to the existing serializer:
from rest_framework import serializers
from .models import Task

class TaskSerializer(serializers.ModelSerializer):
    class Meta:
        model = Task
        fields = ['id', 'title', 'description', 'completed', 'created_at', 'created_by']
        read_only_fields = ['id', 'created_at', 'created_by']

    def validate_title(self, value):
        if len(value) < 3:
            raise serializers.ValidationError("Title must be at least 3 characters long.")
        if not value.replace(' ', '').isalnum():  # Allow spaces but check alphanumeric content
            raise serializers.ValidationError("Title must be alphanumeric with optional spaces.")
        return value
Step 4: Secure Error Handling
Custom error handling prevents exposing sensitive data and returns generic messages instead.
Create tasks/exceptions.py
Add a custom exception handler:
from rest_framework.views import exception_handler
from rest_framework.response import Response
from rest_framework.exceptions import ValidationError

def custom_exception_handler(exc, context):
    response = exception_handler(exc, context)
    if response is not None:
        if isinstance(exc, ValidationError):
            # For validation errors, preserve the field-specific error structure
            response.data = {'error': response.data}
        else:
            # For other errors, use a generic message or the detail if available
            response.data = {'error': response.data.get('detail', str(exc))}
    return response
Update taskmanager/settings.py
Configure the custom handler:
REST_FRAMEWORK = {
    # Existing settings...
    'EXCEPTION_HANDLER': 'tasks.exceptions.custom_exception_handler',
}
Step 5: Deploy with HTTPS
HTTPS encrypts data in transit, preventing man-in-the-middle attacks. For now, we’ll prepare for deployment by using ngrok to simulate HTTPS locally; full HTTPS setup requires a production server.
Prerequisite: Set Up ngrok Account and Authtoken
To use ngrok for local HTTPS testing, you need a verified ngrok account and an authtoken. Ngrok requires this to prevent anonymous usage, so let’s set it up:
Sign Up for a ngrok Account:
- Visit https://dashboard.ngrok.com/signup and create a free account.
- Verify your email as required.
Install Your Authtoken:
- After signing in, go to https://dashboard.ngrok.com/get-started/your-authtoken to find your authtoken.
- Install the authtoken on your machine by running:
- bash
ngrok config add-authtoken <your-authtoken>
Replace with the token from the dashboard (e.g., 2X9...).
Verify ngrok Setup:
Run ngrok http 8000 to test. If successful, you’ll see a public URL (e.g., https://abcd1234.ngrok.io). If you see ERR_NGROK_4018, double-check your authtoken and account verification.
Troubleshooting: If you encounter ERR_NGROK_4018, ensure your account is verified and the authtoken is correctly installed. Check ngrok’s documentation at https://ngrok.com/docs/errors/err_ngrok_4018.
Preparation
Install ngrok if not already done:
Install via pip: pip install pyngrok
Or download from https://ngrok.com and follow the installation instructions for your OS.
Run your Django server: python manage.py runserver.
In a new terminal, start ngrok:
ngrok http 8000
Update taskmanager/settings.py
Enable HTTPS support for ngrok by configuring SECURE_PROXY_SSL_HEADER:
# HTTPS settings for ngrok
SECURE_SSL_REDIRECT = False  # Set to True when testing with ngrok
SECURE_PROXY_SSL_HEADER = ('HTTP_X_FORWARDED_PROTO', 'https')  # Trust ngrok's X-Forwarded-Proto header

# Update ALLOWED_HOSTS to include the ngrok domain
ALLOWED_HOSTS = ['127.0.0.1', 'localhost', 'abcd1234.ngrok-free.app']  # Replace with your ngrok domain
Note:
- The Django development server (runserver) only supports HTTP. When testing locally without ngrok, keep SECURE_SSL_REDIRECT = False.
- When using ngrok for HTTPS testing, set SECURE_SSL_REDIRECT = True and add SECURE_PROXY_SSL_HEADER to recognize ngrok requests as secure.
- Update ALLOWED_HOSTS with your ngrok domain (e.g., abcd1234.ngrok-free.app). This domain changes each time you restart ngrok, so update it accordingly.
- In production, deploy on a server like Render or AWS with SSL/TLS enabled, and set SECURE_SSL_REDIRECT = True without SECURE_PROXY_SSL_HEADER unless using a proxy like nginx.
Step 6: Set Up Logging for Monitoring
Logging tracks API usage to detect anomalies, enhancing security.
Update taskmanager/settings.py
Add logging configuration:
LOGGING = {
    'version': 1,
    'disable_existing_loggers': False,
    'handlers': {
        'console': {
            'class': 'logging.StreamHandler',
        },
        'file': {
            'class': 'logging.FileHandler',
            'filename': 'debug.log',
        },
    },
    'loggers': {
        '': {
            'handlers': ['console', 'file'],
            'level': 'INFO',
            'propagate': True,
        },
        'django': {
            'handlers': ['console', 'file'],
            'level': 'INFO',
            'propagate': True,
        },
    },
}
Step 7: Test with Postman
Start your server
python manage.py runserver
We’ll test each security feature, starting with rate limiting. To make rate-limiting tests faster, we’ve set the limits to 100 requests per minute for authenticated users and 50 requests per minute for anonymous users (instead of per day). We’ll use a Python script to automate sending requests until we hit the 429 Too Many Requests response.
1. Test Rate Limiting
We’ll use a script to automate sending requests to /api/tasks/, testing both authenticated and anonymous users.
Create the Test Script
Create a file named test_rate_limiting.py in your project directory with the following code:
import requests
import time

# Configuration
BASE_URL = "http://127.0.0.1:8000/api/tasks/"  # Use HTTP for local development server; switch to ngrok HTTPS URL in Step 5
TOKEN = "<your-token>"  # Replace with your actual token from Postman

# Headers for authenticated requests
AUTH_HEADERS = {
    "Authorization": f"Token {TOKEN}"
}

# Headers for anonymous requests (no token)
ANON_HEADERS = {}

def test_rate_limiting(user_type, headers, limit):
    print(f"\nTesting rate limiting for {user_type} user (limit: {limit} requests/minute)...")
    request_count = 0
    start_time = time.time()

    while True:
        try:
            response = requests.get(BASE_URL, headers=headers, timeout=5)
            request_count += 1

            # Print request number and status code
            print(f"Request {request_count}: Status {response.status_code}")

            # Print response body for non-200 status codes
            if response.status_code != 200:
                try:
                    print(f"Response body: {response.json()}")
                except ValueError:
                    print(f"Response body (non-JSON): {response.text}")

            # Check for 429 Too Many Requests
            if response.status_code == 429:
                print(f"Rate limit hit after {request_count} requests for {user_type} user!")
                break

            # Stop if we exceed the expected limit + a buffer
            if request_count > limit + 10:
                print(f"Rate limit not hit after {request_count} requests. Something might be wrong.")
                break

        except requests.RequestException as e:
            print(f"Request failed: {e}")
            break

    elapsed_time = time.time() - start_time
    print(f"Time taken: {elapsed_time:.2f} seconds")

def main():
    # Test for authenticated user (100 requests/minute)
    test_rate_limiting("authenticated", AUTH_HEADERS, 100)

    # Test for anonymous user (50 requests/minute)
    test_rate_limiting("anonymous", ANON_HEADERS, 50)

if __name__ == "__main__":
    main()
Install Dependencies:
Ensure the requests library is installed:
bash
pip install requests
Get Your Token:
If you haven’t already, register and log in to get a token (as shown in Part 3 of the series):
POST to /api/register/, Body: {"username": "user1", "password": "pass123"}

POST to /api/login/, Body: {"username": "user1", "password": "pass123"}
Copy the token from the response (e.g., token1).
Update the Script:
Replace <your-token> in test_rate_limiting.py with your actual token (e.g., TOKEN = "token1").
Run the Script
With your server running (python manage.py runserver), open a new terminal.
Run the script:
python test_rate_limiting.py
Expected Output:
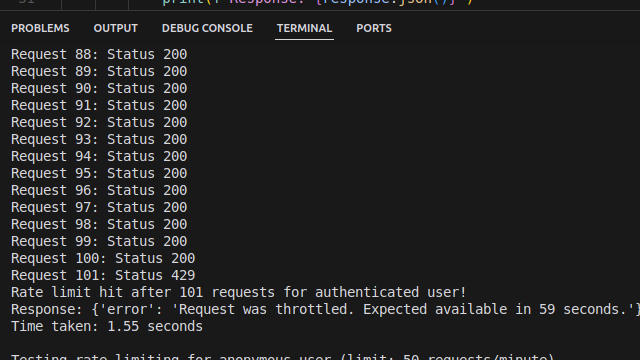
For authenticated users: It should send requests until it hits the 100-request limit, then print:
Testing rate limiting for authenticated user (limit: 100 requests/minute)...
Request 1: Status 200
...
Request 100: Status 200
Request 101: Status 429
Response body: {"error": "Request was throttled. Expected available in 60 seconds."}
Rate limit hit after 101 requests for authenticated user!
Time taken: 5.23 seconds
For anonymous users: It should stop after 50 requests:
Testing rate limiting for anonymous user (limit: 50 requests/minute)...
Request 1: Status 401
...
Request 50: Status 401
Request 51: Status 429
Response body: {"error": "Request was throttled. Expected available in 60 seconds."}
Rate limit hit after 51 requests for anonymous user!
Time taken: 2.87 seconds
Note: Anonymous requests return 401 Unauthorized because the endpoint requires authentication, but the rate limit still applies based on IP address.
2. Test Input Validation
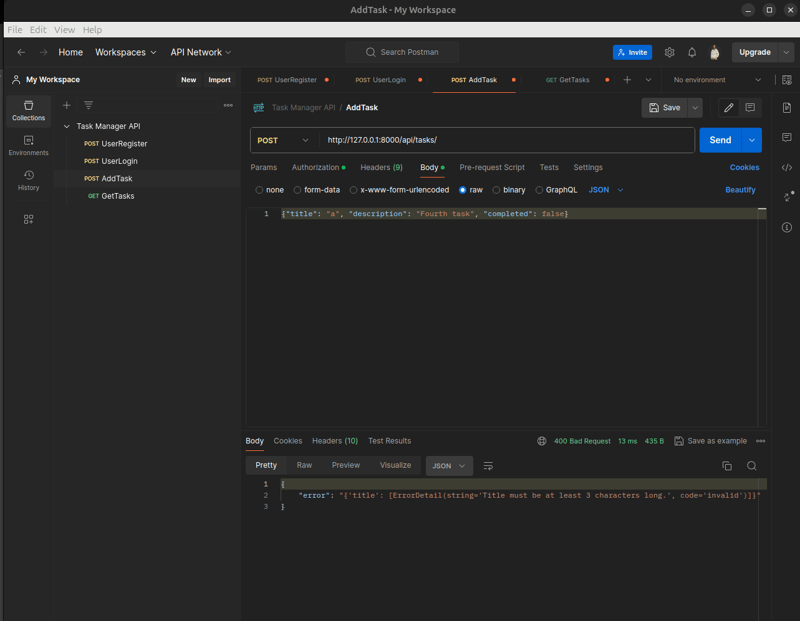
Invalid Title (Short):
POST to /api/tasks/, Body: {"title": "a", "description": "Short", "completed": false}
Expect 400 Bad Request with {"error": {"title": ["Title must be at least 3 characters long."]}}.
Invalid Title (Non-Alphanumeric):
Body: {"title": "Task@", "description": "Invalid", "completed": false}
Expect 400 Bad Request with {"error": {"title": ["Title must be alphanumeric with optional spaces."]}}.

3. Test Error Handling
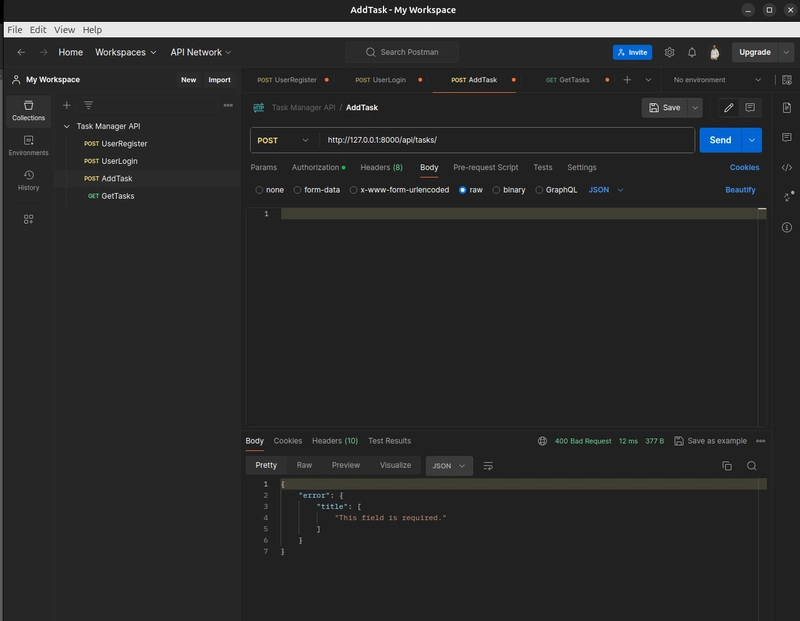
- POST to
/api/tasks/with no body. - Expect 400 Bad Request with:
{
    "error": {
        "title": ["This field is required."]
    }
}
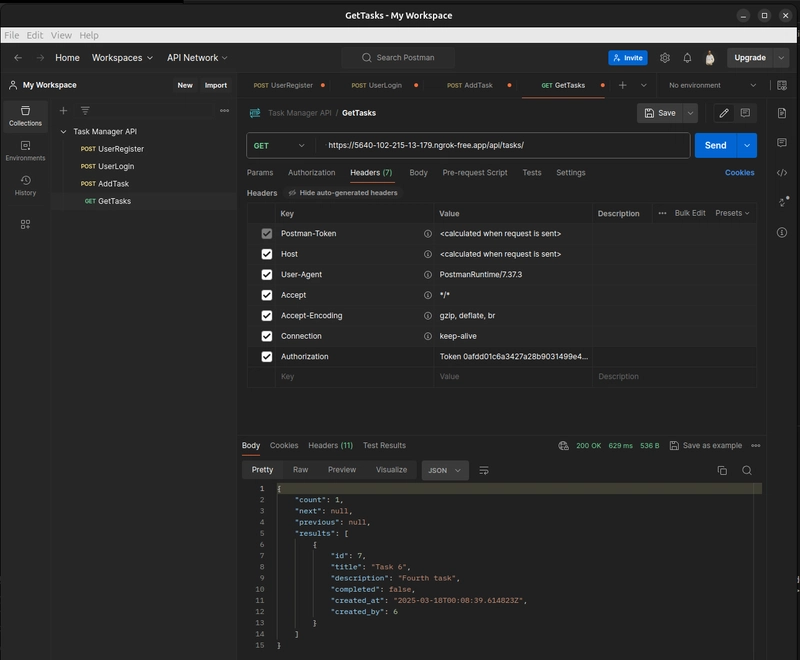
5. Test HTTPS (Local)
With ngrok running, set SECURE_SSL_REDIRECT = True in settings.py and restart the server.
GET to https://abcd1234.ngrok.io/api/tasks/, Headers: Authorization: Token
Expect 200 OK with your tasks, confirming a secure connection.
After testing, set SECURE_SSL_REDIRECT = False and revert BASE_URL to http://127.0.0.1:8000/api/tasks/ for local testing.
6.Test Logging
Send a few requests (e.g., GET to /api/tasks/ using Postman or the script).
Check debug.log in your project root directory (where manage.py is located, e.g., /path/to/taskmanager/debug.log) for entries like:
INFO 2025-03-15 03:31:00 - "GET /api/tasks/ HTTP/1.1" 200 582
Conclusion
Your Task Manager API is now secure with:
✅ Rate limiting
✅ CORS configuration
✅ Input validation
✅ Error handling
✅ HTTPS readiness
✅ Logging
What’s Next?
In Part 7, we’ll generate interactive API documentation with OpenAPI and Swagger!
Stay tuned! 🚀

Top comments (4)
Amazing!!!
Thank you❤️.
Do you know graphQL
Yes, I do.