
GitOps is a hot topic in DevOps circles these days, and this article series aims to break down its core concepts starting from the basics. We'll kick things off by setting up ArgoCD a GitOps operator and deploying a sample application in this initial article. The following parts will dive deeper into configuration specifics.
GitOps 101
GitOps automates modern cloud infrastructure setup by treating configuration files like code—similar to application source code. It ensures consistent and replicable infrastructure deployments, aligning with DevOps practices for quick code deployment, efficient cloud resource management, and adaptation to rapid development cycles.
In the context of Kubernetes and microservices, GitOps serves as a model for managing infrastructure and application deployment.
- Declarative Infrastructure Management: GitOps takes a declarative approach, defining the desired state of the Kubernetes cluster and its resources in configuration files (often YAML) stored in a Git repository.
- Automated Synchronization: Changes to these configuration files trigger an automated synchronization process in GitOps, ensuring the Kubernetes cluster's actual state matches the defined state in the repository.
- Version Control Using Git: Leveraging Git for version control allows teams to track changes, revert as needed, and collaborate on configurations.
Now that we've covered the basics of GitOps, let's jump into the example. We'll deploy a simple application on Kubernetes using minikube to illustrate these concepts.
CI/CD Workflow
There are primarily two workflows: pull-based and push-based.
Push-based GitOps Workflow
In a push-based GitOps workflow, the deployment and synchronization are initiated externally by a CI/CD system or an operator.
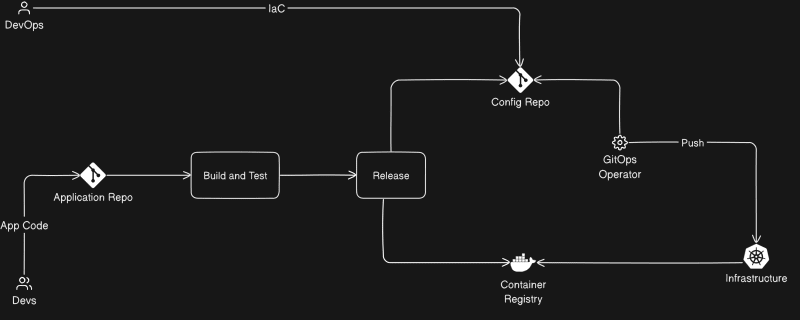
Application Repo: Contains the application source code, which is intended to package and later deploy.
Config Repo: The desired state of the infrastructure and applications is defined in this Git repository, often through declarative configuration files like YAML.
GitOps Operator: An external system, like a CI/CD tool, monitors the codebase and, upon changes, triggers the GitOps workflow.
Developers make changes to the Application Repo, either by creating pull requests or directly committing alterations to the codebase. As a result, a CI/CD pipeline is triggered, initiating the creation and pushing of new container images to the container registry.
Subsequently, these newly generated images or their tags are updated in the Config Repo. This step could be executed through an automated commit or by means of a pull request intended for manual merging.
The GitOps operator, an external system like a CI/CD tool, closely monitors the codebase for any changes. Once alterations to the Config Repo are detected, the GitOps operator pulls the most recent configuration from the repository. It then proceeds to deploy or update the infrastructure and applications based on this updated configuration. This process is continuous, as the operator consistently monitors the Config Repo for any further changes, ready to repeat the deployment cycle when new updates are detected.
Pull-based GitOps Workflow
In a pull-based GitOps workflow, the deployment and synchronization of the infrastructure and applications are triggered by changes in the Git repository.
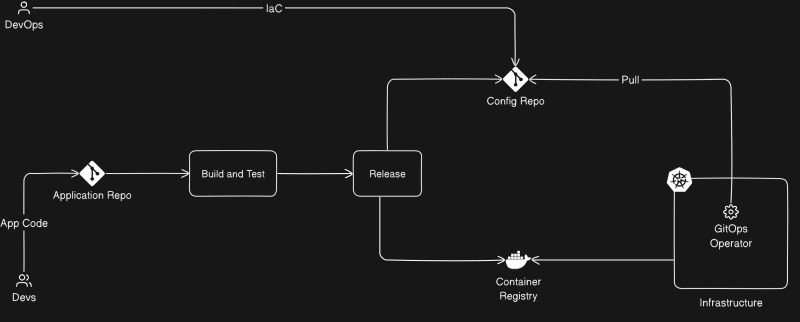
Similar to the push-based workflow, there are two primary repositories: the Application Repo and the Config Repo.
GitOps Operator: The GitOps operator or tool continuously monitors the Git repository for changes. This operator usually sits closely with infrastructure, in this case, deployed in a Kubernetes cluster.
Developers, again, make changes to the Application Repo, either by creating pull requests or directly committing changes to the codebase. This triggers a CI/CD pipeline, resulting in the creation and pushing of new container images to the container registry.
Following this, the updated image or its tag is modified in the Config Repo, either through an automated commit or a pull request for manual merging.
However, the GitOps operator's role is distinct in this workflow. Instead of external initiation, the GitOps operator constantly monitors the Config Repo for any changes. As soon as changes are detected, the operator pulls the latest configuration from the repository and proceeds to deploy or update the infrastructure and applications based on this revised configuration.
Similar to the push-based workflow, this process remains continuous, with the GitOps operator continuously monitoring the Config Repo for any subsequent changes, ready to redeploy or update as needed.
Install minikube
If you haven't installed Minikube already you can follow the official documentation here
Or you can use below shell script to upgrade/install minikube if you are a Linux user.
#! /bin/sh

# Minikube update script file
# Ref: https://stackoverflow.com/questions/57821066/how-to-update-minikube-latest-version

minikube delete && \
sudo rm -rf /usr/local/bin/minikube && \
sudo curl -Lo minikube https://storage.googleapis.com/minikube/releases/latest/minikube-linux-amd64 && \
sudo chmod +x minikube && \
sudo cp minikube /usr/local/bin/ && \
sudo rm minikube && \
minikube start &&\

# Enabling addons: ingress, dashboard
minikube addons enable ingress && \
minikube addons enable dashboard && \
minikube addons enable metrics-server && \
# Showing enabled addons
echo '\n\n\033[4;33m Enabled Addons \033[0m' && \
minikube addons list | grep STATUS && minikube addons list | grep enabled && \

# Showing the current status of Minikube
echo '\n\n\033[4;33m Current status of Minikube \033[0m' && minikube status
To install kubectl and helm please follow the respective official documentation.
Install Argo CD
Now if your minikube cluster is up and running you are ready to install the ArgoCD. GitOps operator in your cluster.
ArgoCD installation is straightforward.
- Create the namespace for the ArgoCD operator:
kubectl create namespace argocd
- Install the Operator and CRDs
kubectl apply -n argocd -f https://raw.githubusercontent.com/argoproj/argo-cd/stable/manifests/install.yaml
You should expect to find similar resources within the argocd namespace.
NAME                                                    READY   STATUS    RESTARTS       AGE
pod/argocd-application-controller-0                     1/1     Running   0              137m
pod/argocd-applicationset-controller-6b67b96c9f-kcbxl   1/1     Running   0              137m
pod/argocd-dex-server-c9d4d46b5-phltz                   1/1     Running   2 (136m ago)   137m
pod/argocd-notifications-controller-6975bff68d-c5cdl    1/1     Running   0              137m
pod/argocd-redis-7d8d46cc7f-gjk25                       1/1     Running   0              137m
pod/argocd-repo-server-59f5479b7-xznv6                  1/1     Running   0              137m
pod/argocd-server-7d7fdcb49-st9vj                       1/1     Running   0              137m

NAME                                              TYPE           CLUSTER-IP       EXTERNAL-IP   PORT(S)                      AGE
service/argocd-applicationset-controller          ClusterIP      10.102.75.218    <none>        7000/TCP,8080/TCP            137m
service/argocd-dex-server                         ClusterIP      10.98.223.112    <none>        5556/TCP,5557/TCP,5558/TCP   137m
service/argocd-metrics                            ClusterIP      10.107.209.210   <none>        8082/TCP                     137m
service/argocd-notifications-controller-metrics   ClusterIP      10.108.175.166   <none>        9001/TCP                     137m
service/argocd-redis                              ClusterIP      10.107.100.213   <none>        6379/TCP                     137m
service/argocd-repo-server                        ClusterIP      10.96.189.5      <none>        8081/TCP,8084/TCP            137m
service/argocd-server                             LoadBalancer   10.100.189.178   <pending>     80:31040/TCP,443:30770/TCP   137m
service/argocd-server-metrics                     ClusterIP      10.109.158.60    <none>        8083/TCP                     137m

NAME                                               READY   UP-TO-DATE   AVAILABLE   AGE
deployment.apps/argocd-applicationset-controller   1/1     1            1           137m
deployment.apps/argocd-dex-server                  1/1     1            1           137m
deployment.apps/argocd-notifications-controller    1/1     1            1           137m
deployment.apps/argocd-redis                       1/1     1            1           137m
deployment.apps/argocd-repo-server                 1/1     1            1           137m
deployment.apps/argocd-server                      1/1     1            1           137m

NAME                                                          DESIRED   CURRENT   READY   AGE
replicaset.apps/argocd-applicationset-controller-6b67b96c9f   1         1         1       137m
replicaset.apps/argocd-dex-server-c9d4d46b5                   1         1         1       137m
replicaset.apps/argocd-notifications-controller-6975bff68d    1         1         1       137m
replicaset.apps/argocd-redis-7d8d46cc7f                       1         1         1       137m
replicaset.apps/argocd-repo-server-59f5479b7                  1         1         1       137m
replicaset.apps/argocd-server-7d7fdcb49                       1         1         1       137m

NAME                                             READY   AGE
statefulset.apps/argocd-application-controller   1/1     137m
If you focus on the pods deployed in the namespace, there are three main pods, which are noteworthy.
-
pod/argocd-application-controller-0The controller continuously monitors running applications, identifies and resolves inconsistencies in their states (OutOfSync), and executes user-defined hooks for synchronization lifecycle events.
-
pod/argocd-repo-server-59f5479b7-xznv6The Repo server serves as an internal service supporting the application infrastructure by maintaining a local cache of Git repositories and generating Kubernetes manifests using repository-specific details.
-
pod/argocd-server-7d7fdcb49-st9vjArgo CD server aka the API server acts as a central interface for various components, managing application operations, credentials, authentication, RBAC, and Git webhook events while serving as a gRPC/REST server for Web UI, CLI, and CI/CD systems.
As a part of the installation, following CRDs should be created in your cluster.
applications.argoproj.io
applicationsets.argoproj.io
appprojects.argoproj.io
Terminlogies
Assuming you're familiar with core concepts in Git, Docker, Kubernetes, Continuous Delivery, and GitOps, here are some specific Argo CD terminologies:
- Application: A defined group of Kubernetes resources outlined in a manifest, treated as a Custom Resource Definition (CRD).
- Target State: The intended state of an application, represented by files in a Git repository.
- Live State: The current operational state of that application, including deployed pods and other components.
- Sync Status: Indicates whether the live state matches the intended target state described in Git—essentially, is the deployed application aligned with what's defined in the repository?
- Sync: The process of transitioning an application to its target state, often done by applying changes to a Kubernetes cluster.
- Sync Operation Status: Indicates the success or failure of a sync process.
- Refresh: The action of comparing the latest code in Git with the live state to identify any differences.
- Health: Reflects the operational health of the application—whether it's functioning correctly and able to handle requests.
See here for further information
ArgoCD UI
ArgoCD ships with a very powerful User Interface. To access the UI,
- Set the port forwarding
- Grab the admin password
# Port Forwarding
kubectl port-forward svc/argocd-server -n argocd 8080:443

# Intial admin password
kubectl -n argocd get secret argocd-initial-admin-secret -o jsonpath="{.data.password}" | base64 -d
Now you should be able to access ArgoCD UI using https://127.0.0.1:8080 using the user name "admin".
ArgoCD has its own CLI as well, follow this article to install the argocli.
Install the Sample App - Album App
For this tutorial, I am using two repos:
- Config: https://github.com/krishanthisera/album-app-config
- Application: https://github.com/krishanthisera/album-app
As the names suggest, the config repo contains the infrastructure configuration, in this case, helm charts, while the application repo contains the code for frontend and backend.
From now on application is referred to ArgoCD Application objects inside the Kubernetes cluster.
To install the Album App,
- Clone the config repo (I would recommend you to fork the repo and then clone the fork)
- Install the helm chart
Here we are using ArgoCD App-of-Apps pattern. The root ArgoCD application object is defined in the root-app helm chart. The root application is responsible for creating ArgoCD application objects for Frontend and Backend.
# Clone the repo
git clone https://github.com/krishanthisera/album-app-config

# Create a namespace for the application
kubectl create ns album-app

# Install the root app
helm install root-app ./root-app -n album-app

# Check the installed application
kubectl get applications.argoproj.io -n argocd
NAME       SYNC STATUS   HEALTH STATUS
root-app   OutOfSync     Healthy
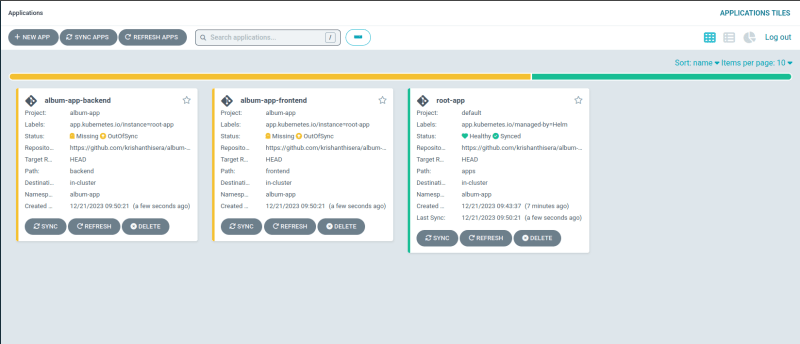
Once you install the helm chart, you should be able to see root-app under the applications in ArgoCD UI.


If you look closely, the root-app is out-sync; let's sync the root-app.
For now let's keep the default settings as it is.

Once the root-app is synced, both the Frontend and Backend ArgoCD application objects are created but they are yet to be synced.
Let's do the same for the Frontend and Backend application; let's get them synced.
Once both the Frontend and Backed apps are synced your ArgoCD applications should be look like this.

All the applications should be synced now 💫
kubectl get applications.argoproj.io -n argocd
NAME                 SYNC STATUS   HEALTH STATUS
album-app-backend    Synced        Healthy
album-app-frontend   Synced        Healthy
root-app             Synced        Healthy
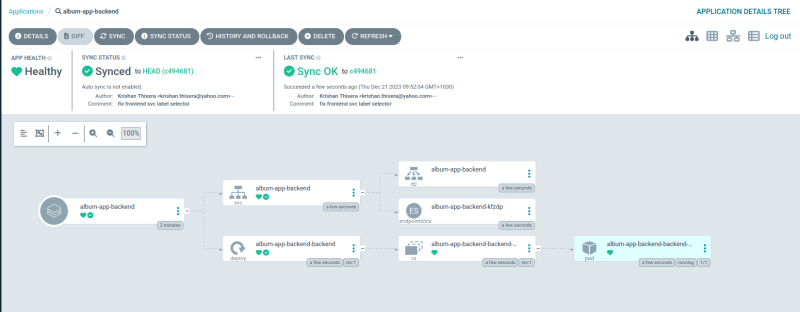
If you do a kubectl get all on the album-app namespace,
NAME                                               READY   STATUS    RESTARTS   AGE
pod/album-app-backend-backend-dcbbc657-stqmc       1/1     Running   0          11h
pod/album-app-frontend-frontend-789b5bbc67-9vd5x   1/1     Running   0          11h

NAME                                  TYPE        CLUSTER-IP       EXTERNAL-IP   PORT(S)    AGE
service/album-app-backend             ClusterIP   10.104.144.238   <none>        8080/TCP   11h
service/album-app-frontend-frontend   ClusterIP   10.108.6.129     <none>        80/TCP     11h

NAME                                          READY   UP-TO-DATE   AVAILABLE   AGE
deployment.apps/album-app-backend-backend     1/1     1            1           11h
deployment.apps/album-app-frontend-frontend   1/1     1            1           11h

NAME                                                     DESIRED   CURRENT   READY   AGE
replicaset.apps/album-app-backend-backend-dcbbc657       1         1         1       11h
replicaset.apps/album-app-frontend-frontend-789b5bbc67   1         1         1       11h
Further, you can port-forward the album-app Frontend service.
kubectl port-forward -n album-app services/album-app-frontend-frontend 8090:80
Forwarding from 127.0.0.1:8090 -> 3000
Forwarding from [::1]:8090 -> 3000

Now that we have installed the Album App, let's dive deep into the ArgoCD-specific configuration.
Stay tuned. To be continued...

Top comments (0)