Hello everyone! 🙋♂️ I thought I'd share my latest game development adventure with you all. Recently, I thought to myself, "Making Flappy Bird in my own game engine? How hard can it be?" 🤔
I learned a lot of things I need to add to my Engine.
Helicity.ai is my Game Engine.
Here is the source 😺github
Step by Step Guide
Step 1: Importing the Necessary Modules 📚
// Import modules
import { GameObject } from "./Gameobject.js";
import { Input } from "./Input.js";
import { Physics } from "./Physics.js";
import { Renderer } from "./Renderer.js";
import { Game } from "./Engine.js";
First things first, we need to import our modules! They're the backbone of our game and do a ton of heavy lifting for us. 🏋️♀️
You can see what every module does on the github link. But they handle specific sections of the game.
Step 2: Setting Up the Bird 🐤
var score = 0;
// Create Bird class that extends GameObject
class Bird extends GameObject {
  constructor(x, y, width, height, imageSrc) {
    super(x, y, width, height, "bird", imageSrc);
    this.velocityY = 0;
    this.gravity = 0.3;
  }

    // Check for input to control the bird
    if (Input.getState().keys["space"] || Input.getState().mouseLeftDown) {
      this.velocityY = -7;
    }

    //draw score
    Renderer.drawText("Score: "+score,30,30,25,"black","Arial")
  }
}
The GameObject is a Class which takes in constructor (x, y, width, height, some-type-tag, image-source) The game engine is build around playing with these instances and their update() methods, that have the frame wise logic.
Here, we're creating a Bird class that extends our GameObject.
The bird is the main object of our game! 🌟 We're giving it a velocity and gravity property to handle its movement. 🌍
Also I'm drawing the score property.
We don't REALLLY need a class for the Bird because it will only have 1 instance but I guess that's good practice?
Step 3: Moving the Bird 🕹
Inside our Bird class, we also have an update function. This is where all the magic happens - we update the bird's position, check for collisions, and handle user input. 🎮
Basic rectangular collisions are handled by Physics.checkCollision(gameobject1 , gameobject2)
class Bird extends GameObject {
  constructor(x, y, width, height, imageSrc) {
    super(x, y, width, height, "bird", imageSrc);
    this.velocityY = 0;
    this.gravity = 0.3;
  }

  update() {
    // Apply gravity
    this.velocityY += this.gravity;
    this.y += this.velocityY;

    // Check for collision with pipes
    for (const pipe of Game.gameObjects) {
      if (pipe.type === "pipe" && Physics.checkCollision(this, pipe)) {
        Game.stop();
        Renderer.drawText("Game Over", 100, 100, 30, "black", "Arial");
      }
    }

    // Check for input to control the bird
    if (Input.getState().keys["space"] || Input.getState().mouseLeftDown) {
      this.velocityY = -7;
    }

    //draw score
    Renderer.drawText("Score: "+score,30,30,25,"black","Arial")
  }
}
Step 4: Creating the Pipes 🌆
// Create Pipe class that extends GameObject
class Pipe extends GameObject {
  constructor(x, y, width, height, imageSrc) {
    super(x, y, width, height, "pipe", imageSrc);
    this.velocityX = -2;
  }

  update() {
    this.x += this.velocityX;

    // Remove pipe when it goes off the screen
    if (this.x + this.width < 0) {
      Game.gameObjects.splice(Game.gameObjects.indexOf(this), 1);
    }
  }
}
Next up are our infamous pipes! Just like our bird, we create a Pipe class that extends GameObject. We're giving each pipe a constant velocity to make it move. 🏙
Step 5: Adding Our Bird 🎲
After creating our classes, it's time to instantiate our bird or any other game objects and add them to our game 🧩. I just picked up some png from Google.
const bird = new Bird(100, 200, 50, 50, "https://freepngimg.com/thumb/logo/109941-logo-bird-flappy-free-transparent-image-hq.png");
Step 6: Spawning the Pipes ⏱
We're using a setInterval function to spawn our pipes every two seconds. Every time a new set of pipes is spawned, our score increases. 📈
// Create pipes every second
setInterval(() => {
  if(Game.isRunning){
    score++;
  }
  const pipeTop = new Pipe(Renderer.canvas.width, 0, 100, Math.random() * 200 + 100, "https://upload.wikimedia.org/wikipedia/commons/9/93/Mario_pipe.png");
  const pipeBottom = new Pipe(Renderer.canvas.width, pipeTop.height + 300, 100, 600 - pipeTop.height - 200, "https://upload.wikimedia.org/wikipedia/commons/9/93/Mario_pipe.png");
  Game.gameObjects.push(pipeTop, pipeBottom);
}, 2000);
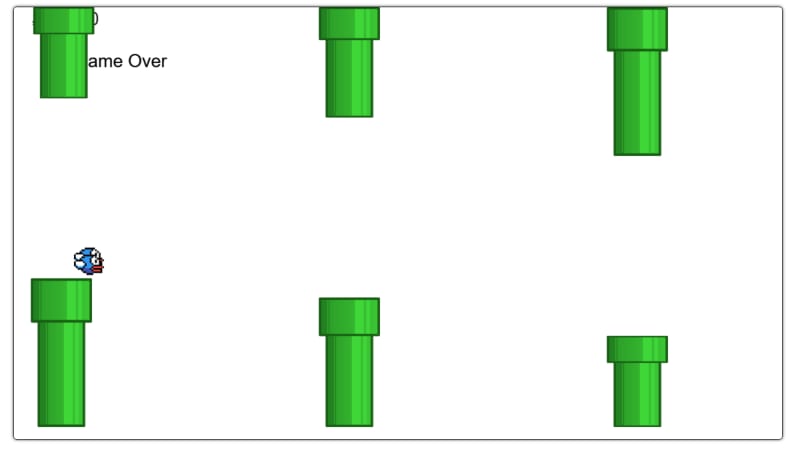
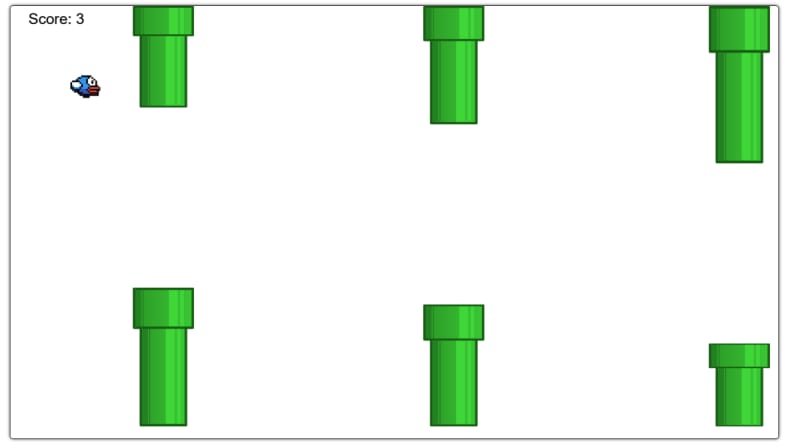
This is when I realised I need xscale and yscale properties ASAP in my game object, I mean look at how the pipes are spawning!
Conclusions
Finally, we start our game with Game.start(). Now, I can tell people I made flappy bird in my own engine! 🎉
But honestly its more about improving the engine and what this taught me. If I need to make this a real thing, it needs to be usable. Also we need a background component.
So that's it! Creating a Flappy Bird clone in my game engine turned out to be a fun and enlightening experience! 🎈🎊 I hope you found this post helpful and inspiring. Don't hesitate to reach out if you have any questions or comments. Happy coding! 🚀🚀🚀

Top comments (2)
hmm,Your game engine needs more features😊.
True that!