
Setting the right material to your mesh in RealityKit is a crucial part of setting the scene and making your models look just right, and there are a few tools at your disposal with RealityKit.
I’ve already talked about the newest and most complex type, VideoMaterial here:

But there are a few other types of materials you can set by code, and ways to tailor them for your needs that you may not already know, learn about all these other types and what you can do with them in this post.
Basic Materials
UnlitMaterial
UnlitMaterial is the most simple of all of these, it only has properties baseColor and tintColor. If you’re coming from SceneKit, or many other rendering engines, baseColor is essentially the diffuse of the material. Here is how you may set the baseColor of an UnlitMaterial to UIColor.systemGreen:
var mat = UnlitMaterial()
mat.baseColor = .color(.systemGreen)
// equivalent to
let mat = UnlitMaterial(color: .systemGreen)

Sphere with green UnlitMaterial
Notice that without any interaction with the light this sphere looks like it could be just a flat circle.
The other parameter, tintColor is also there, but is not very useful when applying a simple color as the baseColor, but for example you can do this:
var mat = UnlitMaterial()
mat.baseColor = .color(.white)
mat.tintColor = .cyan

Sphere with a cyan UnlitMaterial
We can see that the color ends up being cyan, rather than white, or a combination of them both. If you try any colours that have no crossover, such as red and blue you will get a result color of black, rather than purple which may be expected. tintColor is best left for when the baseColor is a white image rather than a color.
SimpleMaterial
Moving on to SimpleMaterial, we can use the initialiser with no parameters and set the baseColor like so:
var mat = SimpleMaterial()
mat.baseColor = MaterialColorParameter.color(.systemGreen)

The subtle darker shading at the bottom right, and lighter at the top left shows it’s interacting with light
There are two additional properties introduced with SimpleMaterial; metallic and roughness. By using the default initialiser those properties are set to float(0.0) and float(1.0) respectively, meaning that the material is not metallic and it has a rough coat. These properties can also be set to a texture, which will be covered below.
Note: If you print out the properties here it actually says the opposite, that metallic is 1.0 and roughness is 0.0, but this is a bug, if you set the properties as such you will get a different visual result. I’ve opened a feedback to Apple
Here’s that same sphere with metallic set to 1.0, and roughness set to 0.0:

Shiny green sphere
OcclusionMaterial
OcclusionMaterial is very different, instead of writing its own color or texture properties to the depth buffer it writes alpha, meaning that everything behind it in your RealityKit scene will not be rendered, and instead the camera feed or otherwise RealityKit environment background (grey in my examples) will be shown instead.
Here is an example where I have positioned two spheres with a cube in front of each of them. One cube has a SimpleMaterial with baseColor of blue, and the other has the same sized cube with OcclusionMaterial.
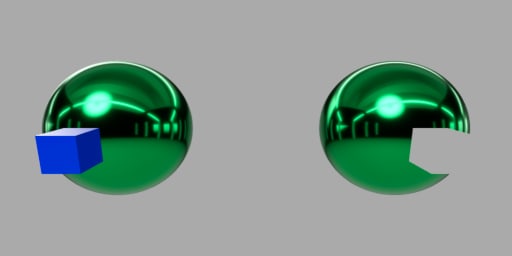
Notice how there is a bite taken out of the sphere on the right in place of where the cube should be. This can be used to place an OcclusionMaterial in place of a real world object, which can then occlude any rendered objects that are supposed to be behind them. This is what the scene understanding feature does, that automatically detects surfaces and objects to then occlude virtual objects behind them.
Materials with Textures
In many instances you will not want a simple color as the material of your object in the scene. You may want to add a texture, for example on a cube to give the look of a die rolling around your scene, or a map of Earth to have a spinning globe in your scene.
For SimpleMaterial and UnlitMaterial we can set the baseColor to a texture in the same way.
let unlitMat = UnlitMaterial()
let litMat = SimpleMaterial()
if let texParam = try? TextureResource.load(named: "planet_earth") {
  unlitMat.baseColor = .texture(texParam)
  litMat.baseColor = .texture(texParam)
}
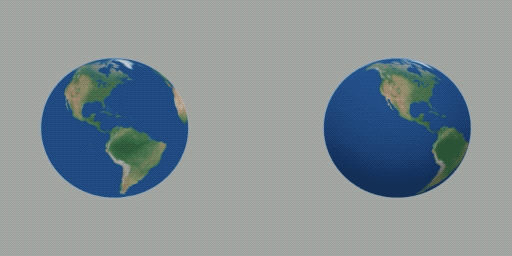
Note: The planet earth image I used can be found here.
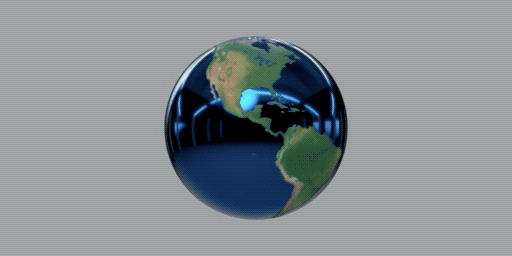
With SimpleMaterial we can also apply textures to metallic and roughness. When we apply a float value of 1.0 to either of those, that is equivalent to giving a completely white image, and similarly 0.0 is a black image.
If we then want the oceans to be metallic, and the land to be non metallic, we can apply an image such as the following to the metallic property:
 planet_earth_ocean.png
All the ocean is set to white (1.0), and the land is black (0.0). If we also want to set the ocean to be smooth and the land to be rough, we can apply the inverted image to the roughness property:
 planet_earth_land.png
Those can be applied like this:
if let earthParam = try? TextureResource.load(
  named: "planet_earth"
), let oceanParam = try? TextureResource.load(
  named: "planet_earth_ocean"
), let landParam = try? TextureResource.load(
  named: "planet_earth_land"
) {
  mat.baseColor = .texture(earthParam)
  mat.metallic = .texture(oceanParam)
  mat.roughness = .texture(landParam)
}
The resulting globe shows reflective oceans and matt land:
Material Transparency
You may have trouble using a transparent image on a model in RealityKit, I believe this is to do with the blend modeapplied to the model. When setting a charming smiley face image with transparent edges to the baseColor property of an UnlitMaterial, then setting that to a basic plane we get these black corners where the opacity is 0.

However, if we simply set the tintColor to white with an alpha component less than 1, we get the opacity back:
mat.tintColor = .init(white: 1, alpha: 0.999)

When trying the same with instead a SimpleMaterial there is one more issue, and that is that the transparency only works when the metallic property is set to 1.0, or true when using the initialiser property isMetallic.
This issue has been around since the first version of RealityKit (iOS 13) in one form or another, and I’m expecting it will be solved once we’re able to manually set the blend mode of models.
Translucency with a plane colored material works as you might expect - just change the alpha component of the UIColor. However, due to a bug in RealityKit, if you ever update the mesh with either a coloured or textured material, you will need to replace the entire ModelComponent like this:
let newModel = ModelEntity(mesh: .generatePlane(width: 1, height: 1))
var mat = SimpleMaterial(color: UIColor.blue.withAlphaComponent(0.5), isMetallic: true)
newModel.model?.materials = [mat]
// next line breaks transluency
newModel.model?.mesh = .generatePlane(width: 1, height: 1)
// next line fixes it
newModel.model = ModelComponent(
    mesh: .generatePlane(width: 1, height: 1),
    materials: [mat]
)
UIImage to TextureResource
There is currently no way (that I’m aware of) to convert a UIImage to a TextureResource, which is a huge blow if you want to download images to your applications and set them to models in the scene. I’m hoping that this too will be fixed one way or another in future versions of RealityKit.
Thanks to Ryan Kopinsky for suggesting I write about some of these things when we were discussing them. I hope many RealityKit developers find this a useful resource when creating materials for Augmented Reality scenes!
As usual, give this article some claps if you can, and feel free to message me on Twitter or leave a response here if you have any questions.

Top comments (0)