Mobile payments are the backbone of Kenya’s digital economy. KCB Bank provides APIs through their Buni API Gateway, allowing developers to trigger Lipa na KCB (STK Push) requests directly from their applications.
In this tutorial, I’ll walk through how to integrate KCB’s STK Push API with Node.js — from generating an access token to initiating an STK push and handling callbacks from KCB using Tunnelmole.
No prior experience with APIs? No problem, I’ll keep it simple.
🛠 Prerequisites
- Node.js installed (nodejs.org)
- A text editor (VS Code recommended)
- KCB API credentials (Consumer Key and Consumer Secret) from KCB Buni API portal
- Tunnelmole installed (https://tunnelmole.com/)
1. Create a New Node.js Project
Open your terminal and run:
mkdir kcb-stk-push
cd kcb-stk-push
npm init -y
npm install axios express dotenv
We installed:
- axios → to make HTTP requests
- express → to handle web requests
- dotenv → to store secrets securely
2. Add Your Credentials
Create a file called .env and add your KCB credentials:
CONSUMER_KEY=your_kcb_client_id_here
CONSUMER_SECRET=your_kcb_client_secret_here
KCB_BASE_URL=https://uat.buni.kcbgroup.com
PORT=3000

INVOICE_NUMBER=your_kcb_bank_account_number
PHONE_NUMBER=phone_number_to_receive_stk_push_or_pay
AMOUNT=1
ORG_SHORT_CODE=522522
CALLBACK_URL=https://d0ub4l-ip-102-209-78-6.tunnelmole.net/callback
Replace with your real KCB credentials.
3. Create the Main File
Create a file called index.js and paste this code:
const express = require("express"); // Import the Express library for building web applications
const axios = require("axios"); // Import Axios for making HTTP requests
require("dotenv").config(); // Load environment variables from a .env file
const fs = require("fs"); // Import the file system module for logging callback data

const app = express(); // Create an Express application
app.use(express.json()); // Middleware to parse JSON bodies
app.use(express.urlencoded({ extended: true })); // Middleware to parse URL-encoded bodies

// 1. Function to generate access token
async function generateToken() {
    const auth = Buffer.from(
        process.env.CONSUMER_KEY + ":" + process.env.CONSUMER_SECRET
    ).toString("base64");

    try {
        const response = await axios.post(
            `${process.env.KCB_BASE_URL}/token?grant_type=client_credentials`,
            {},
            {
                headers: {
                    "Content-Type": "application/x-www-form-urlencoded",
                    Authorization: `Basic ${auth}`
                },
            }
        );
        return response.data.access_token;
    } catch (error) {
        console.error("Error generating token:", error);
        throw error;
    }
}

// Test token generation
app.get("/token", async (req, res) => {
  console.log("/token endpoint hit");
  try {
    const token = await generateToken();
    // console.log("Generated Token:", token);
    res.json({ token });
  } catch (error) {
    res.status(500).json({ error: "Failed to generate token: " + (error.message || error.toString()) });
  }
});

// 2. Function to initiate/trigger STK Push
app.get("/stkpush", async (req, res) => {
    const token = await generateToken();
    // console.log("Generated Token:", token);

    try {
        const response = await axios.post(
            `${process.env.KCB_BASE_URL}/mm/api/request/1.0.0/stkpush`,
            {
                phoneNumber: process.env.PHONE_NUMBER,
                amount: process.env.AMOUNT,
                invoiceNumber: process.env.INVOICE_NUMBER,
                sharedShortCode: true,
                orgShortCode: process.env.ORG_SHORT_CODE,
                orgPassKey: "",
                callbackUrl: process.env.CALLBACK_URL,
                transactionDescription: "Payment for school fees",
            },
            {
                headers: {
                    Authorization: `Bearer ${token}`
                },
            }
        );
        res.json(response.data);
    } catch (error) {
        console.error("Error initiating STK Push:", error);
        res.status(500).json({ error: "Failed to initiate STK Push: " + error.message });
    }
});

// 3. Callback endpoint to handle responses from KCB
app.post("/callback", (req, res) => {
    console.log("/callback endpoint hit");
    console.log("Callback received body:", req.body);

    // (Optional) log the callback data to a file or database for record-keeping
    // For example, you could use fs to append the data to a file

    fs.appendFile("callback.log", JSON.stringify(req.body) + "\n", (err) => {
        if (err) {
            console.error("Error logging callback data:", err);
        }
    });
    res.status(200).send("Callback received");
});


const PORT = process.env.PORT || 3000; // Define the port the app will run on

// Start the server and listen on the defined port
app.listen(PORT, () => {
    console.log("Server is running on http://localhost:" + PORT);
});
4. Expose Your Localhost Using Tunnelmole
KCB needs a public URL to send callbacks. A callback URL is a web address used by one system (3rd party system) to communicate with another, typically for asynchronous events or notifications. It acts as a designated endpoint where a system can send data or responses back to an application after a specific event or process has occurred. We’ll use Tunnelmole to expose your localhost.
Step 1: Install Tunnelmole
Run this command in your terminal:
npm install -g tunnelmole
This installs tunnelmole globally so you can run it anywhere.
Step 2: Start Tunnelmole
In a new terminal window, run:
tunnelmole 3000
This tells tunnelmole to expose your app running on port 3000.
Step 3: Get Your Public URL
You’ll see output like this:

Your url is: https://tmole.io/abcd1234
This is your public URL.
Step 4: Update Callback URL
Copy the Tunnelmole URL and use it in your .env CALLBACK_URL variable:
CALLBACK_URL=https://vsx9ei-ip-102-209-70-6.tunnelmole.net/callback
Now, when KCB sends the payment result, it will reach your local server through Tunnelmole, and you’ll see it in your terminal.

5. Run Your Project
Start your server:
node index.js
Then visit in your browser:
http://localhost:3000/stkpush
If everything is correct, your phone will receive the STK Push popup to enter your M-PESA PIN. Your browser will show the follow response body for a successfully stk push
{"response":{"MerchantRequestID":"ecd6-4f78-aab6-eb605add35b5436660","ResponseCode":"0","CustomerMessage":"Success. Request accepted for processing","CheckoutRequestID":"ws_CO_30092025140712774708920430","ResponseDescription":"Success. Request accepted for processing"},"header":{"statusDescription":"Success. Request accepted for processing","statusCode":"0"}}

6. See the Callback
When the payment is processed, KCB will send the result to your /callback endpoint. In the terminal, you will see:
{
"ResultCode": "0",
"ResultDesc": "The service request is processed successfully."
}
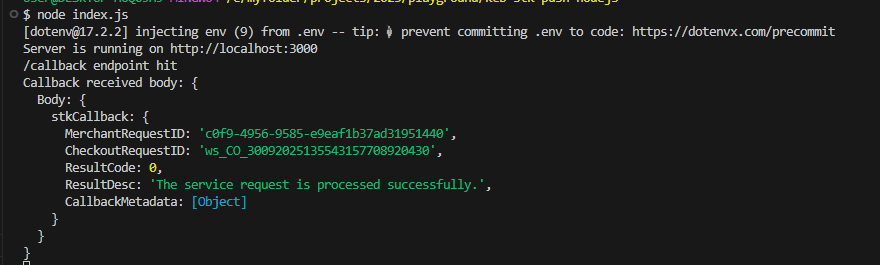
The callback.log will have the results of the callback as well. See below.

Cancelled Payments

7. Going Live
Once you have successfully tested your integration in the sandbox environment, the next step is to request access to the production environment (go-live). Going live allows your application to interact with real customer data and process actual transactions.
To initiate this process, you are required to submit a formal go-live request:
- Use the template of the formal request letter provided by KCB.
- Fill and submit the signed request letter to buni@kcbgroup.com.
- The KCB team will review your request, verify your sandbox implementation, and guide you through the approval process.
For any queries or additional support, you can reach out to buni@kcbgroup.com.
✅ Summary
You have successfully built a Node.js app that can:
- Generate a KCB API token.
- Send an STK Push request.
- Receive the callback from KCB on your local machine via Tunnelmole.
This integration allows you to collect payments programmatically from customers — perfect for e-commerce, school fees, or any digital service.
You can now expand this to:
- Save transactions in a database.
- Trigger payments from a web or mobile app.
- Integrate with e-commerce or school fee platforms e.t.c.
If you’d like guidance or support with payment integrations, feel free to reach out.
Happy Integrations !

Top comments (4)
This is amazing! Just did it
Great ..
Works well, I have tried it out. How do we go live from the current stkpush with "daraja sandbox" to a custom name in the stkpush
Please at the bottom of the article, I have added steps on how to go live