
Introduction
In this article, we are going to use the JAMSTACK and GitHub services in order to build and deploy a blog in 5 minutes and for free. We will also make the deployment automatic (for free too !).
Overview of the stack
The JAMSTACK
Fast and secure sites and apps delivered by pre-rendering files and serving them directly from a CDN, removing the requirement to manage or run web servers.
Source: https://jamstack.org/
The general idea behing the JAMSTACK is to use a tool for pre-compiling all the pages of a website (a blog in our case) during build time and push it directly to a static server (such as Github Pages, a CDN, a S3 bucket, etc.). The tool will re-build the entire website everytime something change (new post blog for example).
What is Hexo?
We will use Hexo as our main generating tool:
A fast, simple & powerful blog framework
Hexo provides a simple CLI for creating a blog. The CLI has the following features:
- Creating a new page
hexo new page "about" - Creating a new blog post
hexo new post "Hello world" - Generating the static source
hexo generate - Clean the static source
hexo clean
GitHub Pages
We will use GitHub Pages for hosting our website:
- We can use a custom domain (cost 10$ on Gandi)
- Or we can use the domain offered by GitHub: https://.github.io
GitHub Actions
We will use GitHub Actions so that any changes made to the Git Repository will trigger automatically a build of our blog and push it to GitHub Pages.
Getting started
Setting up Hexo and repo
First, clone Hexo and install it locally:
$ npm install -g hexo-cli
$ hexo init <folder>
$ cd <folder>
$ yarn install
Create a .gitignore file:
.DS_Store
Thumbs.db
db.json
*.log
node_modules/
public/
.deploy*/
If you have a personal domain name, create a new empty GitHub repository named <yourdomain> (e.g: olivier.codes)
If you do not have a domain name, GitHub offers free .github.io subdomain. You will need to use your username: <username>.github.io as name for your GitHub repository.
The repository must be public in order to use GitHub Pages for free.
Now link your local directory with the new GitHub repository:
$ cd <folder>
$ git init
$ git remote add origin remote repository <URL>
Verify the new remote URL:
$ git remote -v
If you have used a personal domain name, you need to create a file named CNAME in source. It will be important for the deployment phase to GitHub Pages. The CNAME file should have the domain used in it :
olivier.codes
Push all codes to the repository:
$ git add -A
$ git commit -am 'First commit: Init Hexo'
$ git push
You can now see your blog locally at http://localhost:4000 by running: hexo server
You can build the static assets by running: hexo generate, it will create a public folder with all the pre-compiled files. We now need to generate the files automatically on each push and push the generated files to GitHub Pages so it's live online.
Setting up automatic build
Let's use GitHub Actions for automating the build step on every push to the git repository.
GitHub Actions are defined by Workflow YAML file describing what to do and when to do it.
Our YAML file should have the following steps:
- Start a linux distribution (such as ubuntu)
- Install Nodejs LTS
- Load yarn cache if any (used for speeding up build time when yarn.lock do not changes)
- Install yarn dependencies (and use cache if any)
- Clean Hexo
- Generate Hexo files
- Push files to GitHub Pages
Create a file for the workflow, it must bbe in .github/workflows:
$ touch .github/workflow/main.yml
Edit main.yml and add:
name: Build and deploy
on: [push]
jobs:
  build:
    runs-on: ubuntu-latest
    strategy:
        matrix:
            node-version: [12]
    steps:
        - uses: actions/checkout@v1
        - name: Use Node.js ${{ matrix.node-version }}
          uses: actions/setup-node@v1
          with:
              node-version: ${{ matrix.node-version }}
        - name: Get yarn cache directory path
          id: yarn-cache-dir-path
          run: echo "::set-output name=dir::$(yarn cache dir)"
        - uses: actions/cache@v1
          with:
              path: ${{ steps.yarn-cache-dir-path.outputs.dir }}
              key: ${{ runner.os }}-yarn-${{ hashFiles('**/yarn.lock') }}
              restore-keys: |
                  ${{ runner.os }}-yarn-
        - name: Install Dependencies
          run: yarn install --frozen-lockfile
        - name: Hexo Clean
          run: ./node_modules/.bin/hexo clean
        - name: Hexo Generate
          run: ./node_modules/.bin/hexo generate
        - name: Deploy to Github Pages
          uses: peaceiris/actions-gh-pages@v2.1.0
          env:
            ACTIONS_DEPLOY_KEY: ${{ secrets.DEPLOY_GH_KEY }}
            PUBLISH_BRANCH: gh-pages
            PUBLISH_DIR: ./public
Every push on master will trigger this GitHub Action, it will generate the files and push it to gh-pages branche on the repository.
The newly created workflow needs a deploy key to be enable to push generated files to gh-pages branche. The deploy key will be available to the workflow by using a GitHub Secret.
We need to create a RSA key pairs for the deploy key:
ssh-keygen -t rsa -b 4096 -C "<youremail>@gmail.com"
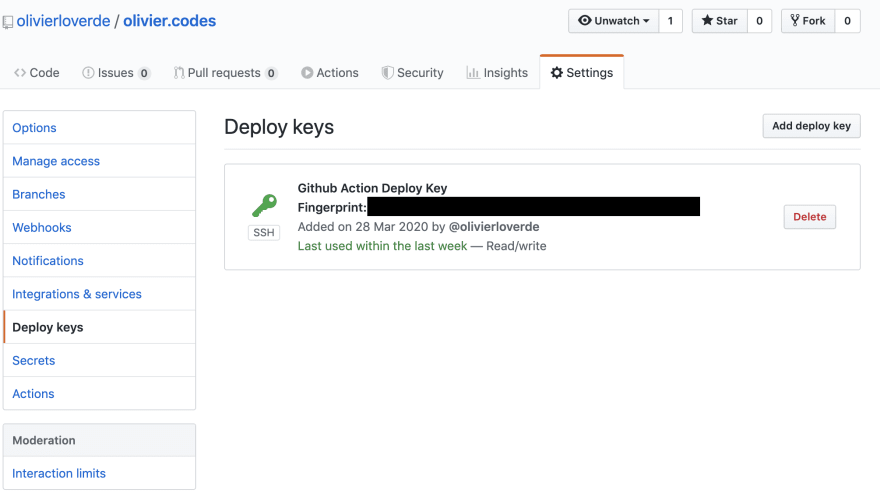
- Go to your repository on GitHub
- Go to Settings section
- Go to "Deploy keys" sub-section
- Add a new key by pasting the content of
id_rsa.pub

Now, let's create the secret for our workflow:
- Go to your repository on GitHub
- Go to Settings section
- Go to "Secret" sub-section
- Create a new secret button
- Use the following name:
DEPLOY_GH_KEYas key - Use the content of
id_rsafile (the secret key this time) as value
We have :
- Created a complete hexo setup
- Created a deploy key, saved it in GitHub using the public key
- Declared the corresponding private key in our secrets
- Created a workflow to automatically generate files on every git push and push them to
gh-pagesbranche
Let's test our new setup:
$ git add -A
$ git commit -am 'Devops: Add build automation'
$ git push
You should now see the workflow running for the new commit:

Or in Actions section:
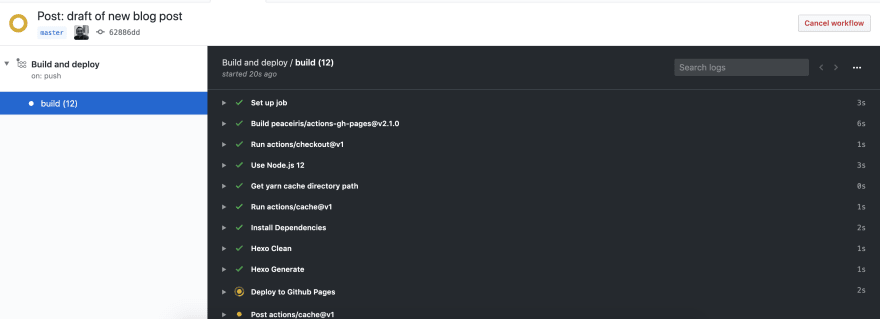
The workflow should pass, indicating a that files have been generated and push to the branche.
Setting up GitHub Pages
Our gh-pages branche will be the home of our GitHub Pages.
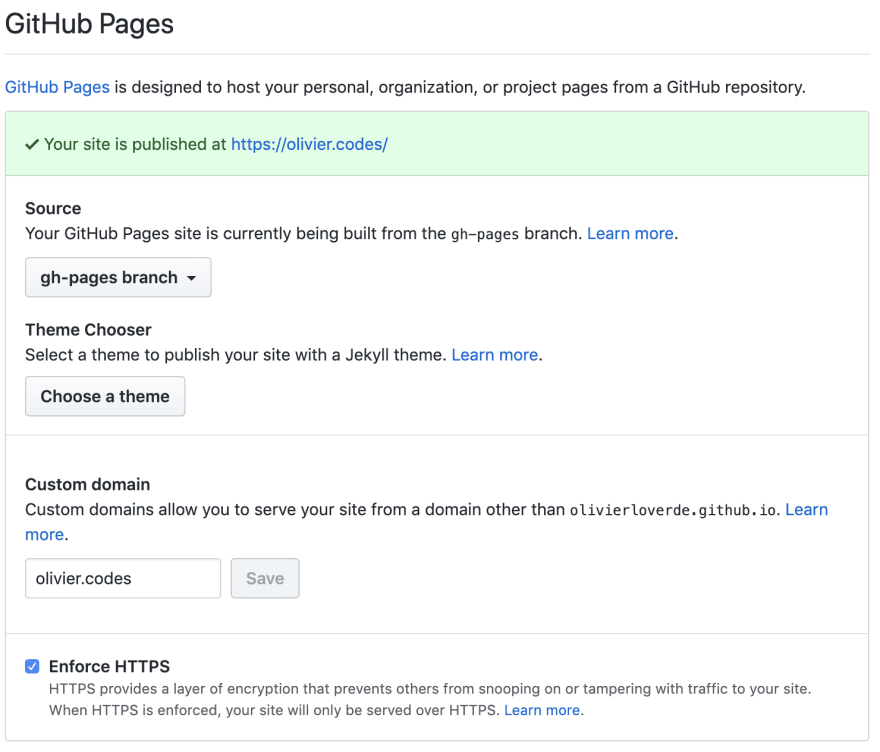
Let's configure GitHub Pages:
- Go to your repository on GitHub
- Go to Settings section
- Go to Options sub-section
- Scroll down to
GitHub Pages - Select
gh-pagesin source - Optionnaly, fill your custom domain if you have any and enforce HTTPS
It is now LIVE ! Go to your custom domain or go to <username>.github.io
Summary
You now have a fully working blog, deployed automatically everytime you push something on git!
You can find more information about Hexo (adding theme, plugins, etc.) directly in their doc: https://hexo.io/docs/
Full source code for this article is available here: https://github.com/olivierloverde/olivier.codes
Happy blogging!
It was my first dev.to post, I hope you liked it! :-)
This article was originally posted on: https://olivier.codes/2020/03/28/Jamstack-create-a-scalable-blog-in-5-minutes-for-free-and-with-automatic-deployment-using-Hexo-Github-Pages-and-Github-Actions/

Top comments (1)
I so build my blog mzaini30.com with Hugo and Github Pages. This is my Github Action: github.com/mzaini30/my-blog/blob/m.... I depend
peaceiris/actions-gh-pages. So, I don't need setup a secret key.And I build Autopug too, for generate all pug files to htmls (github.com/mzaini30/autopug). Build with Github Action using NPM.