
Networking in Kubernetes is an important topic to understand, as it enables applications running on a Kubernetes cluster to communicate with each other, as well as with external services.
In a Kubernetes cluster, each pod has its own unique IP address that is routable within the cluster. This IP address is typically assigned by the Kubernetes network plugin, which is responsible for configuring the networking for the cluster. The network plugin is a key component of the Kubernetes networking architecture, and there are multiple options available, such as Calico, Flannel, and Weave Net.
In addition to the network plugin, Kubernetes also includes a number of other components that are involved in networking, such as the kube-proxy, which is responsible for load balancing network traffic across multiple pods, and the Service object, which provides a stable IP address and DNS name for a set of pods.
Understanding how networking works in Kubernetes is important for anyone working with Kubernetes, as it can have a significant impact on the performance and reliability of applications running on the cluster.
Ingress

In Kubernetes, an Ingress is an API object that provides a way to configure external access to services in a cluster. An Ingress resource typically defines a set of rules that specify how incoming traffic should be routed to the appropriate service, based on the incoming request’s host and path. It exposes HTTP and HTTPS routes from outside the cluster to services within the cluster.
When a request comes into the Kubernetes cluster, it first hits the Ingress controller, which is responsible for managing and routing traffic according to the rules defined in the Ingress resource. The Ingress controller uses a set of rules defined in the Ingress resource to determine where the traffic should be routed. In order for ingress to work you need to use an Ingress controller i.e Nginx, AWS.
Once the Ingress controller has determined the appropriate service to route the traffic to, it forwards the request to the service’s ClusterIP, which is an internal IP address assigned to the service by the Kubernetes network plugin. The service then uses its own rules to determine which pod(s) to forward the traffic to.
The traffic then reaches the target pod, where it is handled by the application running inside the pod. The application’s response is then sent back through the same path, via the service and the Ingress controller, to the original request sender.
It’s important to note that the Ingress resource is only responsible for routing traffic to services within the cluster, and does not handle any authentication or security. Therefore, it is often used in combination with other security measures such as TLS termination or Web Application Firewalls (WAFs) to provide a secure and reliable service.
DNS — Domain Name System
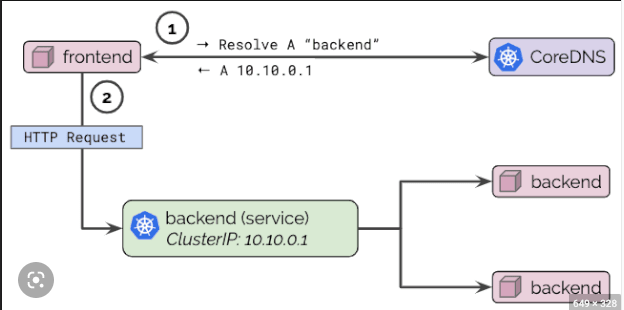
Domain Name System (DNS) is used to provide a way for services and pods to discover and communicate with each other. It is a service that is responsible for translating or resolving a service name to its IP address. Each pod in a Kubernetes cluster is assigned a unique hostname, which is derived from the pod’s name and the namespace it is running in. By default, each hostname is resolvable within the cluster’s DNS namespace.
When a service is created in Kubernetes, it is assigned a stable DNS name that is used to access the service from other pods and services within the cluster.
The DNS name is typically in the format servicename.namespace.svc.cluster.local, where servicename is the name of the service,
namespace is the Kubernetes namespace in which the service is running, cluster.local is the default DNS domain for the cluster.
When a pod wants to communicate with a service, it can simply use the service’s DNS name to connect to it. The Kubernetes DNS service will resolve the DNS name to the corresponding ClusterIP assigned to the service, and route the traffic to the appropriate pod.
In addition to resolving DNS names for services, Kubernetes also supports custom DNS configurations, which allow you to specify additional DNS servers or search domains that should be used when resolving DNS queries. This can be useful if you need to resolve DNS names outside of the Kubernetes cluster, such as for accessing external services or APIs.
Overall, DNS is a critical component of networking in Kubernetes, as it allows services and pods to discover and communicate with each other, and is an essential part of the infrastructure for deploying reliable and scalable applications on a Kubernetes cluster.
Core DNS
CoreDNS is a popular DNS server implementation used in Kubernetes for service discovery and DNS resolution. It is the default DNS server for Kubernetes and ensures pods and services have a Fully Qualified Domain Name (FQDN). CoreDNS is a flexible and extensible DNS server that is designed to be easily integrated into Kubernetes clusters and can be customized to support a wide range of use cases. Without CoreDNS the cluster's communication would cease to work.
In Kubernetes, CoreDNS is typically deployed as a pod in the cluster and is responsible for resolving DNS queries for services and pods. CoreDNS uses the Kubernetes API to retrieve information about services and pods and automatically generates DNS records for each of them.
One of the benefits of using CoreDNS in Kubernetes is that it is highly configurable, and can be extended to support custom plugins and DNS providers. For example, you can use CoreDNS plugins to add support for custom DNS zones or to integrate with external DNS providers.
Another benefit of CoreDNS is that it provides better performance and scalability than the previous default DNS server in Kubernetes, kube-dns. CoreDNS is written in Go and is designed to be lightweight and efficient, which makes it well-suited for handling large volumes of DNS queries in high-traffic Kubernetes environments.
To use CoreDNS in your Kubernetes cluster, you can deploy it as a pod using a Kubernetes manifest file or Helm chart. Once deployed, you can configure the CoreDNS server to meet your specific needs, such as by adding custom DNS providers, defining custom DNS zones, or integrating with other Kubernetes components such as Ingress or ExternalDNS.
Overall, CoreDNS is a powerful and flexible DNS server implementation that is well-suited for use in Kubernetes clusters and provides a solid foundation for service discovery and DNS resolution in modern cloud-native applications.
FQDN — Fully Qualified Domain Name is a domain name that specifies its exact location in the tree hierarchy, also known as an absolute domain functionality of core DNS.
Probes
In Kubernetes, probes are used to determine the health of a container running in a pod. Probes are a critical part of Kubernetes’ self-healing and auto-scaling capabilities, as they provide a way for the cluster to automatically detect and recover from unhealthy containers. Probes are used to detect the state of a container.
There are three types of probes in Kubernetes:
Liveness Probe
This type of probe is used to determine if a container is still running and is healthy. The liveness probe sends periodic requests to the container, and if the container fails to respond or responds with an error, the probe will mark the container as unhealthy and trigger a restart.
A Liveness probe could catch a deadlock where an application is running but unable to make any progress instead it restarts the container this can make the application more available despite the bugs.
Readiness Probe
This type of probe is used to determine if a container is ready to start receiving traffic. The readiness probe sends periodic requests to the container, and if the container responds with a success code, it will be marked as ready to receive traffic. If the container fails to respond or responds with an error, it will be marked as not ready, and will not receive any traffic until it becomes ready again.
Startup Probe
This type of probe is used to determine if a container is in the process of starting up. The startup probe sends periodic requests to the container, and if the container responds with a success code, it will be marked as ready to receive traffic. If the container fails to respond or responds with an error, the startup probe will keep sending requests until the container becomes ready, or until a configurable timeout is reached.
Probes in Kubernetes are defined in the pod’s spec section, using YAML configuration. Each probe is defined with a set of parameters, such as the type of probe, the endpoint to probe, the probe timeout, the probe period, and the success and failure thresholds.
Overall, probes are a powerful feature in Kubernetes that enable containers to be automatically monitored and restarted in the event of failures or unresponsiveness, which helps to improve the reliability and availability of applications running on Kubernetes clusters.
Netfilter
In Kubernetes, Netfilter is used to implement network policies, which are used to control the flow of network traffic between pods in a cluster. Network policies are Kubernetes objects that define rules for how traffic is allowed to flow between pods, and they use Netfilter rules to enforce those policies.
When a network policy is applied to a Kubernetes cluster, the Kubernetes API server communicates with the network plugin, which is responsible for configuring the networking rules in the underlying network infrastructure. The network plugin, in turn, generates Netfilter rules to enforce the network policy.
The Netfilter rules generated by the network plugin are based on the selectors specified in the network policy. Selectors are used to identify which pods should be affected by the policy, and they can be based on a wide range of criteria, such as the pod’s labels, namespace, or IP address. The network plugin generates Netfilter rules that match the specified selectors, and then applies the action specified in the policy to the matching packets.
For example, a network policy might be defined to allow traffic to flow only between pods that have a specific label. The network plugin would generate Netfilter rules to match packets between pods with that label, and then allow those packets to flow through the network. Similarly, a network policy might be defined to deny traffic between two specific pods, in which case the network plugin would generate Netfilter rules to drop packets between those pods.
Overall, Netfilter is a critical component of the network policy implementation in Kubernetes, as it allows for granular control over the flow of network traffic between pods in a cluster, and provides a powerful mechanism for enforcing security and access control policies.
IPTables
IPTables is a Linux-based firewall tool that allows users to configure and manage network filtering rules. In Kubernetes, IPTables are used to implement network policies, which control the flow of traffic between pods and services.
When a network policy is created in Kubernetes, the kube-proxy component creates IPTables rules to enforce the policy. These rules are applied to network traffic as it passes through the node where the pod or service is located.
The IPTables rules generated by Kubernetes are based on the network policy’s selectors and rules. Selectors identify which pods the policy applies to, while rules define what traffic should be allowed or denied. For example, a network policy could be created that only allows traffic to specific ports on pods with a certain label.
The IPTables rules generated by Kubernetes are inserted into the kernel’s IPTables chains, which determine how network traffic is processed. These chains are evaluated in a specific order, with the first matching rule determining the action taken on the packet.
Kubernetes also uses IPTables to implement Kubernetes Services, which provide a stable IP address and DNS name for accessing a set of pods. When a Service is created in Kubernetes, kube-proxy creates an IPTables rule to forward traffic to the appropriate pod based on the Service’s selector.
Overall, IPTables are an important tool for implementing network policies and Services in Kubernetes, as it allows for fine-grained control over the flow of network traffic, and provides a reliable and scalable mechanism for load balancing and service discovery.
IPVS
IPVS (IP Virtual Server) is a Linux kernel module that provides network load-balancing capabilities. In Kubernetes, IPVS is used as an alternative to kube-proxy and IPTables for implementing Services.
When a Service is created in Kubernetes and the Service type is set to “LoadBalancer”, IPVS is used to create a virtual IP address (VIP) for the Service. The VIP is used as the target address for client traffic and is associated with a set of pods that provide the actual service.
IPVS works by intercepting incoming traffic to the VIP and distributing it among the available pods using a load-balancing algorithm. There are several load-balancing algorithms available in IPVS, including round-robin, least-connection, and weighted least-connection.
IPVS also provides health checks to ensure that traffic is only sent to healthy pods. When a pod fails a health check, IPVS removes it from the list of available pods and redistributes traffic among the remaining healthy pods.
IPVS has several advantages over kube-proxy and IPTables, including better scalability and performance, and more flexible load-balancing algorithms. IPVS can handle large numbers of connections and is optimized for high throughput and low latency. It also supports more advanced load-balancing features, such as session persistence and connection draining.
However, IPVS requires additional configuration and setup compared to kube-proxy and IPTables, and may not be compatible with all network environments. IPVS also requires kernel support and may not be available on all Linux distributions.
Proxy
A proxy is a server application that acts as an intermediary between client requesting a resource and the server providing that resource
Kubectl Proxy
The Kubectl Proxy is a command-line tool that enables a user to create a secure tunnel between their local machine and a Kubernetes API server. This allows the user to access the Kubernetes API server without the need for direct network access or complex authentication configurations. Kubectl Proxy is used for various purposes, such as accessing the Kubernetes Dashboard or using kubectl commands against a remote cluster.
For example, suppose a user wants to access the Kubernetes Dashboard running on a remote cluster. They can use Kubectl Proxy to create a secure tunnel and then access the Dashboard through a local web browser.
Kube-Proxy
On the other hand, Kube-Proxy is a component that runs on each node in a Kubernetes cluster and is responsible for implementing Kubernetes Services. Kube-Proxy listens for changes to Services and then updates the local IPTables or IPVS rules accordingly. This ensures that traffic is correctly routed to the appropriate pods in the cluster.
For example, suppose a Service is created in Kubernetes that maps to a set of pods with the label “app=myapp”. Kube-Proxy will create IPTables or IPVS rules that direct traffic to the appropriate pod based on the Service’s selector.
Both Kubectl Proxy and Kube-Proxy have benefits and limitations. Kubectl Proxy is simple to set up and provides secure access to the Kubernetes API server, but it can be slow and may not be suitable for production environments.
Kube-Proxy is reliable and scalable, but it can be complex to configure and may not be suitable for all network environments.
Envoy
In addition to Kube-Proxy, another popular proxy used in Kubernetes is Envoy. Envoy is a high-performance proxy that provides advanced traffic management and load-balancing capabilities. Envoy can be used as a replacement for Kube-Proxy to implement Kubernetes Services or can be used as an independent component to provide advanced traffic management features.
Envoy is used in many production environments and can provide benefits such as advanced load-balancing algorithms, circuit breaking, and distributed tracing.
However, Envoy requires additional setup and configuration compared to Kube-Proxy, and may not be compatible with all network environments. Additionally, Envoy is generally used in more complex scenarios, such as multi-cluster or multi-cloud environments, and may be overkill for simpler use cases.
Container Networking Interface
The Container Networking Interface (CNI) is a specification and set of tools for configuring networking in containerized environments, such as those provided by Kubernetes. The goal of CNI is to provide a common standard for network plugins so that container runtimes and orchestration systems can work with any networking solution that supports the CNI API.
CNI defines a standard way for container runtimes, such as Docker or CRI-O, to call networking plugins to configure the network interfaces of containers. The plugins are responsible for creating and configuring network interfaces for the containers, as well as configuring the network namespace and routing tables.
In Kubernetes, CNI is used by the kubelet to configure the network interfaces of pods. When a pod is created, the kubelet invokes the CNI plugin to configure the pod’s network. The CNI plugin then creates and configures the network interfaces for the pod, sets up any necessary routing rules, and adds the pod’s IP address to the appropriate network namespace.
CNI plugins can be either built into the container runtime or provided as standalone binaries. There are many CNI plugins available, each with its own strengths and weaknesses. Some popular CNI plugins include Calico, Flannel, and Weave Net.
The use of CNI provides several benefits in containerized environments. First, it allows for a common standard that can be used by multiple container runtimes and orchestration systems. This means that network plugins can be developed independently of the container runtime or orchestration system, which promotes flexibility and compatibility.
Second, CNI provides a modular and extensible architecture that allows for easy integration with other networking solutions. This enables users to choose the best networking solution for their specific use case and avoid vendor lock-in.
Finally, CNI provides a simple and flexible API for configuring container networking, which makes it easy for developers to create and deploy custom networking solutions tailored to their needs.

Top comments (0)