 I've been using Azure App Services (e.g. WebApps) for a few years now. I've been mostly happy with the result. Though I've had some trouble with the way that the App Service environment works from time to time (mostly with the version of .NET Core that is running).
To try and eliminate that (and possibly save some cost), I decided to switch my apps to use Docker Containers. I thought I'd share how I did it in case you want to do this as well.
This will be a three part series:
Getting an ASP.NET Core project running on Docker Desktop (this post)
Deploying Docker Images to Azure App Services (here)
Automating Docker Image Deployment with GitHub Actions (here)
Why Containers
While the benefits of containers is well known to many, for me containers represent a continuation of the abstraction of the platform. Containers are simply an OS as a service (in some respects). It's one more thing I don't have to worry about.
Back in the day, configuring COM/COM+ was a headache, setting up dependencies on the machine was cumbersome, and figuring out why a machine in the field was throwing an error we couldn't replicate was a nightmare. Virtual Machines became a reliable way to create a well-known environment to run our code.
Containers, in many ways, are a continuation of this. I like App Services because I don't have to worry about the operating system, updates, and configuration changes. But App Services weren't always repeatable (especially if you were building through integrations (e.g. Git)).
For me, using a container in App Services is about the repeatability of this same idea. Because it is going to run on a container (or containers) that I describe, it should work identically on my machine as it will in the cloud. That's why I like this approach.
Getting Docker Working Locally
In order to get started, I needed to get docker working on my machine. The idea behind this is to simply be able to create and test your project in a container locally before you send it off to the cloud.
Getting Docker Desktop
Luckily for Windows and Mac, there is a simple solution called Docker Desktop. Just head over to Docker Desktop and download it:
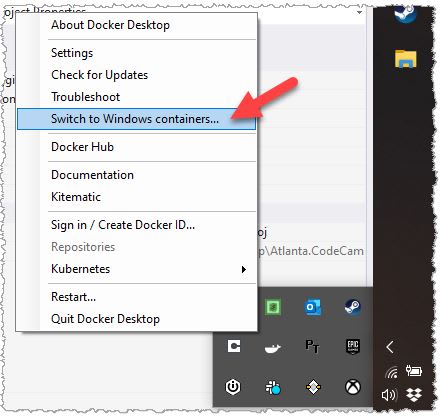
Once you install it, you'll get a choice of whether to run it with Windows Containers (if you're on Windows) or Linux containers. I'd suggest using Linux containers as they are lighter than Windows containers and most ASP.NET Core projects can live in Linux just fine:
Once this is running you can start to use containers. While there is a complete command-line for docker (and docker-compose), I'm going to talk about how to get this working in Visual Studio (there are a ton of tutorials about how to do this with the command line or Visual Studio Code elsewhere).
Creating a Docker file in Visual Studio
Open the project that you want to containerize in Visual Studio (I'm using VS 2019). You will have to have Docker support installed but I believe that's part of the default VS2019 installation.
To get started, just right-click on the project node:
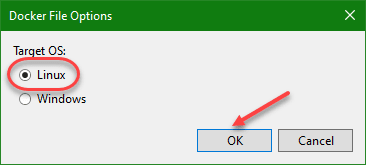
Once you add Docker support it will ask if you want to use Windows or Linux (in this example I'm using Linux):
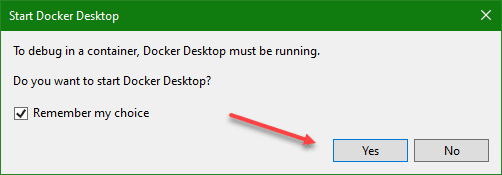
Finally, it will ensure you have Docker Desktop running to debug into a container:
If you look at the Debug Toolbar, you'll see that Docker is now added as a Debugging target:
But before we dive into that, let's look at the docker file Visual Studio has created. It's more complex than you might think.
The Docker File
The dockerfile it creates creates several containers. This is mostly to facilite quick restart when you're debugging. In general this means that we can use this to build our image when we actually deploy it. We end up with a really small container with just our code that is required (instead of leaking any build artifacts). Here is the entire Dockerfile:
FROM mcr.microsoft.com/dotnet/core/aspnet:2.2-stretch-slim AS base
WORKDIR /app
EXPOSE 80

FROM mcr.microsoft.com/dotnet/core/sdk:2.2-stretch AS build
WORKDIR /src
COPY ["CoreCodeCamp/CoreCodeCamp.csproj", "CoreCodeCamp/"]
RUN dotnet restore "CoreCodeCamp/CoreCodeCamp.csproj"
COPY . .
WORKDIR "/src/CoreCodeCamp"
RUN dotnet build "CoreCodeCamp.csproj" -c Release -o /app/build

FROM build AS publish
RUN dotnet publish "CoreCodeCamp.csproj" -c Release -o /app/publish

FROM base AS final
WORKDIR /app
COPY --from=publish /app/publish .
ENTRYPOINT ["dotnet", "CoreCodeCamp.dll"]
Let's walk this through section by section:
FROM mcr.microsoft.com/dotnet/core/aspnet:2.2-stretch-slim AS base
WORKDIR /app
EXPOSE 80
This creates a new image called ‘base’ that is based on the version of ASP.NET Core you're using (this site is still using 2.2 so we got a 2.2 version).
FROM mcr.microsoft.com/dotnet/core/sdk:2.2-stretch AS build
WORKDIR /src
COPY ["CoreCodeCamp/CoreCodeCamp.csproj", "CoreCodeCamp/"]
RUN dotnet restore "CoreCodeCamp/CoreCodeCamp.csproj"
COPY . .
WORKDIR "/src/CoreCodeCamp"
RUN dotnet build "CoreCodeCamp.csproj" -c Release -o /app/build
This section is for an image called ‘build’ that copies your project to the image and builds the project. If you need more dependencies, you could add them here (e.g. if you need Node installed to run gulp).
FROM build AS publish
RUN dotnet publish "CoreCodeCamp.csproj" -c Release -o /app/publish
Then it creates a new image based on the ‘build’ and calls publish (this is done so we can re-use the ‘build’ image on every build).
Finally:
FROM base AS final
WORKDIR /app
COPY --from=publish /app/publish .
ENTRYPOINT ["dotnet", "CoreCodeCamp.dll"]
This just creates an image from the ‘base’ image and copies the app to the project and executes the project. This final image is what you'll end up actually deploying to Azure.
Debugging with Docker
Being able to debug direct inside the docker container is a good feature that will allow you to ensure that your app works as expected inside docker. I wouldn't recommend developing full-time on the Docker container as that will increase your startup time during development.
To get started, we'll need to make sure that we have the Docker option on our Debug selection toolbar:
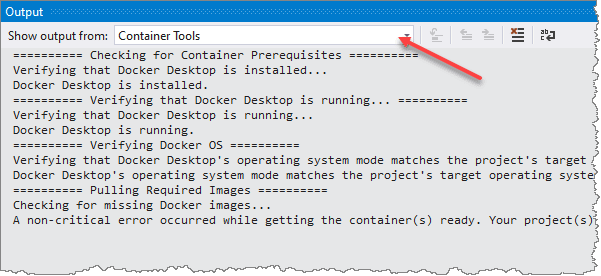
Now we can build our project. You'll notice that there is a new item in the dropdown of the output window called “Container Tools”:
You can always view this to see what the containers is actually doing. Just run the project and it will build and run your app inside the Linux container. You can step on breakpoints and find any issues. For example, if you're using LocalDB for your database, you'll see an error that causes the SQL to fail:
While debugging you'll also see a new window called “Containers” that shows the running containers:
You'll need to go through and find any issues with your app working inside a container. One thing that usually trips people up first is that Linux is case sensitive so if you're doing any file i/o, it will need to be case sensitive. There are a number of things to check.
Coming Up Next
Once you have your app working inside the container, you're ready to move on to deploying it as a container inside of App Services. I'll cover that in the next part of this blog post coming soon.
Let me know what you think!
      This work by [Shawn Wildermuth](http://wildermuth.com) is licensed under a [Creative Commons Attribution-NonCommercial-NoDerivs 3.0 Unported License](http://creativecommons.org/licenses/by-nc-nd/3.0/).
      Based on a work at [wildermuth.com](http://wildermuth.com).
If you liked this article, see Shawn's courses on Pluralsight.







Top comments (1)
Simple and easy to follow. Thanks for sharing.