This post was originally published at suze.dev.
If you're a JavaScript developer, you'll know about console.log(), but have you heard of console.table(), console.group() or console.assert()?
console.table(), console.group() and console.assert() aren't as well-known as console.log(), but they are very useful for debugging.
Let’s take a look, using some example data.
Imagine you are running an e-commerce website. You sell a number of different kitchen items.
You store details about these items in objects, within an array named products.
You can see the product ID, product name, the price and whether or not each one is in stock.
You can see that the coffee maker is the only one out of stock.
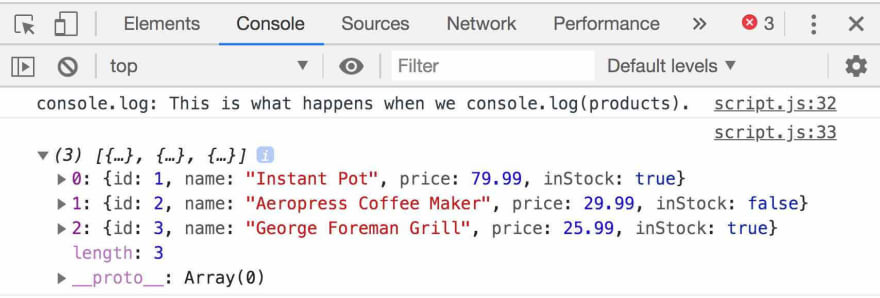
What happens if we simply console.log(products)?
The array is logged inline. We can see there are three items in the array, but to see any of the details we need to expand the log.
When we do this, we see the following:
We can still expand further but this is time-consuming. The information is too close together to allow us to easily pick out any details. For example, it is difficult to see quickly which items are in stock. If we are using JavaScript to make API calls, results like this aren't very user-friendly.
console.table()
What happens when we console.table(products) instead?
The array is logged neatly in a table.
The column headings are the index of the array, then the object keys.
It is much quicker and easier to see the object information at a glance.
We can sort by any column by clicking the column name.
We can even click and drag to resize the column widths.
The array is still logged inline under the table in case we want to expand the levels and inspect all the functions we could call on the array, in the same way as when we console.log() it.
console.table(products, [ 'name', 'price' ])
We can make this table even neater.
We don't need the ID numbers, for example, as we can see the names and these are more descriptive.
We can select whichever keys we want to view by including them in the console.table() function.
Here we've chosen to view only the name and price of each product using console.table(products, [ 'name', 'price' ]).
console.assert()
Let's take a look at console.assert() now.
Say for example we want to make sure there are exactly four products.
Therefore, we want to output an error message if there are not four products.
There are different ways we can do this.
We can use an if statement or a ternary operator, but these require logic and the lengthy code that goes with it:
console.assert() requires less code:
console.assert(); is neater and gives us a more readable error message than an if statement or ternary operator.
console.group()
We can organise console output by indenting it and making it collapsible.
For example, we want to check for products in stock every 10 seconds and print them out.
We also want to be able to easily see from the console output the time and date that the stock check was conducted.
The code here loops over the array every 10 seconds to check if each item is in stock.
So what does this look like in the console?
The output of the loops are grouped together and time stamped.
They are expanded by default. We can collapse them manually.
We can also output them collapsed by modifying the code:
The output of the loops are grouped together and time stamped. They are collapsed by default. We can manually expand the ones we want to examine.
Further reading
These are just three of the console functions you can use to debug your JavaScript in the browser. There are lots more! Find out about them.


Top comments (2)
console.group() is my absolute favorite! Ever since I discovered it I use it almost daily. Great write-up!
Thank you!