
Azure Blob Storage is a cost-effective and scalable cloud storage solution for storing unstructured data, such as text, binary data, images, and videos.
The Azure portal provides a web-based interface for managing your Azure resources, while the Azure SDK for Node.js allows you to interact programmatically.
Prerequisites
- Azure Subscription: You'll need an active Azure subscription. If you don't have one, you can create a free account.
- Node.js and npm: Ensure you have Node.js and npm (Node Package Manager) installed on your development machine.
- Text Editor/IDE: A text editor or IDE (like VS Code) to write your Node.js code.
Sign in to the Azure Portal
- Open your web browser and go to the Azure Portal.
- Sign in using your Azure account credentials.
Create a Storage Account
- In the Azure Portal, search for "Storage accounts" in the search bar at the top.
- Click on "Storage accounts".
- Click the "+ Create" button to create a new storage account.
Configure the Storage Account
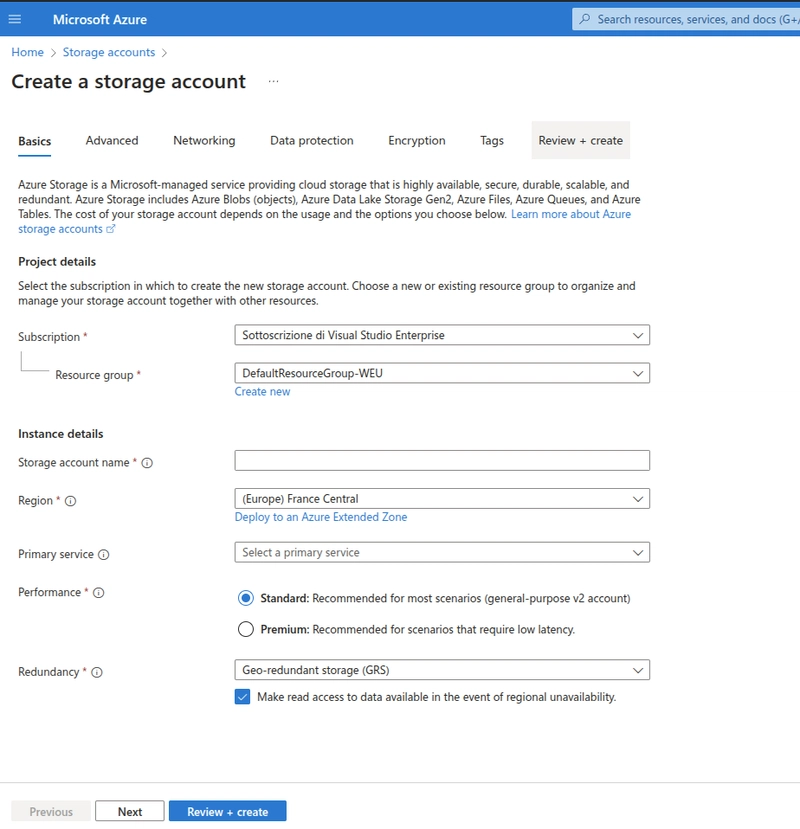
Subscription: Select the Azure subscription you want to use.
Resource group: Choose an existing resource group or create a new one. Resource groups help organize related Azure resources.
Storage account name: Enter a unique name for your storage account. The name must be globally unique across Azure. It must be between 3 and 24 characters and can only contain lowercase letters and numbers. For example,
mystorageaccountnodejs.Region: Select the Azure region where you want to locate your storage account. Choose a region close to your users or other Azure resources.
Performance: Choose "Standard" for general-purpose storage or "Premium" for high-performance applications. "Standard" is typically sufficient for most scenarios.
-
Redundancy: Select the redundancy option that best suits your needs. For testing purposes, LRS is usually fine.
- Locally-redundant storage (LRS): Lowest-cost option with basic protection against server rack and drive failures. Recommended for non-critical scenarios.
- Geo-redundant storage (GRS): Intermediate option with failover capabilities in a secondary region. Recommended for backup scenarios.
- Zone-redundant storage (ZRS): Intermediate option with protection against datacenter-level failures. Recommended for high availability scenarios.
- Geo-zone-redundant storage (GZRS): Optimal data protection solution that includes the offerings of both GRS and ZRS. Recommended for critical data scenarios.
Leave the remaining settings at their default values for this tutorial.
Review and Create
- Click the "Review + create" button.
- Review the configuration details and click "Create".
- Azure will begin provisioning your storage account. This may take a few minutes.
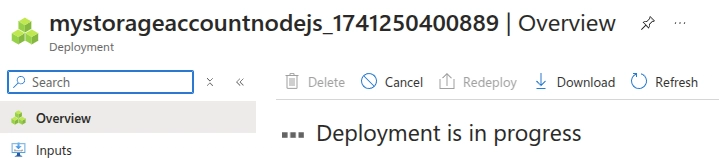
Once the deployment is complete, click "Go to resource" to navigate to your newly created storage account.
Get the Connection String
- In the storage account overview, go to "Security + networking" and click on "Access keys".
- You'll see two access keys (key1 and key2). Either key will work.
- Copy the Connection string for either key. This connection string contains the information needed to connect to your storage account from your Node.js application.
Important: Treat your connection string like a password. Do not commit it to source control or share it publicly. For production applications, consider using Azure Key Vault to store and manage your connection strings securely.
Writing the Node.js Application
Open your terminal or command prompt and create a new directory for your project.
mkdir azure-blob-node
cd azure-blob-node
Initialize a new Node.js project.
This will create a package.json file with default values.
npm init -y
Install the necessary Azure Storage SDK for Node.js.
npm install @azure/storage-blob
Install the dotenv package to manage environment variables.
npm install dotenv
Create a file named .env in your project's root directory and add the following line.
AZURE_STORAGE_CONNECTION_STRING="<your_connection_string>"
Replace
<your_connection_string>with the actual connection string you copied from the Azure Portal.
Create the main application file named index.js (or any name you prefer) in your project directory and copy this snippet.
import { BlobServiceClient } from '@azure/storage-blob';
import 'dotenv/config';
import path from 'path';

// Create the Container Client
const blobServiceClient = BlobServiceClient.fromConnectionString(
    process.env.AZURE_STORAGE_CONNECTION_STRING
);

// Create the container
const containerName = 'photo-uploads';
const containerClient = blobServiceClient.getContainerClient(containerName);
await containerClient.create();

// Upload from a file stream (efficient for larger files)
const imagePath = './your-relative-image-path-here.png';
const blobName = path.basename(imagePath);
const blockBlobClient = containerClient.getBlockBlobClient(blobName);
await blockBlobClient.uploadFile(imagePath);

// List the blob(s) in the container.
for await (const blob of containerClient.listBlobsFlat()) {
    console.log(blob.name);
}

// Download the blob
const destinationPath = './your-relative-destination-path-here.jpg';
await blockBlobClient.downloadToFile(destinationPath);

// Delete the blob
await blockBlobClient.delete();

// Delete the container
await containerClient.delete();
In your terminal, run the application with:
node index.js
You can comment on this code piece by piece and see the changes in your Azure dashboard.
Best Practices
- Secure Your Connection String: Never hardcode your connection string directly into your application code. Use environment variables or, preferably, Azure Key Vault.
- Error Handling: Implement robust error handling to catch and log exceptions that may occur during storage operations.
- Asynchronous Operations: Use
async/awaitconsistently for asynchronous operations to improve code readability and maintainability. - Clean Up Resources: Always delete the resources you create (containers and blobs) when you are finished with them to avoid unnecessary storage costs. The provided code already does this, but it's a good practice to keep in mind.
- Logging: Add logging to your application to track its activity and diagnose problems.
We covered the essential steps from setting up a storage account in the Azure Portal, securing the connection string, to implementing basic operations like container creation, blob uploading, listing, downloading, and deletion within a Node.js application. By following these steps and incorporating the best practices outlined, you can efficiently integrate Azure Blob Storage into your projects, benefiting from its scalability, cost-effectiveness, and robust features for managing unstructured data. This foundation allows you to build more complex applications that rely on reliable and secure cloud storage solutions.
I hope you enjoy this article, happy coding! 🎉
Need help? Ask away in the comments!

Top comments (0)