
This series is so close to being done but not quite.

If you've kept up till now your application's frontend is (hopefully) functional on your home server with Heroku hosting its backend API. It's now time to migrate the Rails API and its Database into the server.
At this point there are, again, a few options you could do:
- Set up the "pgAdmin", PostgreSQL Tools, and interact with the admin and development platform in a GUI.
- Create a fresh Rails API for the application to interface with the PostgreSQL database on the server.
- Rewrite the application have the frontend and backend together with something like a Ruby on Rails base and React functionality to display the public "views" folder of the Ruby application.
- Create a PHP interface for the frontend to interact with the ProgreSQL database.
Because I already have a Ruby on Rails API built I'm going to download that repository and configure a private endpoint for the frontend to interact with it.
If you need a refresher the difference between an API and a database, refer to my API =/= Database post.
Table Of Contents
Step 1: Installing Ruby and Rails
Step 2: Downloading and Configuring the API Repository
Step 3: Adding the Backend Endpoints
Step 4: Adding SSL
Step 5: Adding in an Application Server
Step 6: Configure database.yml and secrets.yml
Step 1: Installing Ruby and Rails
Before I add the API repository onto the server both Ruby and Rails need to be installed. For this I'm going to follow the Digital Ocean tutorial for installing Ruby on Rails with rbenv on my Ubuntu server, with a few changes for my specific system that I will list as needed.
Note: For this step I did find that if you run the commands as the "Root" user you will run into some issues; so I recommend using the sudo command as needed.
- First I will run
sudo apt install autoconf bison build-essential libssl-dev libyaml-dev libreadline6-dev zlib1g-dev libncurses5-dev libffi-dev libgdbm6 libgdbm-dev. For this command I will need to change thelibgdbm5(that's for Ubuntu 18) tolibgdbm6(that's for Ubuntu 20).-
autoconfis " a tool for producing shell scripts that automatically configure software source code packages to adapt to many kinds of Posix-like systems" 19 -
bison"is a general-purpose parser generator that converts an annotated context-free grammar into a deterministic LR or generalized LR (GLR) parser employing LALR(1), IELR(1) or canonical LR(1) parser tables." 20 -
build-essentialis "a meta-package that includes the GNU compiler collection, GNU debugger, and other development libraries and tools required for compiling software." 21 -
libssl-devis the OpenSSL project's implementation of the SSL/TLS cryptographic protocols for secure communication over the Internet. 22 -
libyaml-dev"is a C library for parsing and emitting data in YAML 1.1, a human-readable data serialization format." 23 -
libreadline6-devis the GNU readline and history library that "aids in the consistency of user interface across discrete programs that need to provide a command line interface." 24 -
zlib1g-dev"is a library implementing the deflate compression method found in gzip and PKZIP." 25 -
libncurses5-devis the "ncurses library routines are a terminal-independent method of updating character screens with reasonable optimization." 26 -
libffi-devis "a foreign function interface... that allows code written in one language to call code written in another language." 27 -
libgdbm6andlibgdbm-devare both a version of the GNU dbm ('gdbm') "library of database functions that use extendible hashing and works similarly to the standard UNIX 'dbm' functions." 28 - The
-devpart speaks to the development libraries, header files, and manpages for the packages.
-
- Clone the "rbenv" repository into the "~/.rbenv" folder with
git clone https://github.com/rbenv/rbenv.git ~/.rbenv. - Add "rbenv" to your command line
$PATHwith the following commands
- To get this command to permanently take hold I needed Root privileges and not just run the commands with
sudo. Without Root privileges my system would not product any output for the next step. I am not sure if this will effect things with other imaginary users but it was the only way I could get thesource ~/.bashrccommand to work.
- To get this command to permanently take hold I needed Root privileges and not just run the commands with
- Test the configuration with
type rbenvwhich should produce the output of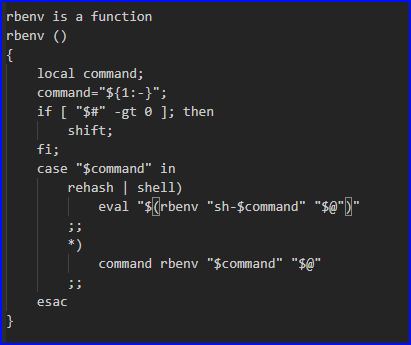
- Clone the rbenv ruby build part of the repository into the
~/.rbenv/plugins/ruby-buildfolder withgit clone https://github.com/rbenv/ruby-build.git ~/.rbenv/plugins/ruby-build - Install the version of Ruby that you need with
rbenv install 2.6.6.- I needed Ruby Version 2.6.6 but you can install any one you need. To see available versions to install run
rbenv install -l. - At this point I actually had a weird thing happen where I think I installed Ruby Version 2.7 and I ended up needing uninstall ruby with the command
sudo apt purge rubyas "Root" and then I was able to install the proper version of Ruby with the rbenv.
- I needed Ruby Version 2.6.6 but you can install any one you need. To see available versions to install run
- At this point you can run
gem install bundlerto manage the gem dependencies for your application.
To reiterate... If you installed rbenv as Root you might have trouble. Rbenv seems to not like being installed as root so only run with "sudo" if it insists.
{Back to the Table Of Contents}
Step 2: Downloading and Configuring the API Repository
Depending on if you are downloading an already built API from GitHub, downloading one from your client computer over SSH, or creating a new API will depend on how you do this step.
Because I already have a Rails API built for my application on GitHub I will go through the same steps here to download the repository as I did with my React frontend into a folder named "backend" in the application's main folder.
- Navigate into the folder your application will live in with
cd /var/www/etcpasswdapp - Same as with the React frontend, run
sudo git clone https://github.com/yourGitHubProject.git backendto clone the backend repository into a new folder named "backend", in the "etcpasswdapp" folder.- Now if you
cd backendinto the "backend" folder you just created and rungit statusyou can see that the folder is linked up to GitHub for some great version control and backup ability of your application.
- Now if you
- If
Gemfile.Lockis there delete it withsudo rm Gemfile.Lock. - Make a copy of the
.env.samplefile, or whatever you named it, withcp .env.sample .env.- You can delete the
.env.samplefile once you have a copy of it.
- You can delete the
- Edit the file with
sudo nano .env, add in any keys needed for your application and save the file.- For example
HASH_KEY=SomeSuperSecretRandonStringwould be added to the.envfile.
- For example
- Now navigate into the
configfolder withcd config. - Here you will run
sudo nano master.keyto either edit an existing "key" file or create one. - Add a key to the file that was previously used.
- This is only for if you are working with a previously created repository and is specific to it's creation.
- Back out into the main "backend" folder and read the
.gitignorefile withless .gitignoreto make sure that both the.envand themaster.keyfiles are listed so they won't be uploaded to GitHub accidently.
- Mine were in there already but good to double check. Don't want any private folders escaping into the Internets.
- Now you should be able to run
bundle installto install any needed gem dependencies.- You night need to "bundle" things again later so, your call if you care to do this now and/or later.
{Back to the Table Of Contents}
Step 3: Adding the Backend Endpoints
Now that Ruby and Rails are both installed on the server it's time to configure the endpoint for the backend API. This step will be similar to the process for the frontend but you will need to make a few naming modifications.
- Navigate to the Apache2 "sites-available" folder with
cd /etc/apache2/sites-available. - Make a copy of the applications "conf" file with a different name by running
sudo cp etcpasswdapp.conf etcpasswdapi.conf.- I recommend making a copy of the frontend "conf" file because we will a lot of the info in it for the backend to be running over HTTPS.
- Run
sudo nano etcpasswdapi.confto open up the new file in the nano editor.- You will be editing a few things so be sure to leave it open for a bit.
- With the editor open change the first
<VirtualHost *:443>section's "DocumenRoot" to the location of the backends' "public" folder.- For example, mine will be
/var/www/etcpasswdapp/backend/public
- For example, mine will be
- With the editor open change the "ServerName" and "ServerAlias" to the API's nameing scheme.
- For example, my "ServerName" will be
api.etcpasswdapp.comand my "ServerAlias" will be*.etcpassedapp.com.
- For example, my "ServerName" will be
- In the second
<VirtualHost *:80>section use the same naming scheme and change its "DocumentRoot, "ServerName", and "Redirect" accordingly.
- Now save the file and exit the editor.
{Back to the Table Of Contents}
Step 4: Adding SSL
Now that there is an end point you will need to follow the same process as the frontend and configure a new SSL certificate with different names for the endpoint to work for testing.
- Create the SSL certificate for the backend with
sudo openssl req -x509 -nodes -days 365 -newkey rsa:2048 -keyout /etc/ssl/private/apache_cert2.key -out /etc/ssl/certs/apache_cert2.crt. It will prompt you for some basic information about your site.
- Note: that
reqis like "request" with a 'Q' and not a 'G' and you can name the cert anything. I chose the "apache_cert2" because it was convenient for me to type for this project.
- Note: that
- Now that the certs are generated you need to navigate into the Apache2 "sites-available" folder, if not there already, with
cd /etc/apache2/sites-available. - Open the "conf" file for the backend to edit it with
sudo nano etcpasswdapi.conf. - Add the SSL configuration into the
<VirtualHost *:443>section below the "DocumentRoot" somewhere.
- Once you have edited the locations of the certs in the first
<VirtualHost *:443>section save the file and exit nano.
You may still get betting the pesky error from the browsers when trying to access the page but you should be able to go into the "Advanced" button and allow the "unsafe site". 
{Back to the Table Of Contents}
Step 5: Configure database.yml and secrets.yml
Now that the API is on the server, it has an endpoint, and SSL is enabled you now need to configure the applications database.yml and secrets.yml/secrets.yml.enc (depending on your set up) files for the database to work. "As of Rails 5.2, config/secrets.yml, config/secrets.yml.enc and SECRET_BASE_KEY are no longer being used to store encrypted keys. From now on, you are to use these files instead: config/credentials.yml.enc and config/master.key." 11
- Navigate to the API's
database.ymlfile withcd /var/www/etcpasswdapp/backend/config - Run
sudo nano master.keyorsudo nano secrects.ymlto create the file, or edit an existing file, and add in your secret to interact with the database in it.- In my case I needed to add in a secret string that I'd previously set up into my
master.keyfile and made asecrets.ymlfile and put the same key that mymaster.keyfile had in it, just to be safe if it's needed.
- Also, this the key not a variable. Just add in the string on the first line all by itself save it. It is case sensitive.
- In my case I needed to add in a secret string that I'd previously set up into my
- Now run
sudo nano database.ymland configure it according to Passenger's Walkthrough step 2.3. It will look something like this when done.
- This will depend a lot on your own set up so take a min with it. (We will be using Passenger in the next section so this will do well.)
- You might need to delete your database configuration if you had set one up previously because it will interfere with Rails' configuration of its database based on the information in the
database.ymlfile.
- Now that the database configuration is set up be sure to edit the
.gitignorefile again and add in any missing files you don't want on the internet.- For example, I added the
database.ymlfile because of the password for my development configuration as so.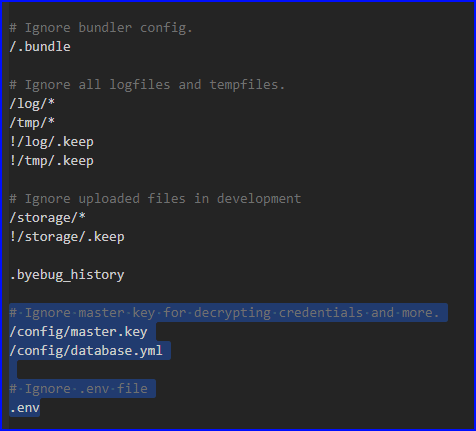
- For example, I added the
- If everything works you will hopefully be able to now run
rake db:createto finish setting up the database. - Hopefully you were able to create the database ok. If so you can now run
rake db:migrateandrake db:seedto populate your database with the seed data for testing.- If you run into an error try running
rake db:resetor try deleting the database in thepsqlcommand line interface and recreating it.
- If you run into an error try running
- You should now be able to check the configuration of the database within the
psqlcommand line interface and interact with the database. 18
{Back to the Table Of Contents}
Sorry but...
There are a few more things to do as I need to set up application server and go through server hardening.
Happy Hacking

Resources:
1. https://www.postgresql.org/docs/12/tutorial-createdb.html
2. https://www.postgresqltutorial.com/postgresql-data-types/
3. https://www.postgresqltutorial.com/postgresql-create-table/
4. https://www.digitalocean.com/community/tutorials/how-to-install-ruby-on-rails-with-rbenv-on-ubuntu-18-04
5. https://devhints.io/rbenv
6. https://www.phusionpassenger.com/library/walkthroughs/deploy/ruby/ownserver/apache/oss/bionic/install_passenger.html
7. https://www.phusionpassenger.com/docs/advanced_guides/install_and_upgrade/standalone/install/oss/focal.html
8. https://www.phusionpassenger.com/docs/advanced_guides/install_and_upgrade/apache/install/oss/focal.html
9. https://www.phusionpassenger.com/library/install/apache/working_with_the_apache_config_file.html
10. https://www.phusionpassenger.com/library/walkthroughs/deploy/ruby/ownserver/apache/oss/rubygems_norvm/install_passenger.html#step-2:-run-the-passenger-apache-module-installer
11. https://medium.com/@thorntonbrenden/rails-and-the-legendary-master-key-15c8be7799f1
12. https://linuxize.com/post/how-to-install-ruby-on-ubuntu-20-04/
13. https://www.phusionpassenger.com/docs/advanced_guides/install_and_upgrade/apache/working_with_the_apache_config_file.html
14. https://www.phusionpassenger.com/docs/tutorials/deploy_to_production/deploying_your_app/oss/aws/ruby/apache/#rails_configure-database-yml-and-secrets-yml
15. https://www.phusionpassenger.com/library/walkthroughs/start/ruby.html
16. https://www.digitalocean.com/community/tutorials/how-to-use-postgresql-with-your-ruby-on-rails-application-on-ubuntu-18-04
17. https://www.digitalocean.com/community/tutorials/how-to-set-up-a-ruby-on-rails-project-with-a-react-frontend
18. http://postgresguide.com/utilities/psql.html
19. https://www.gnu.org/savannah-checkouts/gnu/autoconf/manual/autoconf-2.69/autoconf.html#Introduction
20. https://www.gnu.org/software/bison/manual/bison.html#Introduction
21. https://linuxize.com/post/how-to-install-gcc-on-ubuntu-20-04/#:~:text=The%20default%20Ubuntu%20repositories%20contain,tools%20required%20for%20compiling%20software.
22. https://packages.debian.org/jessie/libssl-dev
23. https://packages.debian.org/buster/libyaml-dev
24. https://packages.debian.org/buster/libreadline-dev
25. https://packages.debian.org/buster/zlib1g
26. https://packages.debian.org/buster/libncurses5
27. https://packages.debian.org/buster/libffi-dev
28. https://packages.debian.org/buster/libgdbm6

Oldest comments (0)