
If you are using Kubernetes, there's a fair chance you are using Helm or at least considered to. This article will guide you on how to publish your Helm charts in a less conventional way - using OCI-based registries.
First of all, we will briefly cover what OCI-based registries are and how they can help us, and after some theory, we will create a Helm chart, push it to the OCI registry, and actually deploy something using it.
Show us your support 🙏🏻

Before we start, we want to mention that we scheduled ourfirst release on Product Hunt! Click the notify me button to be alerted when we are out and ready to receive your feedback 🔔
We would love it if you starred our repository and helped us get our tool in front of other developers ⭐
Helm OCI-based registries
Helm repositories are used to store Helm charts. Using them, we can publish and version our applications as packaged Helm charts others can install into their cluster. They also allow for easier versioning and rollback of resources. All in all, a single, centralized place to store your Helm charts.
Under the hood, a Helm repository is a simple HTTP server that serves an index.yaml file that contains information about charts stored in that repository, like versions, descriptions, and URLs on where to download chart contents (usually on the same server). Read more about index.yaml file here.
OCI stands for Open Container Initiative, and its goal as an organization is to define a specification for container formats and runtime.
At first glance, it does not seem related to the Helm repositories we just mentioned; at least for me it wasn’t. OCI registries mostly host container images, but we can store different types of content there. One of the types we can host is Helm charts!
With such a registry, you can host all your images and Helm charts in the same place. On top of that, you don’t need to maintain a Helm repository index.yaml file, which makes the management of your chart easier.
You can serve the exact same chart on a Helm repository and a container (OCI) registry; the only difference between those two approaches is how you maintain the charts.
You can use multiple different container registries to store Helm charts:
- Amazon ECR
- Azure Container Registry
- Docker Hub (used in this demo)
- Google Artifact Registry
- Harbor
- IBM Cloud Container Registry
- JFrog Artifactory
Getting our hands dirty
Now that we have our basics down, let's see those OCI charts in practice and use them to deploy our applications. We will create a chart, push it to DockerHub, and then use it to deploy our apps in a Kubernetes cluster. In order to deploy resources from the chart we defined into a Kubernetes cluster, we are going to use Cyclops.
Creating a Helm chart on OCI registry
Firstly, we are going to create a Helm chart. To create a chart, create a new directory
mkdir oci-demo
and add the files listed below to the created directory. Feel free to customize the chart to fit your needs, but for the sake of this demo, we are going to create a basic one with the following structure:
.
└── oci-demo
    ├── Chart.yaml                 # YAML file containing information about the chart
    ├── templates                  # Directory of templates that, when combined with values, will generate valid Kubernetes manifest files.
    │         ├── deployment.yaml  # K8s resources are separated into multiple files. Feel free to add more or change existing
    │         └── service.yaml
    ├── values.schema.json         # JSON Schema for imposing a structure on the values.yaml file
    └── values.yaml                # The default configuration values for this chart
You can find out more about each of those files/directories on Helm's official docs.
Chart.yaml
Let's start with Chart.yaml:
# Chart.yaml

apiVersion: v1
name: oci-demo
version: 0.0.0
Not to go into detail, I'm going to 302 you to the Helm docs.
Templates folder
The next step is defining what Kubernetes resources our packaged application need. We define those in the /templates folder. As seen in the chart structure from earlier, we are going to add only a deployment and a service to our application.
Contents of those files are below:
# templates/deployment.yaml

apiVersion: apps/v1
kind: Deployment
metadata:
  labels:
    app: {{ .Values.name }}
  name: {{ .Values.name }}
spec:
  replicas: {{ .Values.replicas }}
  selector:
    matchLabels:
      app: {{ .Values.name }}
  template:
    metadata:
      labels:
        app: {{ .Values.name }}
    spec:
      containers:
      - image: {{ .Values.image -}}:{{ .Values.version }}
        name: {{ .Values.name }}
        ports:
        - containerPort: 80
          name: http
and
# templates/service.yaml

{{- if .Values.service }}
apiVersion: v1
kind: Service
metadata:
  name: {{ .Values.name }}
  labels:
    app: {{ .Values.name }}
spec:
  type: LoadBalancer
  ports:
    - port: 80
      targetPort: 80
      protocol: TCP
      name: http
  selector:
    app: {{ .Values.name }}
{{- end }}
Values definition
In the /templates folder we defined, obviously, just the templates. It would be a good idea to define default values for those. We are going to use values.yaml for that:
name: demo
replicas: 3

image: nginx
version: 1.14.2

service: true
These are default values, and anybody using your chart will most probably want to change those. But what happens if someone using your chart messes up values by providing invalid data? For example, setting replicas: two or service: no. Another thing that can get messed up is the name of the value, so somebody might use instance: 3 instead of replicas: 3.
Both of these examples seem pretty obvious and something you wouldn’t mess up, but as your chart grows, so does your values.yaml file. A great example is the Redis chart by Bitnami. I encourage you to scroll through its values file. See you in a minute!
Now that you are back, you probably understand why validating values and defining their structure makes sense. Let’s do the same for our chart.
But first, let’s define what are the rules of this validation:
-
serviceis type boolean -
name,imageandversionare strings -
replicasis an integer -
replicasis ≥ 0 - allow only certain values for
version; let those be1.14.1,1.14.2, or1.15.0
There are quite a few rules packed for such short values file! However, having them in place gives us the confidence to deploy the chart without worrying about making mistakes.
Now that we have those defined, our JSON schema will look like the following:
{
  "properties": {
    "name": {
      "description": "Application name",
      "type": "string"
    },
    "replicas": {
      "description": "Number of replicas",
      "type": "integer",
      "minimum": 0
    },
    "image": {
      "description": "Container Image",
      "type": "string"
    },
    "version": {
      "description": "Container image version",
      "type": "string",
      "enum": ["1.14.1", "1.14.2", "1.15.0"]
    },
    "service": {
      "description": "Expose your application",
      "type": "boolean"
    }
  },
  "order": ["name", "replicas", "image", "version", "service"],
  "title": "Values",
  "type": "object"
}
You can find more on how to write a JSON schema for a Helm chart in the Helm docs.
Pushing to Docker Hub
If you don’t already have a Docker Hub account, you should create one to host your charts.
To push our chart to an OCI registry, we will need to package the chart into a tarball with the following command:
helm package oci-demo
There should now be a tarball file called oci-demo-0.0.0.tgz .
Next, you will need to sign in to Docker Hub using Helm:
helm registry login registry-1.docker.io -u {username}
And finally, push your chart to the remote registry:
helm push oci-demo-0.0.0.tgz oci://registry-1.docker.io/{username}
Check your artifacts on Docker Hub, and you should see your newly created Helm chart. If you click on the chart, you’ll see more info about the chart and its versions.

Using OCI charts
We now have our Helm chart locked and loaded, so let’s use it. First of all, let's spin up a Kubernetes cluster. If you already have a running Kubernetes cluster, feel free to use it and skip this step.
Create a minikube Cluster
When I want to play around with a new Kubernetes tool, I try it out on a minikube cluster. Minikube is basically a Kubernetes cluster you can run on your own machine and easily tear down once you are done.
If you are using a mac, you can install it via brew:
brew install minikube
Check their installation guide here → https://minikube.sigs.k8s.io/docs/start/
To actually run the cluster, just hit:
minikube start
A quick check that everything is ok; let's list all the namespaces:
kubectl get ns

NAME              STATUS   AGE
default           Active   11s
kube-node-lease   Active   13s
kube-public       Active   13s
kube-system       Active   13s
Deploy OCI chart into a Kubernetes cluster
You can deploy your newly created Helm chart using pure Helm, but let’s take it a step further. Chances are we will want to edit that deployment with our specific values and change those over time, so let's make it more user-friendly.
We can use Cyclops to help us with that! It can help you deploy and visualize your applications by giving you a simple UI where you get your chart deployed in just a couple of clicks. Let’s install Cyclops into our cluster and deploy that newly created chart!
You can install Cyclops with a single command:
kubectl apply -f https://raw.githubusercontent.com/cyclops-ui/cyclops/v0.2.0/install/cyclops-install.yaml
It will create a new namespace called cyclops and start a Cyclops deployment inside it.
Check that pods are up and running:
kubectl get pods -n cyclops

NAME                           READY   STATUS    RESTARTS   AGE
cyclops-ctrl-d6fd877d8-tpdqd   1/1     Running   0          62s
cyclops-ui-5c858b44d4-dhn2c    1/1     Running   0          62s
Once those are up, you need to port-forward both deployments:
kubectl port-forward svc/cyclops-ui 3000:3000 -n cyclops
and in a separate window, run:
kubectl port-forward svc/cyclops-ctrl 8080:8080 -n cyclops
You can now access Cyclops at http://localhost:3000
When you open your local Cyclops, you can hit Add module in the upper right corner.
This is where we get to use our OCI chart! You are prompted for the repository, path, and version of the template. You can fill those out with the OCI chart you created earlier, like I did below.
Repository: oci://registry-1.docker.io/{username}
Path:       oci-demo
Version:    0.0.0
From here, you can just hit load and let Cyclops render a form based on your chart.
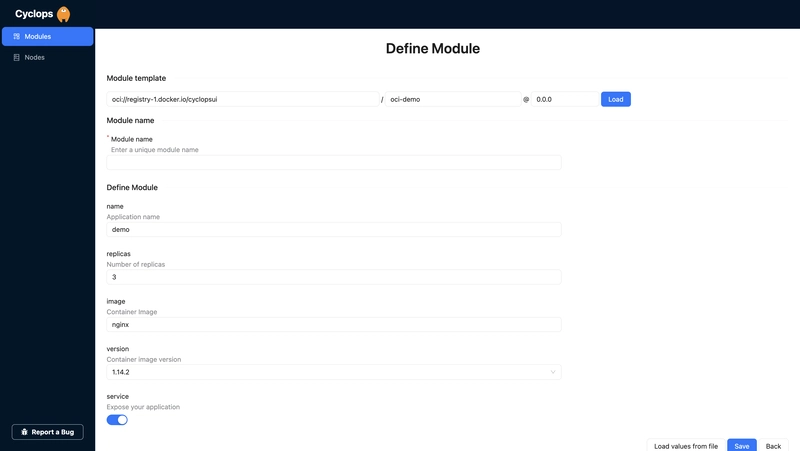
Do you remember that schema file we added to our chart earlier? This is what Cyclops uses to render this form for you. All the fields and validations you set in the values.schema.json file are taken into account so you can get a completely custom UI for your applications.
You can now fill those fields out and hit save, and Cyclops will do the rest for you. Firstly, it will inject those form values into the template and then deploy each of the resources into the cluster.

Any last words?
We started from scratch and, in a couple of minutes, deployed an application with our own Helm chart and a custom UI tailored specifically for our application. On top of that, we did it using an OCI-based registry and didn’t go through setting up a Helm repository to serve our chart.
Hope you had fun throughout the article and found the information and steps we did useful. Thank you for checking out our article!

Top comments (18)
Awesome article! Also can't wait for your PH launch!
Thanks! We are excited as well 😊
Seems really simple when you do it using Cyclops UI! :D
😉
Interesting project and I enjoyed reading your article. Kudos as well for your banner - well thought out. Did you use DALL-E for it?
Thanks Bap!
Midjourney was used to create the banner.
Nice overview of how registries work and how to use them :)
Thanks Edo!
Great step-by-step tutorial
Thanks Luka!
I hope it was easy to follow along
Great article, very detailed & thorough! Thanks
Glad you enjoyed it Nathan!
Thanks for the comprehensive guide!
My pleasure Roman 😁
Great article!
Thanks Roko!
Thanks for the tutorial!
Glad you find it useful 😊