
Today, it is impossible to imagine a modern large project without using Next.js or Nuxt.js.
But, nevertheless, if the task is to quickly create such a structure, then this method, which is described here, is perfect for this.
Today, we will create a small landing page application with 5 components that are located on the server.
Let's get started!
📦 Application structure
Our application will have a structure just like modern SSR applications (without BFF, of course, etc.), but the rendering will occur on the client, which is shown through the browser.
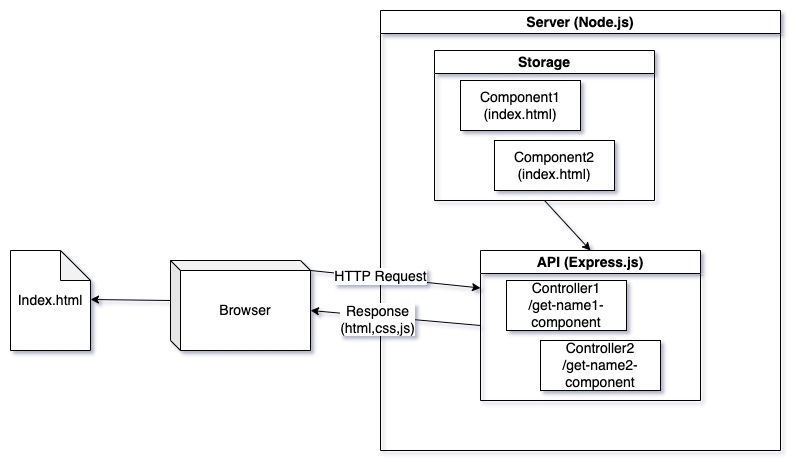
There is no concept of a database in our structure, since the data will be located in html files. But if we were doing registration on the landing page, we would have, say, a .json file that would please modern databases, but this example should be done in 10 minutes, so there is no point in expanding the functionality.
Also, in order to connect the client to the server, we will connect a module such as HMPL:
👀 Where to start creating an app?
First of all, let's create two files global.css and global.js. They will include those styles and scripts that will not depend on what comes from the server.
global.css
* {
  margin: 0;
  padding: 0;
  box-sizing: border-box;
  font-family: Roboto, sans-serif;
}

body {
  line-height: 1.6;
  color: #333;
}

.container {
  width: 100%;
  max-width: 1200px;
  margin: 0 auto;
  padding: 0 20px;
}

.section {
  padding: 80px 0;
  text-align: center;
}

.section h2 {
  font-size: 36px;
  margin-bottom: 30px;
}
global.js
console.log("Global scripts loaded");
As a result, it was possible not to connect global.js but, in general, it would be great for an example if we had common points on js. Config constants, utility functions, etc.
Now, we will create index.html, in which we will connect all the necessary modules for the landing page.
<!DOCTYPE html>
<html lang="en">
  <head>
    <meta charset="UTF-8" />
    <meta name="viewport" content="width=device-width, initial-scale=1.0" />
    <title>My Landing Page</title>
    <link rel="stylesheet" href="global.css" />
  </head>
  <body>
    <script src="https://unpkg.com/json5/dist/index.min.js"></script>
    <script src="https://unpkg.com/dompurify/dist/purify.min.js"></script>
    <script src="https://unpkg.com/hmpl-js/dist/hmpl.min.js"></script>
    <script src="global.js"></script>
  </body>
</html>
The site itself looks empty for now, so let's create our components!
⚙️ Server Configuration
For the server, we will take, of course, the Node.js platform. You can take any, it is not essential for the site. The framework will be Express.js.
app.js
const express = require("express");
const path = require("path");
const bodyParser = require("body-parser");
const cors = require("cors");

const PORT = 8000;
const app = express();

const getRoutes = require("./routes/get");

app.use(express.json());
app.use(bodyParser.urlencoded({ extended: false }));
app.use(cors({ origin: true, credentials: true }));

app.use(express.static(path.join(__dirname, "src")));

app.get("/", (_, res) => {
  res.sendFile(path.join(__dirname, "src/index.html"));
});

app.use("/api", getRoutes);

app.listen(PORT, () => {
  console.log(`Server is running on http://localhost:${PORT}`);
});
routes/get.js
const express = require("express");
const expressRouter = express.Router();
const path = require("path");

const components = {
  title: "CTA",
  header: "Header",
  features: "Features",
  promo: "Promo",
  cta: "CTA",
  footer: "Footer",
};

Object.entries(components).forEach(([name, folder]) => {
  expressRouter.get(`/get-${name}-component`, (_, res) => {
    res.type("text/html");
    res.sendFile(path.join(__dirname, `../components/${folder}/index.html`));
  });
});

module.exports = expressRouter;
Having described just a couple of js files, we can now create our application parts in the components folder.
The routes can be named anything, but for convenience I named them /api/get-${name}-component
⌨️ Writing the first component
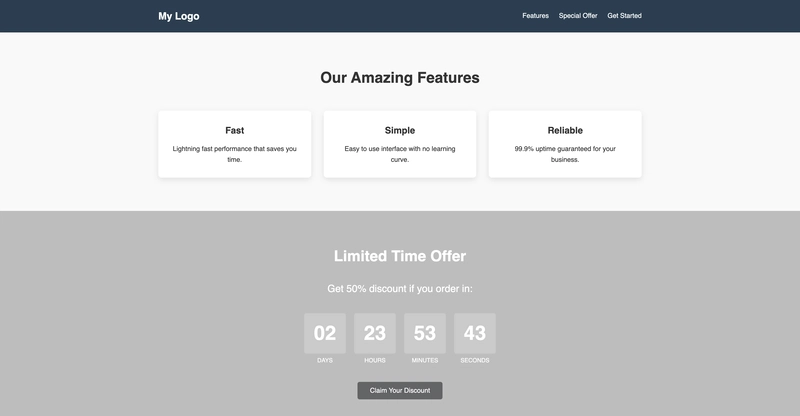
Let's start with the banner, as this is our first content block on the landing page. We will do it directly from the server route at the URL http://localhost:8000/api/get-features-component.
components/Features/index.html
<div id="features-component">
  <section id="features" class="section features">
    <div class="container">
      <h2>Our Amazing Features</h2>
      <div class="features-grid">
        <div class="feature-card">
          <h3>Fast</h3>
          <p>Lightning fast performance that saves you time.</p>
        </div>
        <div class="feature-card">
          <h3>Simple</h3>
          <p>Easy to use interface with no learning curve.</p>
        </div>
        <div class="feature-card">
          <h3>Reliable</h3>
          <p>99.9% uptime guaranteed for your business.</p>
        </div>
      </div>
    </div>
  </section>
  <style>
    .features {
      background: #f9f9f9;
      padding: 80px 0;
      text-align: center;
    }
    .features h2 {
      font-size: 36px;
      margin-bottom: 30px;
    }
    .features-grid {
      display: grid;
      grid-template-columns: repeat(3, 1fr);
      gap: 30px;
      margin-top: 50px;
    }
    .feature-card {
      background: white;
      padding: 30px;
      border-radius: 8px;
      box-shadow: 0 5px 15px rgba(0, 0, 0, 0.1);
      opacity: 0;
      transform: translateY(20px);
      transition: all 0.6s ease;
    }
    .feature-card h3 {
      margin-bottom: 15px;
      font-size: 22px;
    }
    @media (max-width: 768px) {
      .features-grid {
        grid-template-columns: 1fr;
      }
    }
  </style>
  <script>
    const animateFeatures = function () {
      const elements = document.querySelectorAll(
        "#features-component .feature-card"
      );
      elements.forEach((element) => {
        const elementPosition = element.getBoundingClientRect().top;
        const screenPosition = window.innerHeight / 1.3;

        if (elementPosition < screenPosition) {
          element.style.opacity = "1";
          element.style.transform = "translateY(0)";
        }
      });
    };

    window.addEventListener("load", animateFeatures);
    window.addEventListener("scroll", animateFeatures);
  </script>
</div>
Now, let's see what it will look like:

Yes, the component on the server will not look very good, since we write styles that are intended only for it. But when we deploy all this things to our prod site, all the fonts and other things will be connected and the site will look fine.
✅ Let's finish writing the rest
Everything works for us and now we can finish writing all our components and connect them using HMPL to our index.html. We will also finish writing such components as:
- Header:
http://localhost:8000/api/get-header-component - Promo:
http://localhost:8000/api/get-promo-component - CTA:
http://localhost:8000/api/get-cta-component - Footer:
http://localhost:8000/api/get-footer-component
You can find the whole list of them in the repository with this site, I will not just copy and paste the code here, because the article will be simply huge. The link to the repository can be found below.
🔗 Connecting everything to our site
Let's add the components of the server request to our html and append the resulting html.
<!DOCTYPE html>
<html lang="en">
  <head>
    <meta charset="UTF-8" />
    <meta name="viewport" content="width=device-width, initial-scale=1.0" />
    <title>My Landing Page</title>
    <link rel="stylesheet" href="global.css" />
  </head>
  <body>
    <script src="https://unpkg.com/json5/dist/index.min.js"></script>
    <script src="https://unpkg.com/dompurify/dist/purify.min.js"></script>
    <script src="https://unpkg.com/hmpl-js/dist/hmpl.min.js"></script>
    <script src="global.js"></script>
    <script>
      const body = document.querySelector("body");
      const template = `
        <main>
            <!-- Header Component -->
            {{#request src="http://localhost:8000/api/get-header-component"}}{{/request}}
            <!-- Features Component -->
            {{#request src="http://localhost:8000/api/get-features-component"}}{{/request}}
            <!-- Promo Component -->
            {{#request src="http://localhost:8000/api/get-promo-component"}}{{/request}}
            <!-- CTA Component -->
            {{#request src="http://localhost:8000/api/get-cta-component"}}{{/request}}
            <!-- Footer Component -->
            {{#request src="http://localhost:8000/api/get-footer-component"}}{{/request}}
        </main>
      `;
      const { response } = hmpl.compile(template)();
      body.append(response);
    </script>
  </body>
</html>
It is worth noting that you can add loaders for our components, or for promo add interval requests via the interval attribute.
🖥️ Result
Now, let's see what we managed to put together in 10 (a little more) minutes of work:

To me, it looks very nice, considering that there was no particular fuss about styles and such.
🖋️ Conclusion
In this article, we created a small, but very cool and functional application in literally 10 minutes, using the SSR method, only on the client. The same can be done with Next.js, but the very fact that we will have to connect the framework and completely depend on its structure, when here we connect one module and get the same thing (without indexing robots).
Also, it would be great if you supported the project with your star! Thanks ❤️!
🗄️ Repository link
You can find the full code here: https://github.com/hmpl-language/examples/tree/main/landing
Thank you all very much for reading the article!


Top comments (18)
Thanks for the article!
I'd argue the opposite. I wouldn't choose a framework for a large project. They are mostly opinionated and limiting when it comes to edge cases (which often happen with larger projects).
Next.js is used by Spotify and ChatGPT. I'd like to believe there are home-grown solutions, but that's basically it.
This is pretty much like having your home bakery or run your own small dairy farm. It is not THAT hard and the result would easilly be more tasty (and healthy) than mass produced groceries from store. But it is REALLY worth your time and effort?
I rather think what to build with existing tools than creating new homemade solutions with limited usage.
But it is up to everyone's preference of course.
Yes, no one is discouraging you from using Next.js, it's just an alternative, as some solutions are not suitable for some business cases.
Nice, this reminds me how much setup is really optional. Im always tempted to just grab a framework, but sometimes its fun to build the pieces yourself. you ever find it worth skipping the big tools or does it just end up messy after a while?
Thank you! Of course it was possible, yes.
honestly the whole fast-build vibe here kinda fits how i do things when i wanna skip extra setup, feels good to see this broken down so simple
his explanation is very good.
Yes
Thanks so much for sharing this tutorial! I love the creative approach and that you're questioning the status quo (we use Go + vanilla JS so also don't subscribe to the NextJS dogma)
I would say though, that while this approach works great for prototyping, there are some performance implications worth considering for production use:
The current setup makes 5+ sequential HTTP requests on page load (one per component), which can significantly impact loading performance. You might want to consider batching these into a single API call or using HTTP/2 server push.
Since the page starts empty and populates via JavaScript, users will see a blank page initially. This affects Core Web Vitals metrics like First Contentful Paint (FCP) and Cumulative Layout Shift (CLS).
I know you mentioned this at the end about the robots.txt file, but search engines may not index the content properly since it's loaded dynamically after the initial HTML.
I can see it would be useful for internal tools where SEO isn't a concern or quick prototyping
Again, I love the thinking outside the box - thanks for sharing the approach :) I'd love to see a follow-up post exploring some of the performance concerns mentioned above.
What is Next.js & Nuxt.js, and why we can't build modern large projects without them??
Frameworks
Okay, so why we cant build modern websites without them?
We can, it just takes a long time.
It was possible to take not only the landing page, but it is simply the main page on any site, so it was taken.
Some comments may only be visible to logged-in visitors. Sign in to view all comments.