
This is the fifth article in the series, Udacity: SUSE Cloud Native Foundations. In this third installment, you'll get to learn what containers are, specifically Docker. Discussed as well is Kubernetes which is used for orchestrating containers.
This section is actually part of a single lesson, Container Orchestration using Kubernetes, but since it'll be too long, I've decided to put Kubernetes on the next article.
Once the application has been developed, the next step would now be to package it, containerize and lastly, deploy it. Here we'll be packaging the application using a Docker container and we'll deploy it using Kubernetes cluster to manage containers at scale.
From VMs to Containers
The traditional way of deploying applications was through virtual machines or VMs. The application would use the OS file system, the OS's resources and default packages installed.
Virtual machines have been extremely efficient in maximizing the use of infrastructure. Instead of running one application on one physical machine, we could run multiple VMs on top of the hypervisor which sits on the physical machine.

While it has proved to be useful, it still has its own disadvantages. Each virtual machine would require its own operating system. If you have three VMs sitting on the hypervisor, this would mean there's also three operating system running on top of the hypervisor. The OS plus the required libraries of each VM takes up a chunk of space on the underlying machine.
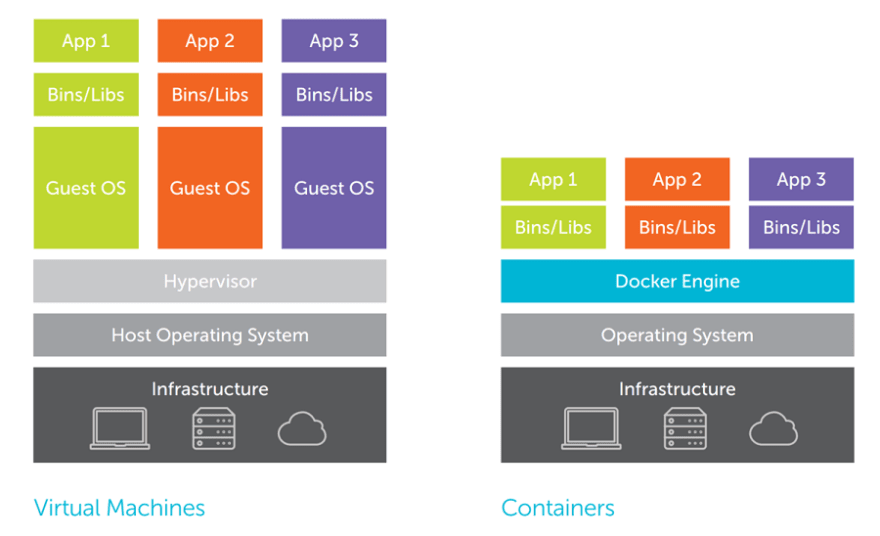
Enter containers. To further optimize the usage of the server, container can be used to virtualized the operating system. Through containers, we won't need to run replicated OS. Regardless of how many containers we run on the machine, they will all use the same underlying operating system of the physical machine itself.
To facilitate the creation and management of the containers, we can use a container engine tool, such as Docker. Overall, containers are:
- lightweight in nature
- provides better use of the resources
Docker
Once you have implemented the software, the next phase would be to release it. The steps would primarily be:
- package the source code, config files, and dependencies in a container
- deploy it using a container manage
There are three docker objects which you need to know here:
the dockerfile, docker image, and docker registry.
Docker file
This is a set of step-by-step instructions on how to create the image
- Operation on how to package the code and its dependencies
- Each operation represents a layer and is cached
- When dockerfile is modified, the changed layers will only be build
The full list of instructions can be found in the official Docker website. Here are some of the widely used instructions:
- FROM - sets the base image
- RUN - executes a command
- COPY and ADD - copy files from host to container
- CMD - default command to execute when container starts
- EXPOSE - exposes a port
For the exercises, you can check out the next article in this series
Below is an example of a Dockerfile that targets to package a Python hello-world application:
# set the base image. A Python base image is used
FROM python:3.8

# set a key-value label for the Docker image
LABEL maintainer="Eden Jose"

# All the files in the current directory is copied
# to the  `/app` directory in the container
COPY . /app

#  defines the working directory within the container
WORKDIR /app

# run commands within the container.
# Here we install dependencies defined in the requirements.txt file.
RUN pip install -r requirements.txt

# provide a command to run on container start.
# For example, start the `app.py` application.
CMD [ "python", "app.py" ]
Docker image
After you've created the dockerfile, you can now create the docker image.
- read-only template
- creates a runnable instance of the application
- used to run the container
A Docker image can be built from an existing Dockerfile using the docker build command. Below is the syntax for this command:
# build an image
# OPTIONS - optional;  define extra configuration
# PATH - required;  sets the location of the
# Dockefile and  any referenced files
docker build [OPTIONS] PATH

# Where OPTIONS can be:
-t, --tag - set the name and tag of the image
-f, --file - set the name of the Dockerfile
--build-arg - set build-time variables
To find all valid options for the build command:
docker build --help
For example, to build the image of a Python "Hello-world " application from the Dockerfile in the current directory, the following command can be used:
docker build -t python-helloworld .
Additionally, you can build the same app that's located on a different directory, say a lesson1/python-app directory
docker build -t python-helloworld lesson1/python-app
To list all available imageS
docker images
To test the image locally, run a container using the docker image,
docker run [OPTIONS] IMAGE [COMMAND] [ARG...]

# OPTIONS - optional;  define extra configuration
# IMAGE -  required; provides the name of the image to be executed
# COMMAND and ARGS - optional; instruct the container to run specific commands when it starts
# Where OPTIONS can be:

-d, --detach - run in the background
-p, --publish - expose container port to host
-it - start an interactive shell
To find all valid options for this command
docker run --help
For example, to run the a sample Python hello-world application, using the created image, the following command can be used:
docker run -d -p 5111:5000 python-helloworld
Here we bind the Docker container port (5000) to a port on the host (5111) or local machine. To view the application, open http://127.0.0.1:5111/ in your browser. The 5000 is the container port that the application is listening to for incoming requests.
To list all running containers,
docker ps
To retrieve the Docker container logs, we can use the command below, where 95173091eb5e is the container ID.
docker logs 95173091eb5e

## Example output from a Flask application
 * Serving Flask app "app" (lazy loading)
 * Environment: production
   WARNING: This is a development server. Do not use it in a production deployment.
   Use a production WSGI server instead.
 * Debug mode: off
Docker registry
Once you've package the application, tested it locally, and proved that it's meeting the expected behavior, You are now ready to store and distribute it.
To do this, you can push the image to a public Docker image registry, such as
- DockerHub
- Harbor
- Amazon ECR (Elastic Container Registry)
- Google Container Registry
You can also store the image to a private registries and make it available to authorized parties.
Before pushing an image to a Docker registry, it is highly recommended to tag it first. Without the tagging, the image would be allocated with a random ID during the build stage.
Tagging also provides version control as a new tage would indicate a new release. To tag an existing image on the local machine,
# tag an image
docker tag SOURCE_IMAGE[:TAG] TARGET_IMAGE[:TAG]

# SOURCE_IMAGE[:TAG]
# - required and the tag is optional;
# - defines the name of an image on the current machine

# TARGET_IMAGE[:TAG]
# - required and the tag is optional;
# - defines the repository, name, and version of an image
To login into DockerHub
docker login
Once the image is tagged, the final step is to push the image to a registry.
docker push NAME[:TAG]

# NAME[:TAG] - required and the tag is optional;
# - name, set the image name to be pushed to the registry
For example, to push the sample Python hello-world application tagged with v1 to 'my-repo' repository in DockerHub
docker push my-repo/python-helloworld:v1.0.0
To pull an image from DockerHub,
docker pull NAME[:TAG]
Other references you can read
Explore Dockerfiles best practices and valid list of instructions:
Explore how to build and run a Docker image, with a list of all available options:
Explore Docker registries, alternatives to package an application, and OCI standards:
- Introduction to Docker registry
- Docker Tag command
- Docker Push command
- Open Container Initiative (OCI) Specifications
- Buildpacks: An App’s Brief Journey from Source to Image
Of course, learning a new technology won't be complete without getting your hands dirty. Head down to the next article to try building an image and pushing it to your own Dockerhub account!😃
If you enjoy this write-up and would like to learn more, make sure to hit the Follow just below and bookmark the series. I'll also be glad to connect with you on Twitter.
See you there! 😃


Top comments (0)