
This series of tutorials will explore the Vonage Video API (formerly TokBox OpenTok) and what you can build with it. The Video API is very robust and highly customizable, and in each post we’ll show how to implement a specific feature using the API. This time we will look at how to add texting to a basic audio-video chat.
As this application will require some server-side code, we will use Glitch for ease of setup. You can also download the code from this Glitch project and deploy it on your own server or hosting platform of choice (may probably require some configuration tweaking based on the requirements of your platform).
We will not be using any front-end frameworks for this series, just vanilla Javascript to keep the focus on the Video API itself. At the end of this tutorial, you should be able to have an audio-video chat application with text chat functionality. Text chat is implemented using the signaling API.
The final code for this application can be found in this GitHub repository or remixed on Glitch.
Prerequisites
Before we get started, you will need a Vonage Video API account, which you can create for free here. You will also need Node.js installed (if you are not using Glitch).
This tutorial builds on the first introductory post in the series: Building a Basic Video Chat. If this is your first time using the Video API, we highly suggest you go through that because it covers the following basic setup:
- Create a Vonage Video API project
- Setting up on Glitch
- Basic project structure
- Initializing a session
- Connecting to the session, subscribing and publishing
- Basic layout styles for a video chat
Basics of Text Chat With Vonage Video API
Implementing text chat with the Video API is done via the signaling API. This signalling mechanism allows clients connected to a session to send text and data to each other. We will only focus on text for now.
The Video API Client SDK will dispatch an event when the client receives a signal. For a basic text chat where messages are visible to all connected clients, we will use the signal() method of the Session object. Participating clients will receive that signal by listening to the signal event dispatched by the Session object.
For an in-depth look at what is accessible via the Session object, its properties, methods and events, please refer to SDK reference for the Session object.
Initial Setup
As we are building onto a basic video chat, start off by remixing the project for the basic video chat built in the previous tutorial. Click the big Remix button below to do that. 👇

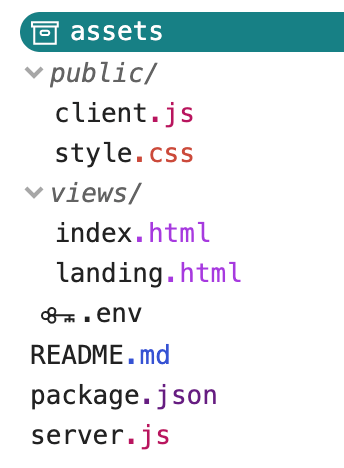
Your folder structure should resemble something like this:
As mentioned at the start, TokBox OpenTok is now Vonage Video API. We haven’t made any changes to our package names, so you will still reference OpenTok in your code.
If you had remixed the Glitch project, your server.js file should already look like this:
const express = require("express");
const app = express();
const OpenTok = require("opentok");
const OT = new OpenTok(process.env.API_KEY, process.env.API_SECRET);

let sessions = {};

app.use(express.static("public"));

app.get("/", (request, response) => {
  response.sendFile(__dirname + "/views/landing.html");
});

app.get("/session/:room", (request, response) => {
  response.sendFile(__dirname + "/views/index.html");
});

app.post("/session/:room", (request, response) => {
  const roomName = request.params.room;
  // Check if the session already exists
  if (sessions[roomName]) {
    // Generate the token
    generateToken(roomName, response);
  } else {
    // If the session does not exist, create one
    OT.createSession((error, session) => {
      if (error) {
        console.log("Error creating session:", error);
      } else {
        // Store the session in the sessions object
        sessions[roomName] = session.sessionId;
        // Generate the token
        generateToken(roomName, response);
      }
    });
  }
});

function generateToken(roomName, response) {
  // Configure token options
  const tokenOptions = {
    role: "publisher",
    data: `roomname=${roomName}`
  };
  // Generate token with the Video API Client SDK
  let token = OT.generateToken(
    sessions[roomName],
    tokenOptions
  );
  // Send the required credentials back to to the client
  // as a response from the fetch request
  response.status(200);
  response.send({
    sessionId: sessions[roomName],
    token: token,
    apiKey: process.env.API_KEY
  });
}

const listener = app.listen(process.env.PORT, () => {
  console.log("Your app is listening on port " + listener.address().port);
});
To get the video chat up and running, go to the .env file and fill in your API key and secret for your project, which you can find from the dashboard. Once that’s done, we will be working on the client-side code to get the text chat working before revisiting the server.js file again.
Add the Required Markup
Our application will be made up of two pages. A landing page with two text inputs. One for users to create a session, which we will call a “Room” so subsequent participants can join that same “Room”. The other text input is for users to enter a display name they can use to identify themselves.
The page will have a simple form element with two input fields for users to submit their room name and user name. Let’s add the user name field to the form.
<form class="registration" id="registration">
  <label>
    <span>Room</span>
    <input
      type="text"
      name="room-name"
      placeholder="Enter room name"
      required
    />
  </label>

  <!-- Add the user name input field and label -->
  <label>
    <span>User name</span>
    <input
      type="text"
      name="user-name"
      placeholder="Enter your name"
      required
    />
  </label>
  <button>Enter</button>
</form>
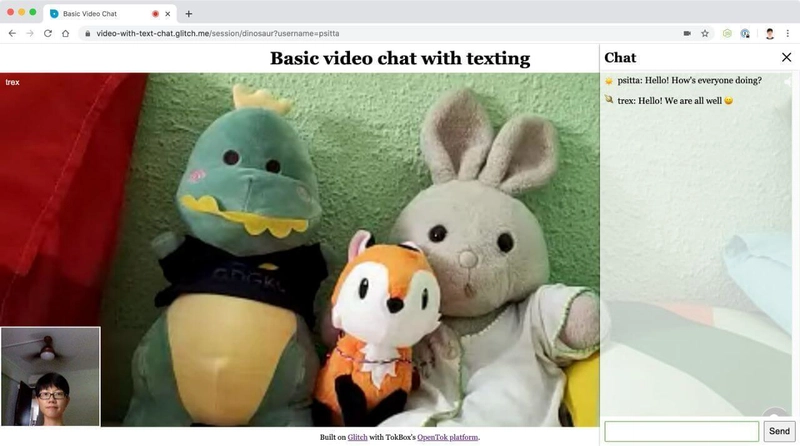
We also need to add a chatbox to the index.html page. Let’s add the markup for a chat window with a header, an area to display messages, and an input at the bottom to type and send messages. To maximise screen space, the chat window will be off-screen by default and only triggered when you click the chat button at the bottom right corner of the page.

Add the following markup to your page, we will add the styles to make the button look like the above design in the next section.
<button class="btn-chat" id="showChat" aria-label="Show chat">
  <svg viewBox="0 0 512 512">
    <path
      fill="white"
      d="m512 346.5c0-63.535156-36.449219-120.238281-91.039062-147.820312-1.695313 121.820312-100.460938 220.585937-222.28125 222.28125 27.582031 54.589843 84.285156 91.039062 147.820312 91.039062 29.789062 0 58.757812-7.933594 84.210938-23.007812l80.566406 22.285156-22.285156-80.566406c15.074218-25.453126 23.007812-54.421876 23.007812-84.210938zm0 0"
    />
    <path
      fill="white"
      d="m391 195.5c0-107.800781-87.699219-195.5-195.5-195.5s-195.5 87.699219-195.5 195.5c0 35.132812 9.351562 69.339844 27.109375 99.371094l-26.390625 95.40625 95.410156-26.386719c30.03125 17.757813 64.238282 27.109375 99.371094 27.109375 107.800781 0 195.5-87.699219 195.5-195.5zm-225.5-45.5h-30c0-33.085938 26.914062-60 60-60s60 26.914062 60 60c0 16.792969-7.109375 32.933594-19.511719 44.277344l-25.488281 23.328125v23.394531h-30v-36.605469l35.234375-32.25c6.296875-5.761719 9.765625-13.625 9.765625-22.144531 0-16.542969-13.457031-30-30-30s-30 13.457031-30 30zm15 121h30v30h-30zm0 0"
    />
  </svg>
</button>
We also want to add the markup for the chat window to the index.html file.
<aside id="chatWindow">
  <header class="chat-header">
    <h1><span id="roomName"></span>Chat</h1>
    <button class="btn-close" id="closeChat" aria-label="Close chat">
      <svg viewBox="0 0 47.971 47.971" role="img">
        <path
          d="M28.228 23.986L47.092 5.122a2.998 2.998 0 000-4.242 2.998 2.998 0 00-4.242 0L23.986 19.744 5.121.88a2.998 2.998 0 00-4.242 0 2.998 2.998 0 000 4.242l18.865 18.864L.879 42.85a2.998 2.998 0 104.242 4.241l18.865-18.864L42.85 47.091c.586.586 1.354.879 2.121.879s1.535-.293 2.121-.879a2.998 2.998 0 000-4.242L28.228 23.986z"
        />
      </svg>
    </button>
  </header>

  <section id="messageArea" class="messages"></section>

  <form class="chat-form" id="chatForm">
    <input id="chatInput" type="text" />
    <input type="submit" value="Send" />
  </form>
</aside>
Style the Chat-Related Elements
Our chat interface will be hidden away from view until needed, since the main feature of this application is the video chat. To toggle the chat interface, users will click the chat button on the bottom right corner of the page. This button has an SVG icon to indicate it triggers the chat.
.btn-chat {
  height: 3.5em;
  width: 3.5em;
  background-color: black;
  border-radius: 50%;
  box-shadow: 0 3px 6px 0 rgba(0, 0, 0, 0.2), 0 3px 6px 0 rgba(0, 0, 0, 0.19);
  position: fixed;
  right: 1em;
  bottom: 1em;
}

.btn-chat svg {
  height: 1.5em;
  width: 1.5em;
}
We are using CSS to transform the chat window outside the viewport by default. When someone clicks on the chat icon, it will toggle a CSS class that changes the translateX value such that the window slides into view from the right side of the screen.
aside {
  position: fixed;
  top: 0;
  right: 0;
  transform: translateX(100%);
  display: flex;
  flex-direction: column;
  min-width: 20em;
  width: 25%;
  height: 100%;
  box-shadow: 0 1px 5px rgba(0, 0, 0, 0.12), 0 1px 3px rgba(0, 0, 0, 0.24);
  transition: transform 0.5s ease;
}

aside.active {
  transform: translateX(0);
}
Let’s add some styles for the header, messages area and message input form as well.
.chat-header {
  background-color: white;
  box-shadow: 0 1px 5px rgba(0, 0, 0, 0.12), 0 1px 3px rgba(0, 0, 0, 0.24);
  display: flex;
  align-items: center;
}

.btn-close {
  margin-left: auto;
  height: 2em;
  width: 2em;
  background: transparent;
  border: none;
  cursor: pointer;
}

.btn-close svg {
  height: 1em;
  width: 1em;
}

.messages {
  flex: 1;
  display: flex;
  flex-direction: column;
  overflow-y: scroll;
  padding: 0.5em;
  box-shadow: 0 1px 5px rgba(0, 0, 0, 0.12), 0 1px 3px rgba(0, 0, 0, 0.24);
  background-color: rgba(255, 255, 255, 0.75);
}

.messages p {
  margin-bottom: 0.5em;
  display: flex;
  word-break: break-word;
}

.chat-form {
  padding: 0.5em;
  background-color: white;
  display: flex;
  align-items: center;
}

.chat-form input[type="text"] {
  flex: 1;
}

.chat-form input[type="submit"] {
  margin-left: 0.5em;
  align-self: stretch;
}
With these styles, you should be able to see a chat icon in the bottom-right corner of the index.html file after you have entered the room. But clicking on it does not do anything yet.
Let’s add an event handler to toggle a CSS class to slide the chat window into view in the client.js file. As well as one on the close icon of the chat window to slide it back out.
const showChatBtn = document.getElementById("showChat");
showChatBtn.addEventListener(
  "click",
  event => {
    const chatWindow = document.getElementById("chatWindow");
    chatWindow.classList.toggle("active");
  },
  false
);

const closeChatBtn = document.getElementById("closeChat");
closeChatBtn.addEventListener(
  "click",
  event => {
    const chatWindow = document.getElementById("chatWindow");
    chatWindow.classList.remove("active");
  },
  false
);
This is not the only way to style a chat interface, so feel free to change things up to suit your needs.
Using the Signal API for Text Chat
Let’s make a few more tweaks to the base project and get the most basic text chat working.
We’ll move the session variable out of the initializeSession function and declare it globally at the top of the client.js file.
let session;

function initializeSession(apiKey, sessionId, token) {
  // Create a session object with the sessionId
  session = OT.initSession(apiKey, sessionId);

  // All the rest of the code
}
Add an event listener to the chat form, which will send a signal to all clients connected to the Session when the form is submitted.
const chat = document.getElementById("chatForm");
const msgTxt = document.getElementById("chatInput");
chat.addEventListener(
  "submit",
  event => {
    event.preventDefault();
    session.signal(
      {
        type: "msg",
        data: `${msgTxt.value}`
      },
      () => {
        msgTxt.value = "";
      }
    );
  },
  false
);
We also need another event listener to receive that message by listening to the signal event dispatched by the Session object. The data payload from that event will be used to print the message into the message area of the chat window.
function initializeSession(apiKey, sessionId, token) {
  // Create a session object with the sessionId
  session = OT.initSession(apiKey, sessionId);

  // All the rest of the code

  // Event listener for the msg signal
  session.on("signal:msg", event => {
    const content = event.data;
    updateChat(content);
  });
}

function updateChat(content) {
  const msgHistory = document.getElementById("messageArea");
  const msg = document.createElement("p");
  msg.textContent = content;
  msgHistory.appendChild(msg);
  msgHistory.scroll({
    top: msgHistory.scrollHeight,
    behavior: "smooth"
  });
}
This is the basic mechanism of text chat with the Video API. If you type something in the chat window and submit, it should display on the screen.
Identify Participants in the Chat
However, to make the chat more user-friendly, we also want to add a means of identifying who said what in the chat. We will make use of the user name input on the landing page to get that information, passing it on to the server as a query string in the URL.
The following script on the landing.html page passes the room name and user name entered to the index.html page.
const form = document.getElementById("registration");
form.addEventListener("submit", event => {
  event.preventDefault();
  location.href = `/session/${form.elements["room-name"].value}?username=${form.elements["user-name"].value}`;
});
When the index.html page loads, it will trigger a POST request to the session/:name route, extracting the submitted user name from the URL and passing it onto the server.
const url = new URL(window.location.href);
const roomName = url.pathname.split("/")[2];
const userName = url.searchParams.get("username");

fetch(location.pathname, {
  method: "POST",
  headers: { "Content-Type": "application/json" },
  body: JSON.stringify({ username: userName })
})
  .then(res => {
    return res.json();
  })
  .then(res => {
    const apiKey = res.apiKey;
    const sessionId = res.sessionId;
    const token = res.token;
    const streamName = res.streamName;
    initializeSession(apiKey, sessionId, token, streamName);
  })
  .catch(handleCallback);
Now we will need to modify that route in the server.js file so it will handle the room name and user name and return the required information for the initializeSession function. We also need to include a middleware to handle the request payload.
// Middleware to read the body of the request
app.use(express.json());

app.post("/session/:room", (request, response) => {
  const roomName = request.params.room;
  const streamName = request.body.username;
  // Check if the session already exists
  if (sessions[roomName]) {
    // Generate the token
    generateToken(roomName, streamName, response);
  } else {
    // If the session does not exist, create one
    OT.createSession((error, session) => {
      if (error) {
        console.log("Error creating session:", error);
      } else {
        // Store the session in the sessions object
        sessions[roomName] = session.sessionId;
        // Generate the token
        generateToken(roomName, streamName, response);
      }
    });
  }
});

function generateToken(roomName, streamName, response) {
  // Configure token options
  const tokenOptions = {
    role: "publisher",
    data: `roomname=${roomName}?streamname=${streamName}`
  };
  // Generate token with the Video API Client SDK
  let token = OT.generateToken(sessions[roomName], tokenOptions);
  // Send the required credentials back to to the client
  // as a response from the fetch request
  response.status(200);
  response.send({
    sessionId: sessions[roomName],
    token: token,
    apiKey: process.env.API_KEY
  });
}
On the client.js, we can now display the user name for the participant who typed the message by modifying the data property of the session.signal() method.
session.signal(
  {
    type: "msg",
    data: `${session.connection.data.split("=")[2]}: ${msgTxt.value}`
  },
  () => {
    msgTxt.value = "";
  }
);
Now when you submit a text message, it will be prepended with the user name you used when you entered the room.
Set up PouchDB as a Data Store
If you refresh the page, however, all previous chat messages are gone. This is because we have not stored the messages but merely displayed them on the screen. Let’s introduce some sort of data store for the messages.
We’ll be using PouchDB on the server in this tutorial, but you are free to replace this with any data store of your choice.
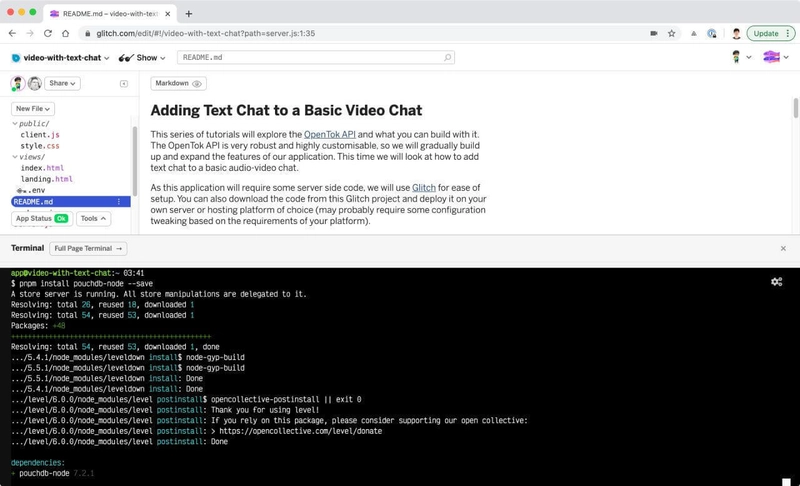
Install pouchdb-node with the following command (note that using pnpm is a Glitch thing):
pnpm install pouchdb-node --save
Let’s check that things are running as expected.
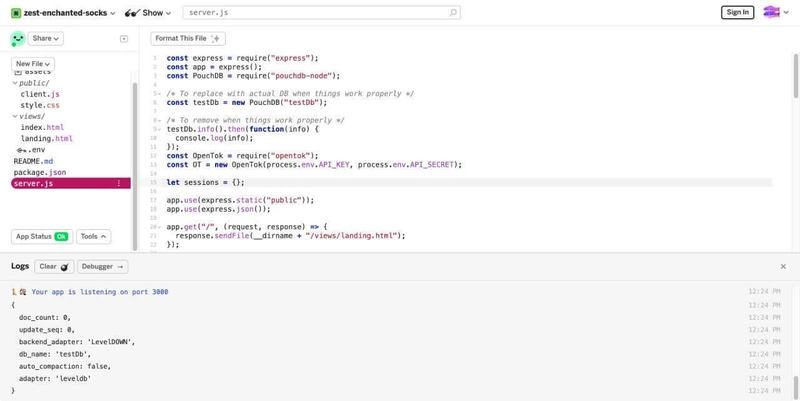
const PouchDB = require("pouchdb-node");
const sessionDb = new PouchDB("sessionDb");

sessionDb.info().then(info => console.log(info));
You should see the following in the Glitch logs.
PouchDB provides a fully asynchronous API, although it also includes the option for users to choose between the callback format or the promise format. We will be using the promise format for this tutorial, and the code will reflect as such.
Instead of storing session information in an object variable, we will store it in our new database. Remove the following line from the server.js file.
// We no longer need this object
let sessions = {};
Let’s make more tweaks to the /session/:name route. We first check the database to verify if a session exists, if it does, we retrieve the associated information and generate the token from it. If the session does not exist, we will create a new session, store it in the database, then generate the token accordingly.
app.post("/session/:room", (request, response) => {
  const roomName = request.params.room;
  const streamName = request.body.username;
  const isExistingSession = checkSession(roomName);

  isExistingSession.then(sessionExists => {
    if (sessionExists) {
      sessionDb
        .get(roomName)
        .then(sessionInfo => {
          generateToken(roomName, streamName, sessionInfo, response);
        })
        .catch(error => error);
    } else {
      OT.createSession((error, session) => {
        if (error) {
          console.log("Error creating session:", error);
        } else {
          const sessionInfo = {
            _id: roomName,
            sessionId: session.sessionId,
            messages: []
          };
          sessionDb.put(sessionInfo);
          generateToken(roomName, streamName, sessionInfo, response);
        }
      });
    }
  });
});

function checkSession(roomName) {
  return sessionDb
    .get(roomName)
    .then(() => {
      console.log(roomName + "exists");
      return Promise.resolve(true);
    })
    .catch(() => {
      console.log("Room does not exist");
      return Promise.resolve(false);
    });
}

function generateToken(roomName, streamName, sessionInfo, response) {
  const tokenOptions = {
    role: "publisher",
    data: `roomname=${roomName}?streamname=${streamName}`
  };
  let token = OT.generateToken(sessionInfo.sessionId, tokenOptions);
  response.status(200);
  response.send({
    sessionId: sessionInfo.sessionId,
    token: token,
    apiKey: process.env.API_KEY,
    streamName: streamName
  });
}
Add Stream Names to the UI
We can make use of the stream name in the response to label streams so participants can hover over each participant’s video stream to see a name. Both the initPublisher() method and the subscribe() method accepts an optional properties argument, which allows us to pass in customisation options for the stream.
function initializeSession(apiKey, sessionId, token, streamName) {
  // Create a session object with the sessionId
  session = OT.initSession(apiKey, sessionId);

  // Create a publisher
  const publisher = OT.initPublisher(
    "publisher",
    {
      insertMode: "append",
      width: "100%",
      height: "100%",
      name: streamName
    },
    handleCallback
  );

  // Subscribe to a newly created stream
  session.on("streamCreated", event => {
    session.subscribe(
      event.stream,
      "subscriber",
      {
        insertMode: "append",
        width: "100%",
        height: "100%",
        name: event.stream.name
      },
      handleCallback
    );
  });
}

Save Messages Into the Database
When participants send text messages, we want to POST them to the server to be stored in the database. Let’s create a saveMessage() function to do that.
function saveMessage(content) {
  const message = {
    _id: Date.now().toString(),
    content: content,
    roomname: name,
    user: username
  };

  fetch("/message", {
    method: "POST",
    headers: { "Content-Type": "application/json" },
    body: JSON.stringify(message)
  }).catch(handleCallback);
}
Modify the event listener on the chat form to trigger this function whenever a participant submits a text message.
chat.addEventListener(
  "submit",
  event => {
    event.preventDefault();
    session.signal(
      {
        type: "msg",
        data: `${session.connection.data.split("=")[2]}: ${msgTxt.value}`
      },
      () => {
        saveMessage(msgTxt.value);
        msgTxt.value = "";
      }
    );
  },
  false
);
On the server.js file, we need to add a handler for this POST request as well.
app.post("/message", (request, response) => {
  const roomName = request.body.roomName;
  const message = {
    timeStamp: request.body._id,
    content: request.body.content,
    user: request.body.user
  };
  sessionDb
    .get(roomName)
    .then(result => {
      result.messages = [...result.messages, message];
      return sessionDb.put(result);
    })
    .then(() => {
      return sessionDb.get(roomName);
    })
    .then(result => {
      response.status(200);
      response.send({
        latestMessage: result.messages[result.messages.length - 1]
      });
    })
    .catch(error => console.log(error));
});
Now that our messages are being stored, we want to display them whenever the page loads. We will add a getChatHistory() function on the client-side which triggers a GET request to retrieve all the stored messages for that session and display them in the chat window.
function getChatHistory() {
  fetch(`/messages/${roomName}`)
    .then(res => {
      return res.json();
    })
    .then(res => {
      const messageArea = document.getElementById("messageArea");
      res.messagesArray.forEach(message => {
        const msg = document.createElement("p");
        msg.textContent = `${message.user}: ${message.content}`;
        messageArea.appendChild(msg);
      });
      messageArea.scroll({
        top: messageArea.scrollHeight,
        behavior: "smooth"
      });
    })
    .catch(handleCallback);
}
And the corresponding route on the server side to pass the messages as an array back over to the client.
app.get("/messages/:room", (request, response) => {
  const roomName = request.params.room;
  sessionDb
    .get(roomName)
    .then(result => {
      response.status(200);
      response.send({
        messagesArray: result.messages
      });
    })
    .catch(error => console.log(error));
});
So now even if you refresh the page while the session is still going on, the messages will still be there. Also, if you enter the same room name as a previous session with stored chat history, that chat history will be displayed.
What’s Next?
The final code on Glitch and GitHub contains everything we covered in this fairly lengthy post but re-organised so the code is cleaner and more maintainable. Feel free to remix or clone the code and play around with it yourself.
There are additional functionalities we can build with the Vonage Video API which will be covered in future tutorials, but in the meantime, you can find out more at our comprehensive documentation site. If you run into any issues or have questions, reach out to us on our Community Slack. Thanks for reading!

Top comments (0)